Lab 2: Pencils
Please put your answers to written questions in this lab, if any, in a Markdown file named README.md in your lab repo.
Introduction
Welcome to lab 2! This lab is designed to help you get started with Project 1: Brush.
During this lab, you'll take your first steps into computer graphics by understanding how digital images are represented and modified.
Objectives
- Learn about how colors and digital images are represented digitally,
- Create pixel art by programmatically modifying an image, and
- Implement a Photoshop-like pencil to draw on a canvas interactively!
Getting Started
All subsequent labs and projects in CS 1230 will follow these same getting-started instructions. We won't repeat them again!
If you have doubts or questions at any point, be sure to check with a TA or ask on Ed.
Stencil Code
Like in lab 1, we've provided you with some stencil code (linked at the top of this page) to get you started. As always, you should git clone the created repository to your local machine, then open the project in QtCreator.
Command Line Arguments
Many labs and projects in CS 1230 will use command line arguments to toggle between different configurations, and this lab is no different. In this lab, you will be using command line arguments to select the type of canvas you wish to use.
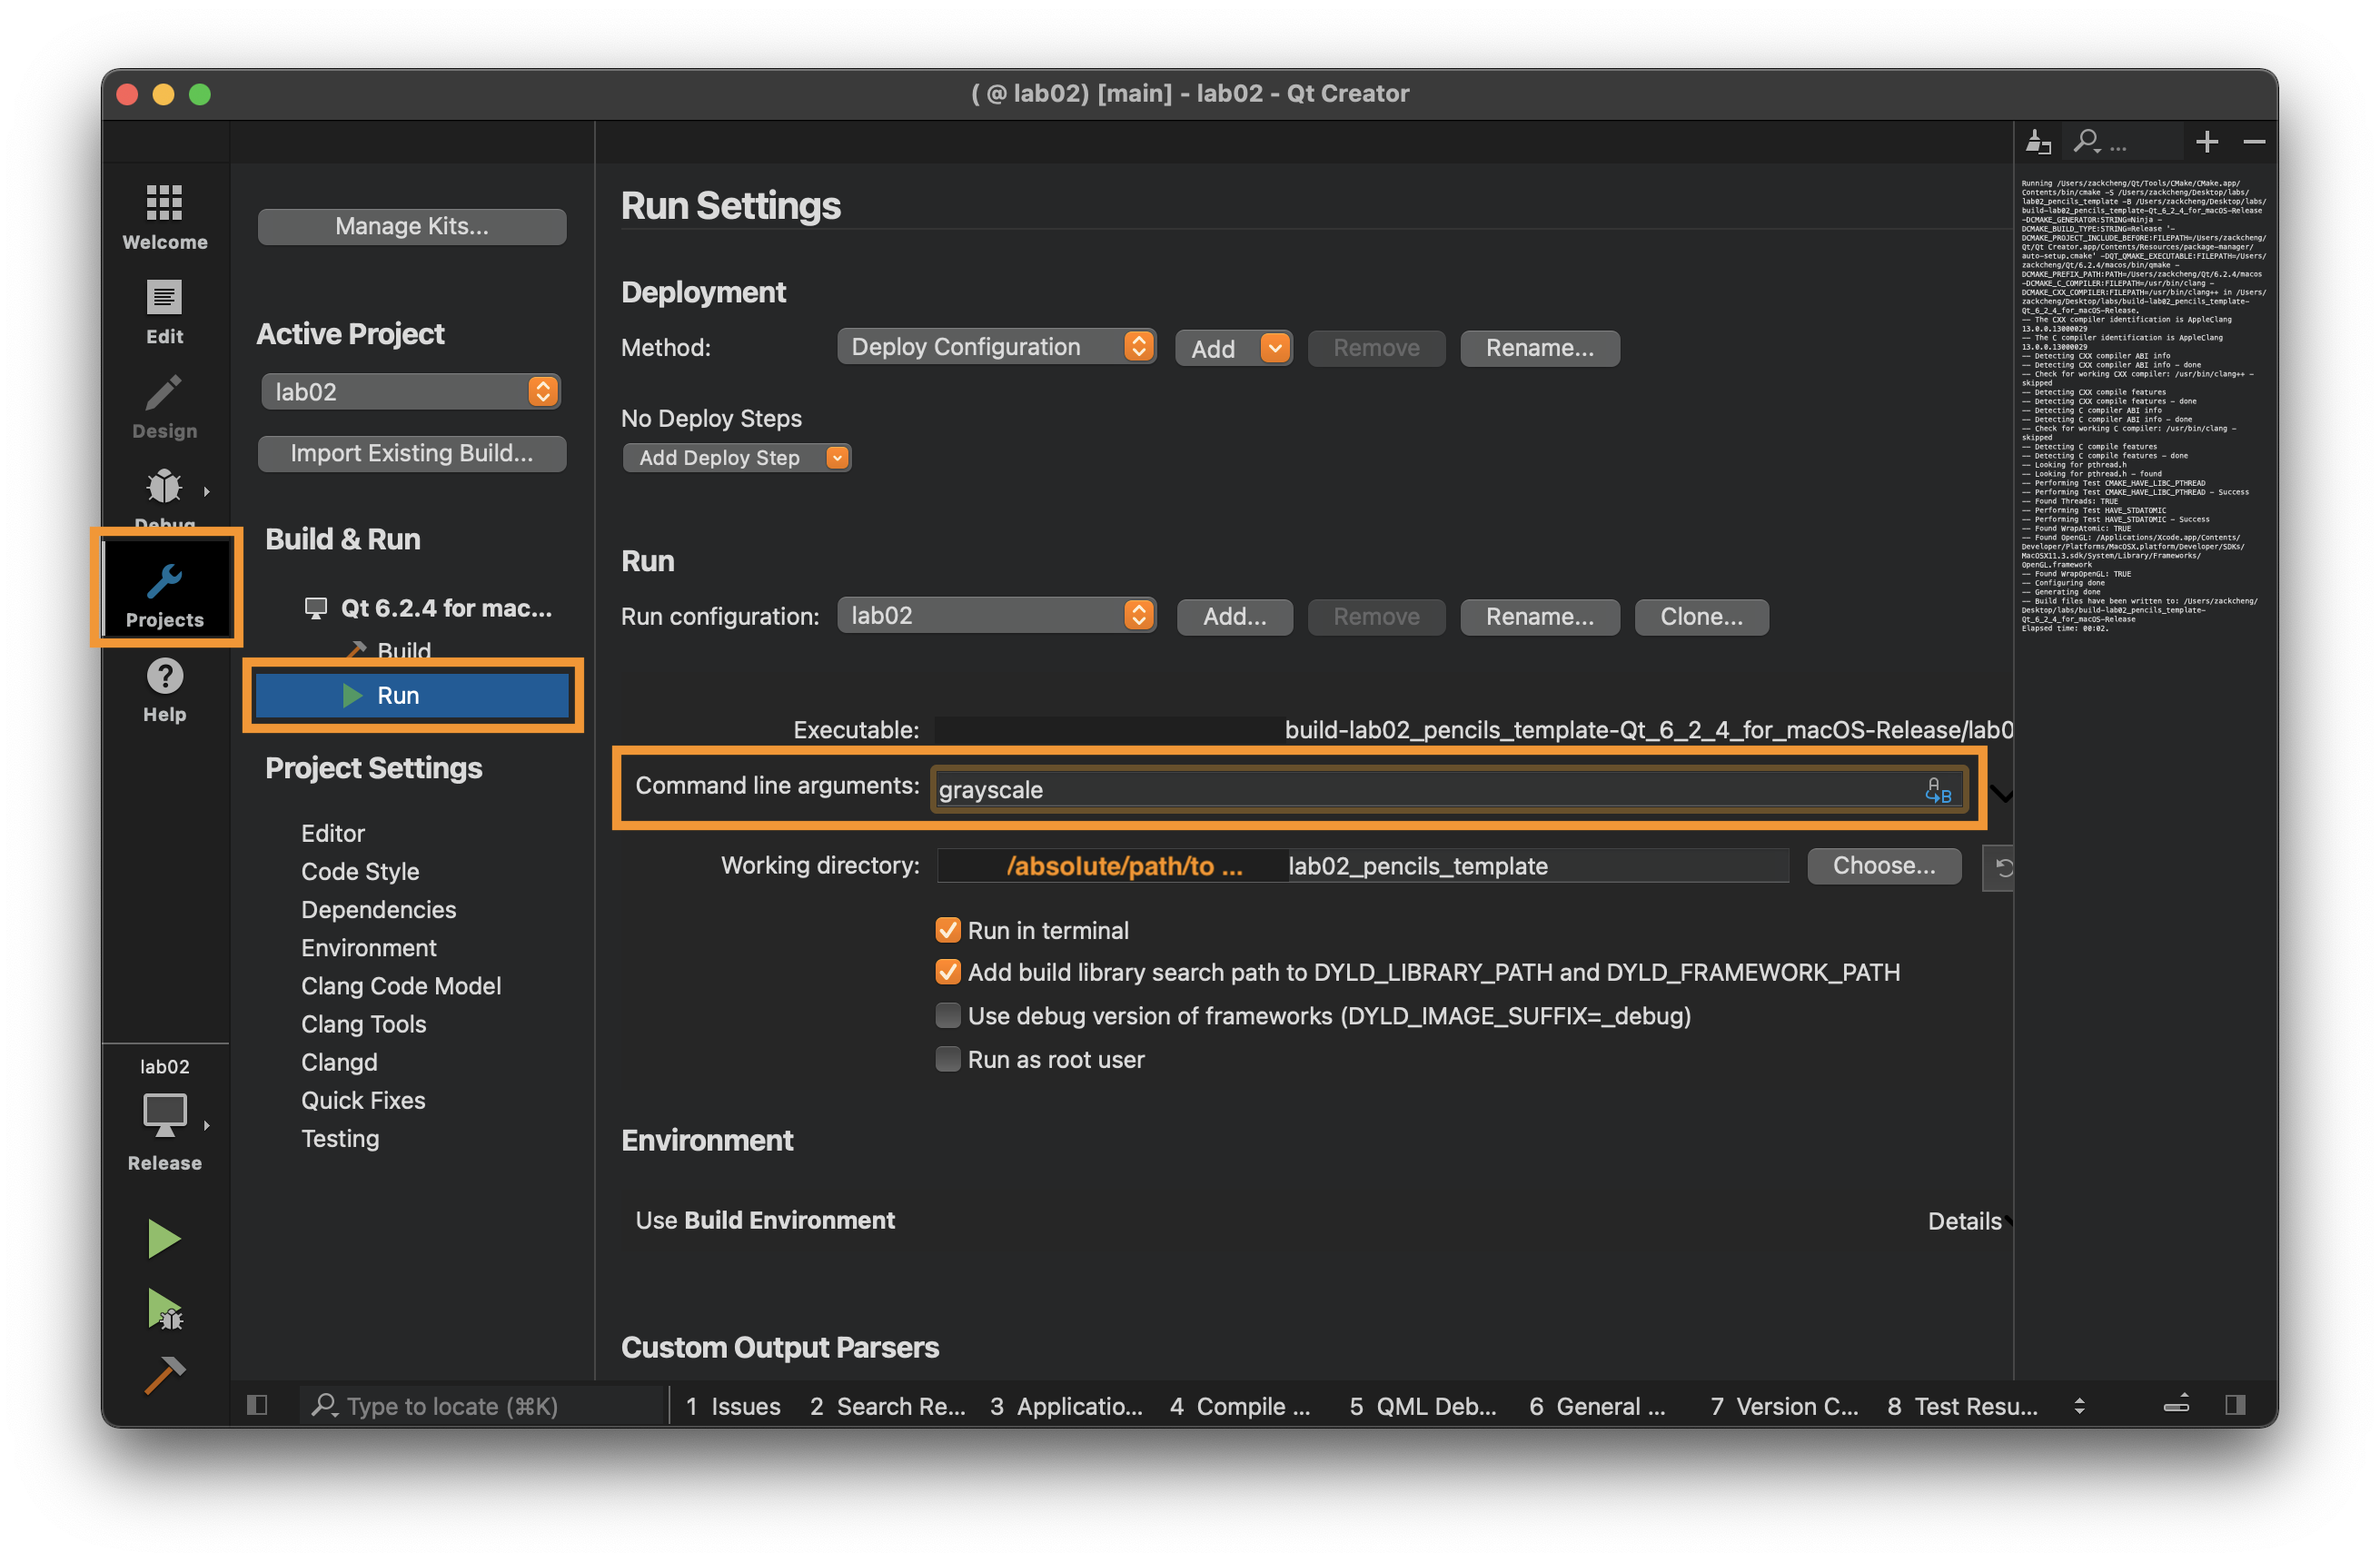
Set the command line argument to grayscale.
- To set the command line input, click the
Projectstab on the left sidebar. UnderBuild and Run > Run > Command Line Arguments, you can enter command line arguments which will be supplied to the application when it is run. grayscalemakes the application window use a grayscale canvas.- Later, we will change this argument to
color, to add some color to our application window's canvas.
The command line argument interface should look something like this:
Extra: why do we use command line arguments?
In general, it's a good idea to separate config (configuration) from code. There are many reasons to do this, but for us, it primarily serves to reduce development latency.
In the next task, you will run your code. While you're doing this, you might notice a significant delay between when you hit play and when you see the GUI window appear—this is because it is building your application. However, in subsequent runs, this delay will be much shorter—this is because changing the command line argument doesn't trigger a re-build of your app from its C++ source code.
If our config was instead stored in the source code (e.g. in a string), any changes to that config would trigger a time-consuming re-build, which can be very annoying when developing or debugging.
Of course, command line arguments aren't the only way of separating config from code: there are plenty of other ways to express configuration in Qt, including QConfig and .ini files, which you will see later in the course.
Application Windows
Run the project in order to display the application window. To do so, click the big green "play" button at the bottom-left corner of the QtCreator interface.
Remember to run in
Releasemode. The speedup won't be significant now, but it's a good idea to get used to doing this.
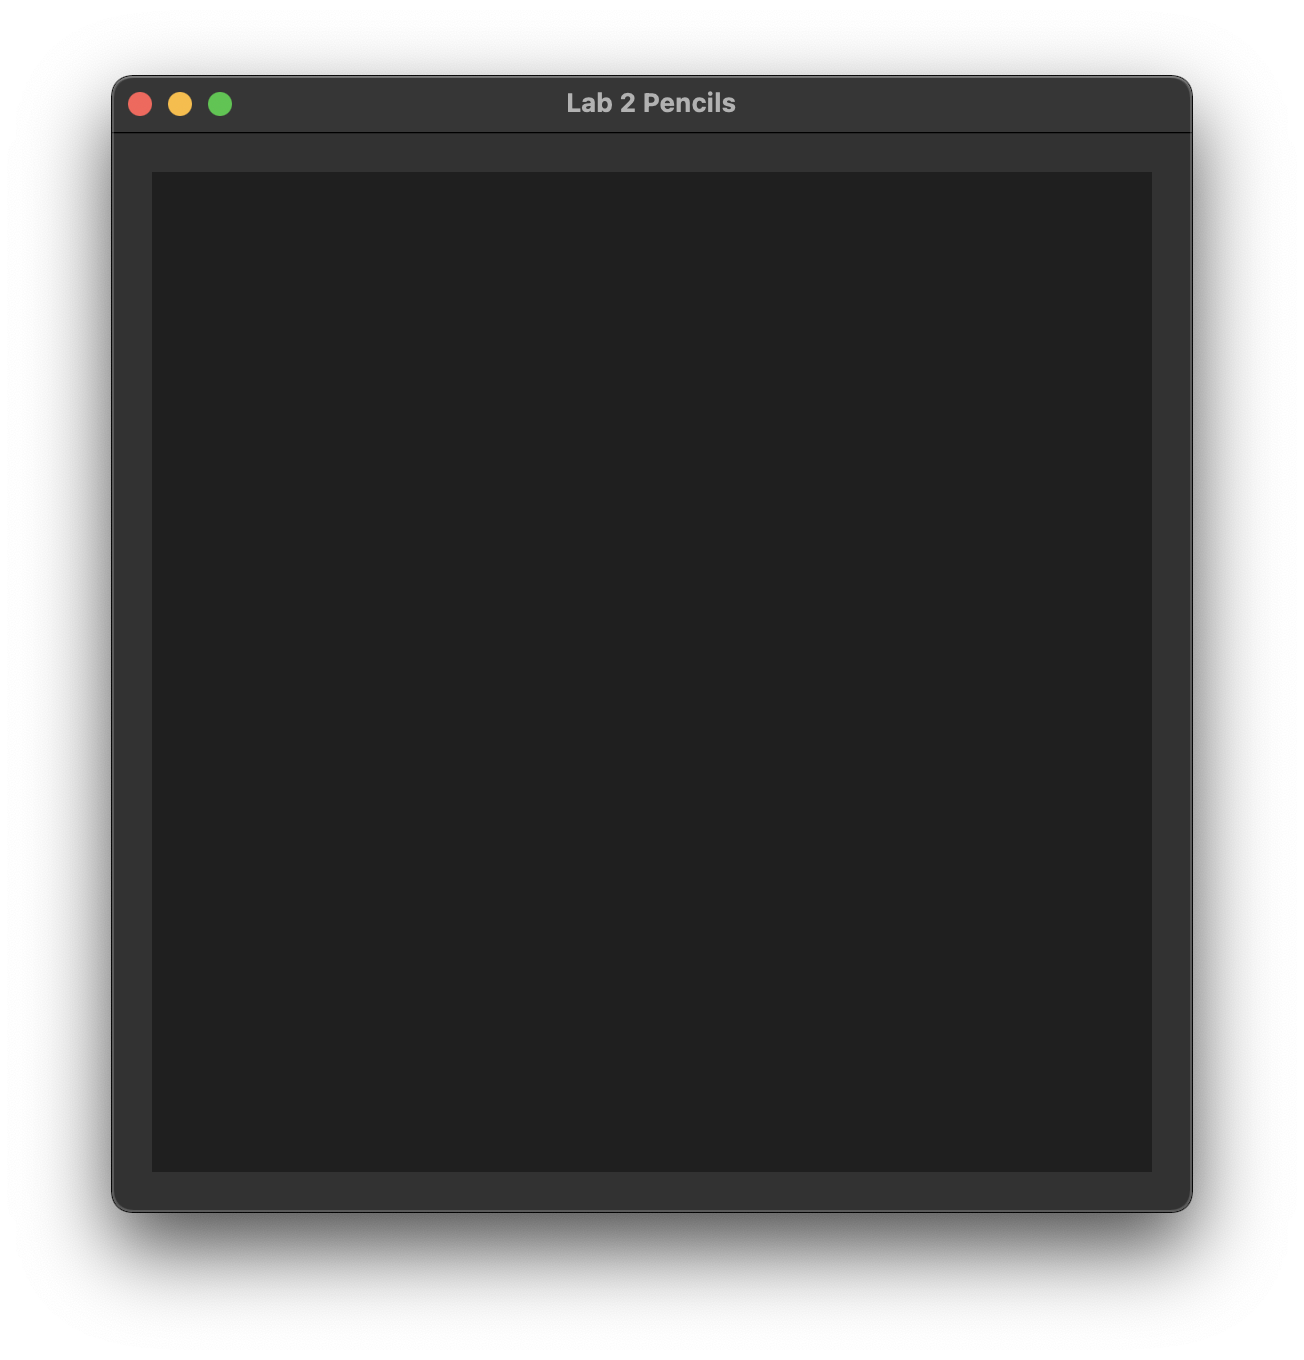
If everything works as intended, an application window should appear. It should look like this:

Interested in how GUI elements like these are set up? Feel free to take a look at
mainwindow.handmainwindow.cppin our stencil code!
Representing Colors
In computer graphics, images are often represented as arrays of pixels, which simply store some form of data. Pixels are most often used to encode color data, though, technically, they can be used to encode any kind of information.
Later in CS 1230, we'll use height maps and depth buffers to encode linear displacement, and even normal maps to encode directions!
In this section, we'll explore how we can represent color data in code.
Grayscale
In a grayscale image like the one below, each pixel requires only one value to encode its intensity. Equivalently, we might say that a grayscale image has one channel. The values stored in this channel can be represented in code as floats.
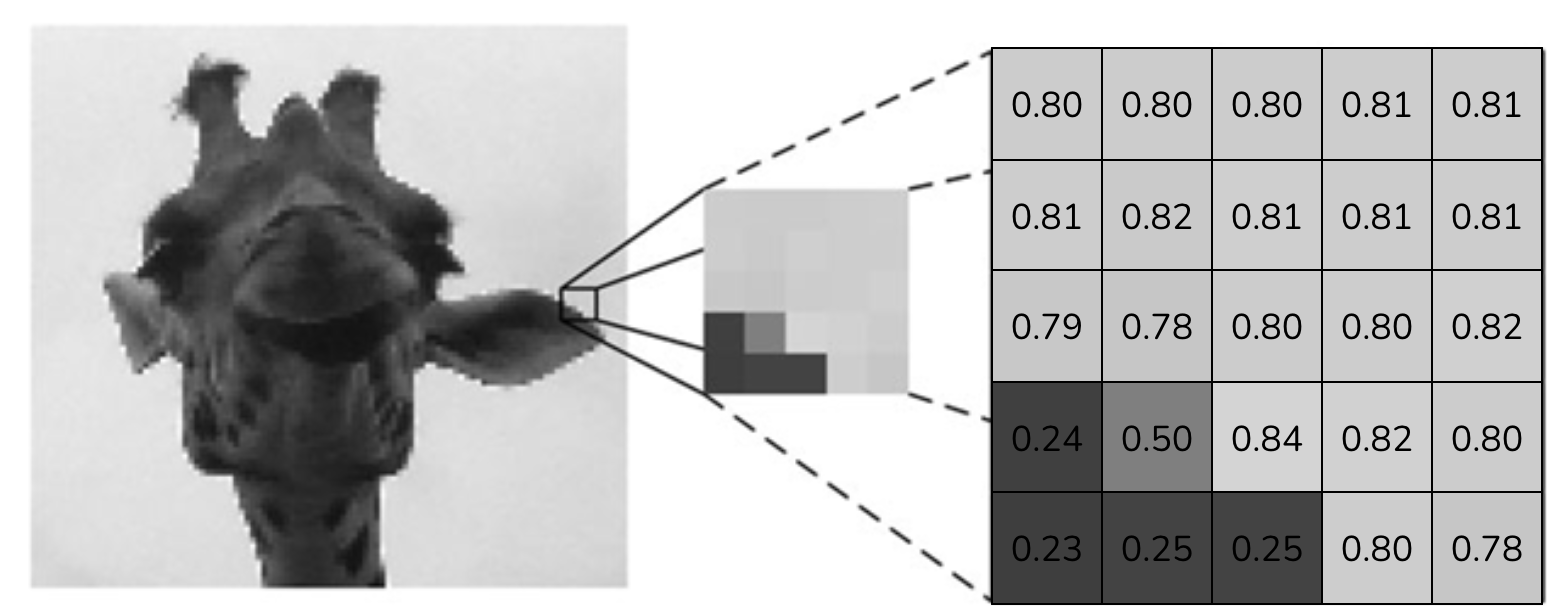
Purely by convention, we define 0 as the lowest intensity (completely black), and 1 as the highest intensity (completely white). 0.5 would be gray, and 0.7 would be a lighter shade of gray.
RGBA
Grayscale images are kind of boring, so let's move on to color images! But to begin using colors, we must first decide on how to describe them.
In CS 1230, we will be using the red-green-blue-alpha (RGBA) model. In this model, every pixel in an image requires four distinct values. Equivalently, we might say that an RGBA-colored image has four channels: red, green, blue, and alpha.
The alpha channel represents the opacity of the color. You will dive deeper into this concept in Project 1: Brush. For now, let's focus on red, green, and blue.
Play around with the color picker below by dragging the point around:
First off, notice that we're no longer using real-numbered values ranging from 0 to 1. Instead, we're using integers ranging from 0 to 255. This shouldn't be too hard to adapt to, and we'll explain why we do this in the next section.
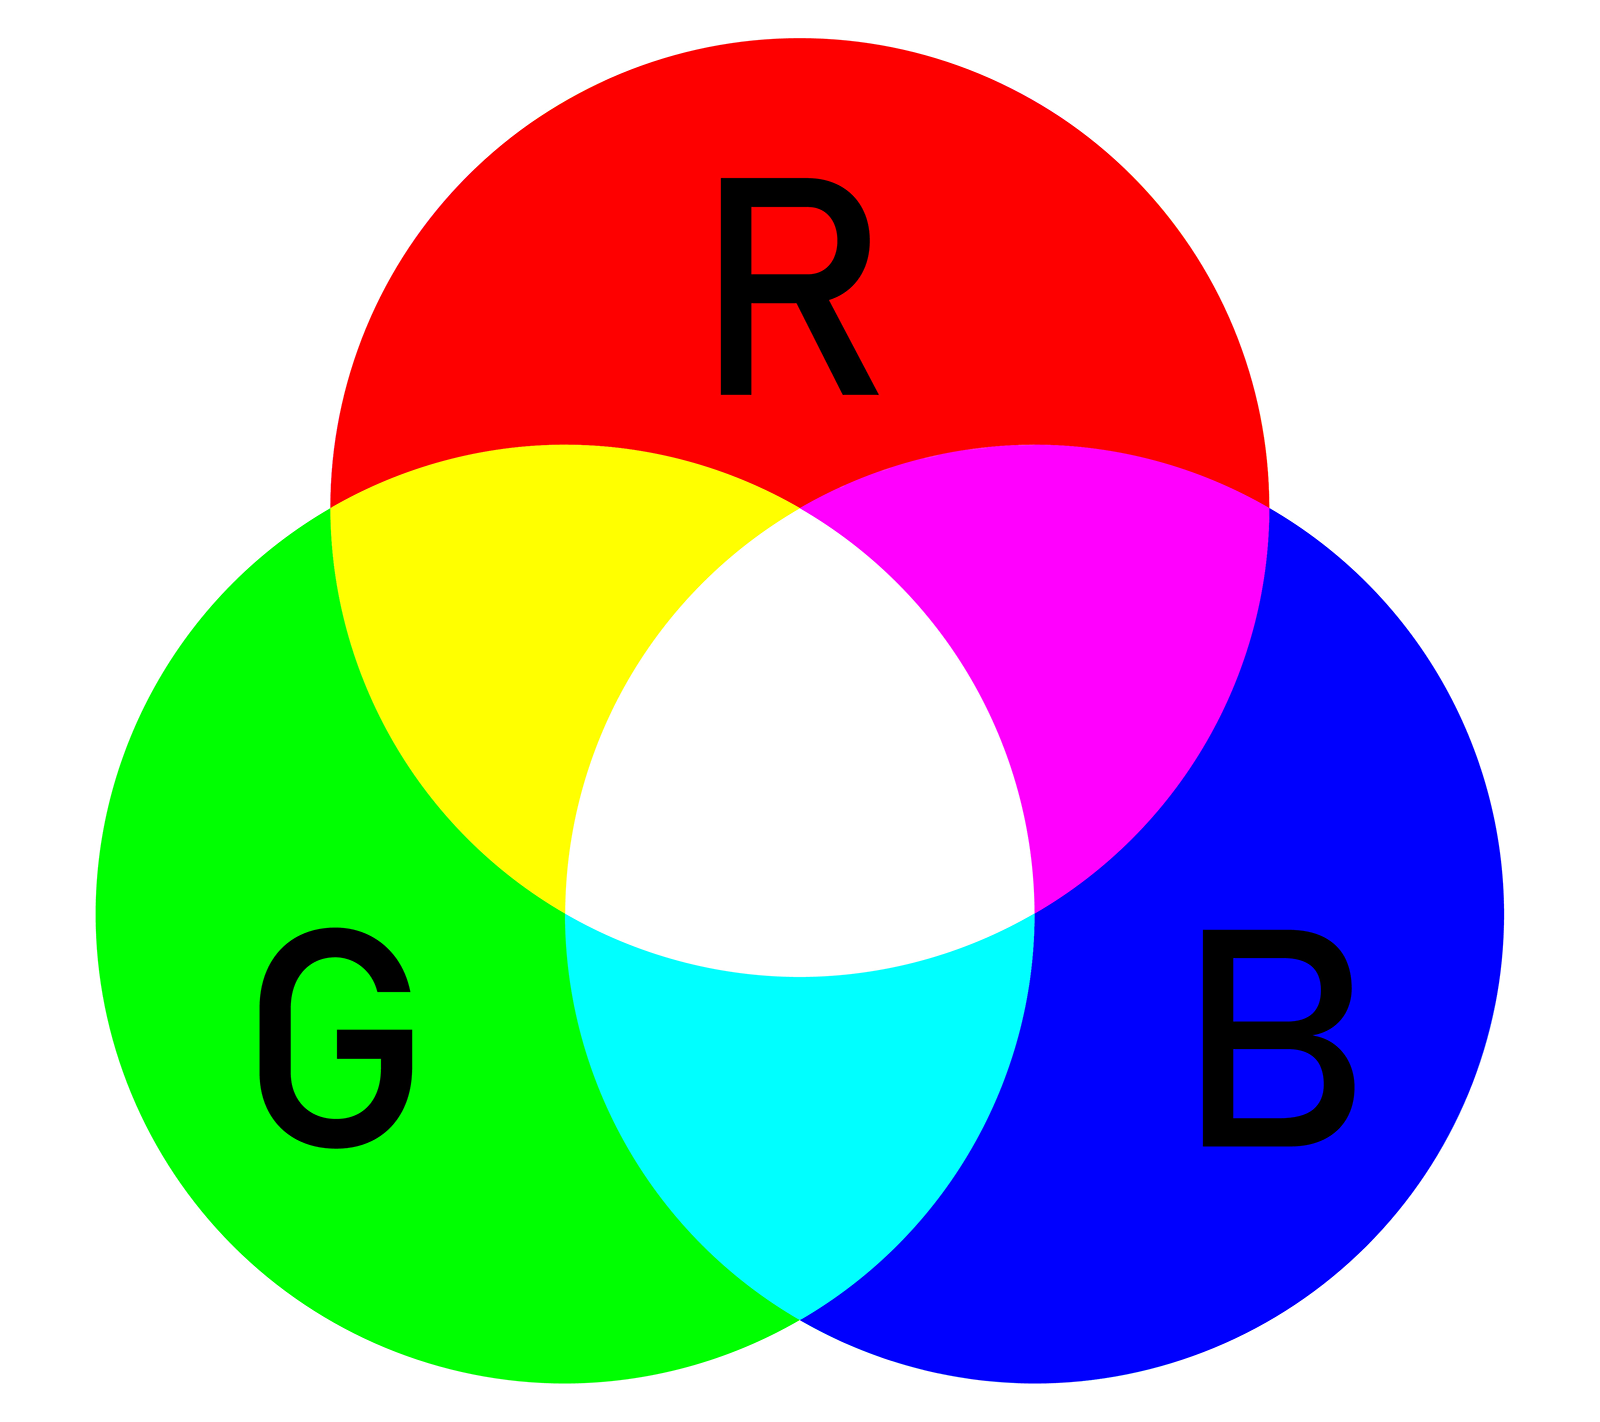
But before that, experiment with how different channels interact to produce colors. An RGB value of (255, 0, 0) gives us red, (0, 255, 0) gives us green, and (0, 0, 255) gives us blue. What color do you get when you "combine" all three? If the result surprises you, click on the note below!
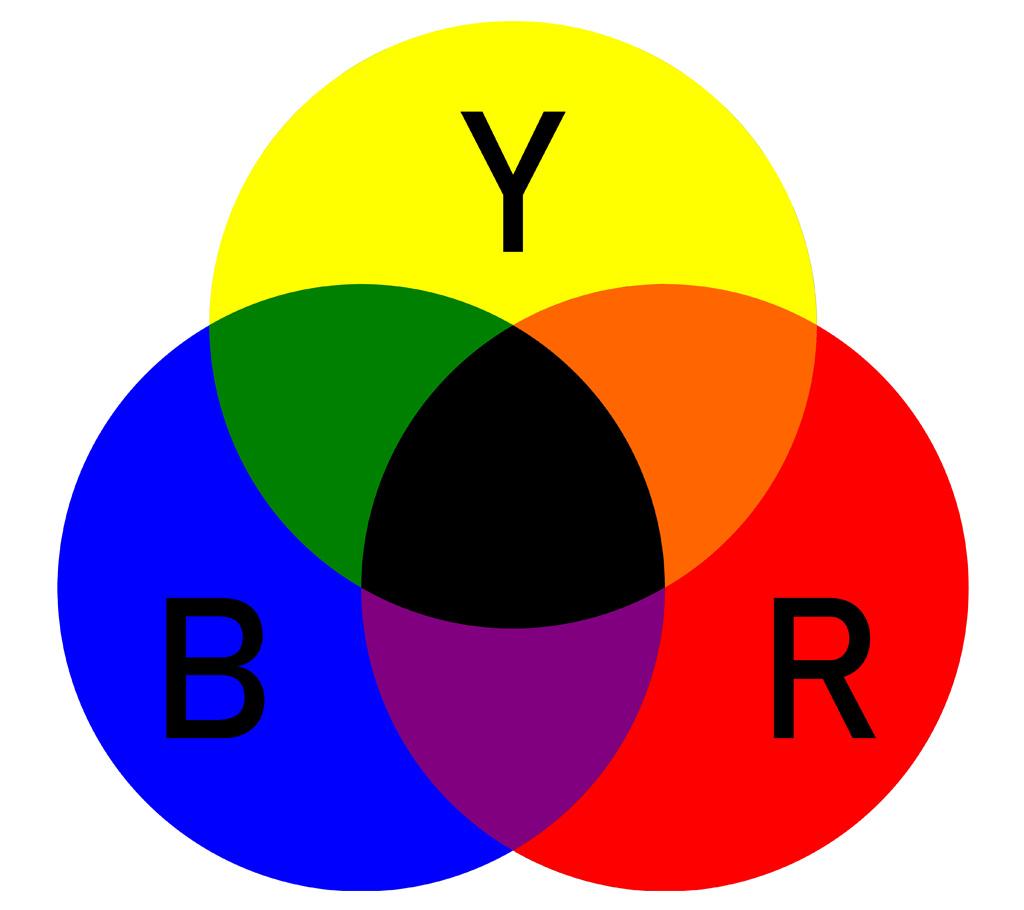
Extra: additive vs subtractive color mixing
If you've any experience with paint, you might know that mixing all your primary colors produces a dark color. However, in the color picker above, red + green + blue somehow gives us white!
This is because we're working with light (from your computer screen), rather than pigment from paint. Therefore, we're actually dealing with additive color rather than subtractive color.
Datatypes and Memory
Earlier, we said that floats could be used to represent intensity. However, floats typically occupy 4 bytes, and this adds up quickly: if we used floats for a RGBA images, each pixel would require 16 bytes, and a 1000 x 1000 image would take up
To avoid this, the vast majority of displays today use 24-bit true color (8 bits per color channel, not including alpha). This lets each color channel have
Conveniently, 8 bits (1 byte) is also the size of an unsigned integer in the range [0, 255], so...
In CS 1230, the type we will be using for our color (and alpha) channel data is std::uint8_t. This is a type provided by the C++ standard library.
Extra: 8-bit color
A single pixel occupying 24 bits was unfathomable in the early days of computer graphics, when memory was much more expensive. Getting around this limitation is why methods like 8-bit color (3 red, 3 green, 2 blue) existed.
There were plenty of other color depths, too: 1-bit, 2-bit, 4-bit, etc.
* Extra: is 24 bits really enough?
While it is indeed true that the human eye can discriminate only around ten million colors, those colors aren't necessarily distributed in "perception space" the same way as they are distributed in "display space" (the subset of colors that can be produced by a display).
Consequently, we can in fact perceive supposedly-smooth changes in color as color banding. Depending on the quality of your device's display, you might perceive color banding in the gradient below:
Converting Between Floats and Ints
At this point, you've seen the 0-255 integer representation of intensity, as well as the 0-1 float representation. Converting from one to the other is simple, and it's likely that you'll be doing it a lot of that in this course, so you may as well get started:
In the GrayCanvas class, implement the floatToInt() function. This function converts the 0-1 float representation of intensity to the 0-255 integer representation.
- Tip: the
round()function in thecmathlibrary will be helpful.
Your First Canvas
Now that you've gotten the basics of color representation, let's create a canvas!
Creating Pixel Data
In lab 1, you learned that you can use containers like std::vector or std::array to store linear collections of data.
Although those are 1D data structures, we can fairly easily store 2D arrays of data in them by "flattening" our data. There are two common ways of doing just that: (1) row-major ordering and (2) column-major ordering:
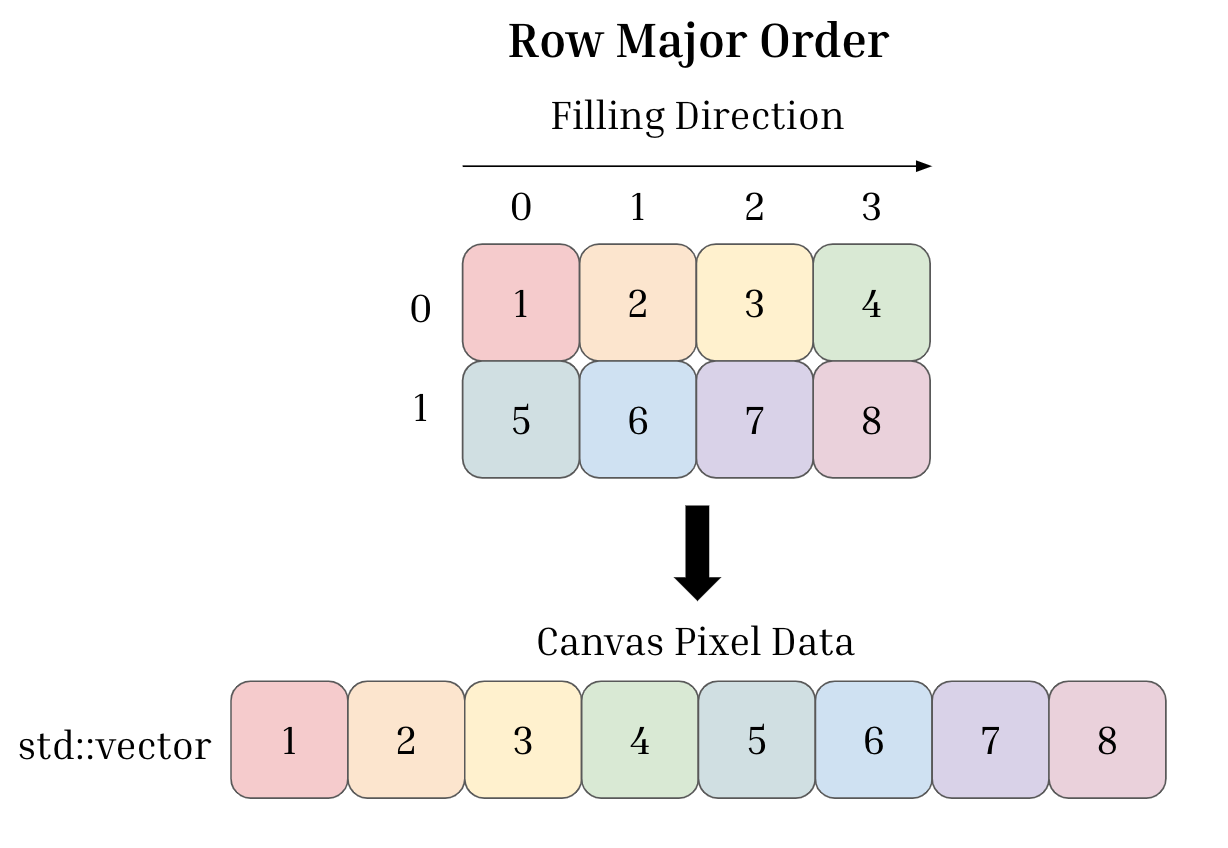
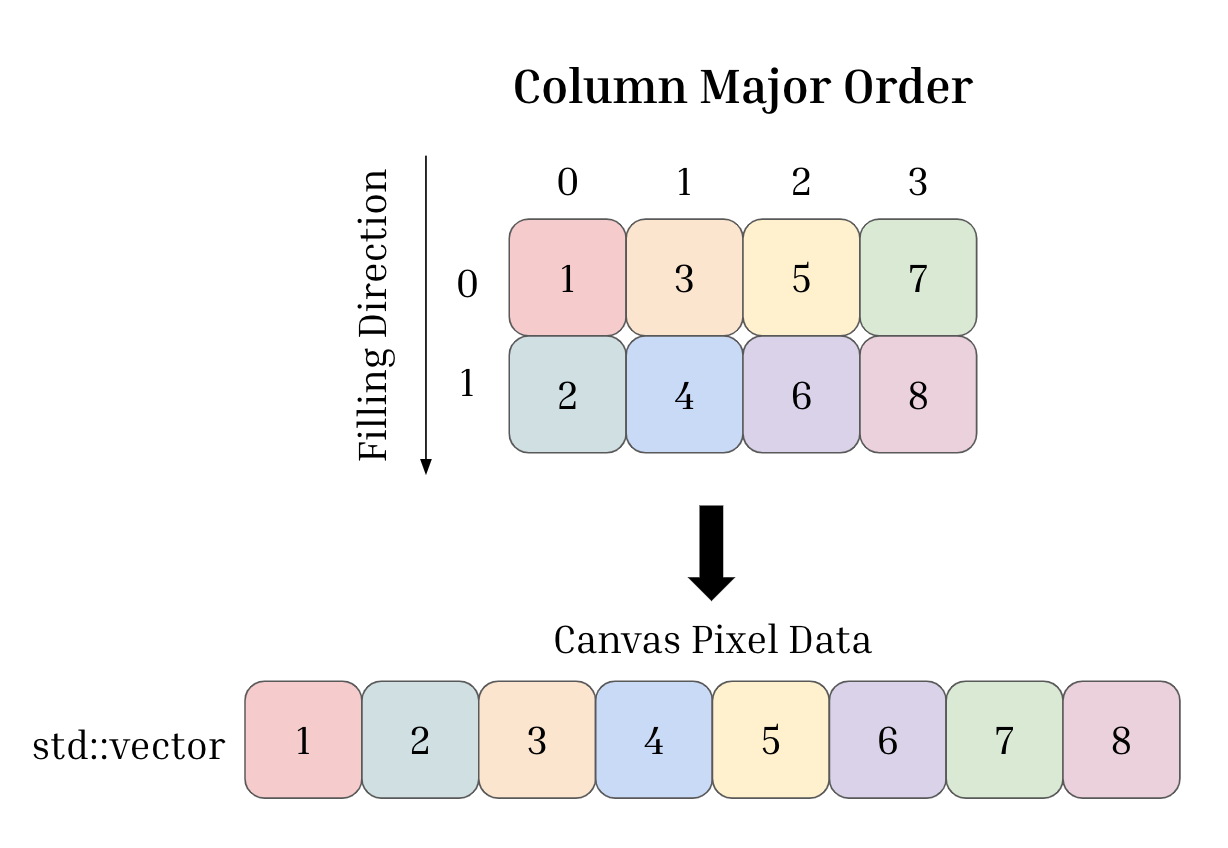
Observe how the 2x4 array in the example above is filled. When using row-major order, the array gets filled row-by-row; when using column-major order, it gets filled column-by-column.
In CS 1230, we'll always store pixel data in row-major order.
Of course, ordering means nothing if we don't have a canvas to begin with, so:
In the GrayCanvas class, implement the initializeGrayCanvas() function. This function should make m_canvasData a 10 x 10 canvas and fill it with a dark gray of intensity 0.123.
m_canvasDatais a member variable of theGrayCanvasclass. It has already been declared for you, inui/graycanvas.h.- What type does
m_canvasDatahave? You may find that you have to do a conversion from the provided intensity value. - Rather than using a for loop to fill the canvas, think about how you could do this more concisely: you might consider using
assign()orfill(). - Your command line argument should still be:
grayscale.
Your canvas should now look like this:
Modifying Pixel Data
Now that we have a canvas, we can attempt to index into our image to modify it. However, indexing can be a little tricky since our underlying data structure is a non-nested (i.e. "flat") 1D array. If we are given a pixel's x and y coordinates, we must compute its index in order to access it.
Your job in this section is to work out which pixels correspond to which elements in the array, then change their values. Remember that our images are stored in row-major order!
Implement createHeart() such that, by modifying specific pixels in m_canvasData, it draws a heart on the canvas (see figure 7). Then, take a screenshot of your drawing!
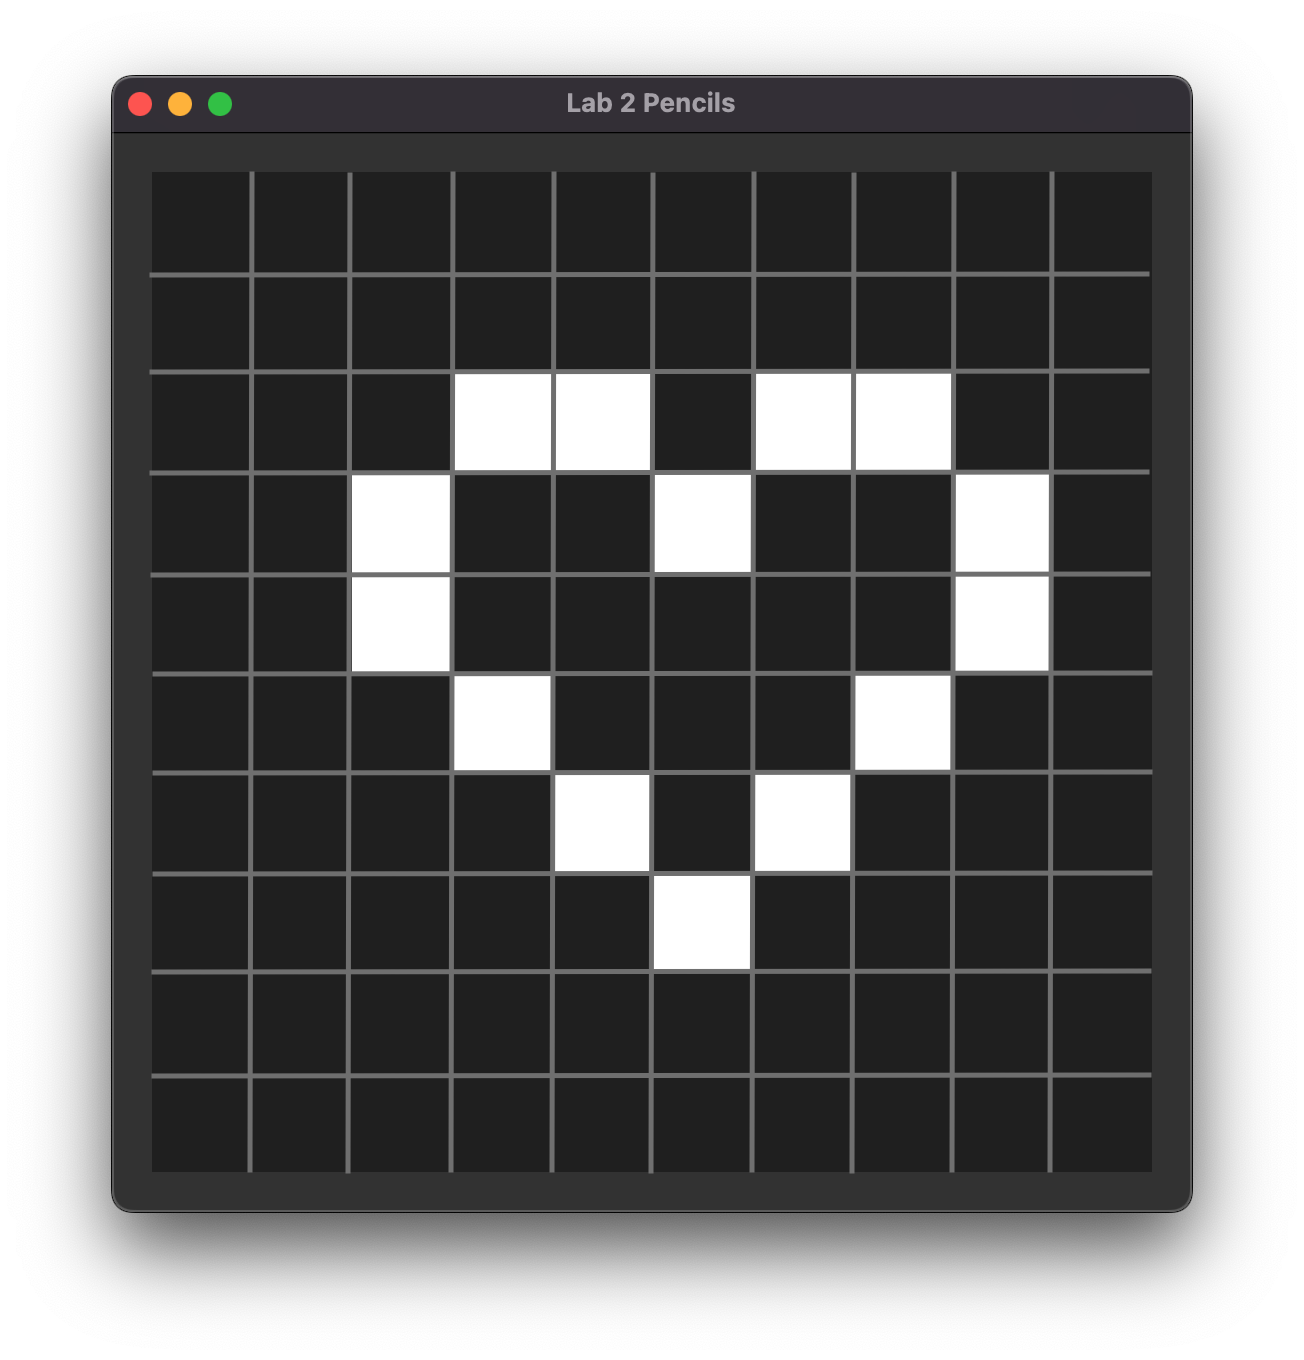
Note: the grid overlaid on the image above is not part of the expected output. It is there for visualization purposes only.
- In
createHeart(), set the heart's pixels to intensity1.0(from0.123previously). - Then, in the
initializeGrayCanvas()function, call yourcreateHeart()function. - Your command line argument should still be:
grayscale.
The RGBA Struct
Now, let's make the canvas a bit more colorful. To do this, we'll need a std::vector of something that contains all 4 RGBA channels. Since we'd like to group several related variables together, we really ought to use a struct.
Take a look at the RGBA.h file, where we define an RGBA struct containing four members: red, green, blue, and alpha. This is the RGBA struct you will be using for the rest of your assignments!
#pragma once

#include <cstdint>

struct RGBA {
    std::uint8_t r;
    std::uint8_t g;
    std::uint8_t b;
    std::uint8_t a = 255;
};
Extra: why is it in a header file?
In lab 1, you learned how to define a struct in the same file that it would be used in.
In RGBA.h, we are defining our struct in the same way. However, by putting its definition in a separate header file, we can now use this struct in any other file by #include-ing RGBA.h.
Extra: include guards and default values in RGBA.h (Include guards may be useful in future projects!)
#pragma once
Line 1 contains a preprocessor directive #pragma once, which serves as an include guard. This lets us #include the header file multiple times without having to worry about errors due to the same struct being defined multiple times. Why would you #include the same file multiple times? This can happen, for example, if you #include two header files which themselves each #include RGBA.h.
Sometimes, you might see an include guard that looks like this, instead. It works just as well, though it's a tad more verbose and therefore prone to error:
#ifndef RGBA
#define RGBA
...
#endif /* RGBA */
struct RGBA {
    std::uint8_t r;
    std::uint8_t g;
    std::uint8_t b;
    std::uint8_t a = 255;
};
Line 9 contains a default value. This allows you to omit the a value when using brace initialization, like so:
RGBA red     = RGBA{255,0,0,255};
RGBA alsoRed = RGBA{255,0,0};
An Array Of Structs
We've already hinted at this, but to be very clear...
In CS 1230, we will use an array of RGBA structs to represent our color canvas' data.
That said, there are at least two ways to store color canvas data. You may read about that below:
Array of Structs
Like ints, floats, and chars, etc, structs can be put into an array. Arrays of structs are the more common way to represent color images, and they can be visualized as follows:
| RGBA | RGBA | RGBA | ... | RGBA |
|---|
In code, you can define a std::vector of RGBA structs like this:
std::vector<RBGA> rgbaArray;
Struct of Arrays
Structs of arrays are less common, but they are equally valid representations of color images:
| red | red | red | ... | red |
|---|
| green | green | green | ... | green |
|---|
| blue | blue | blue | ... | blue |
|---|
| alpha | alpha | alpha | ... | alpha |
|---|
In code, you can define the canvas like this:
struct CanvasRGBA {
	std::uint8_t r[100]; // We're using C-style arrays here
	std::uint8_t g[100]; // for demonstration, even though
	std::uint8_t b[100]; // we generally don't recommend them
	std::uint8_t a[100];
};
canvasRGBA.r[0] represents the zeroth pixel's red value, canvasRGBA.g[0] represents its green value, and so on.
Even further reading: array of structures vs array within a structure in C/C++.
A Colorful Canvas
Now, let's switch to a canvas that allows us to use colors!
In the ColorCanvas class, implement the initializeColorCanvas() function. This function should make m_canvasData a 10 x 10 canvas and fill it with RGB color (0, 123, 123).
- What type does
m_canvasDatahave this time? - Your command line argument should now be:
color!
Your canvas should now look like this:

A canvas filled with a teal color, corresponding to RGB color (0, 123, 123).
Making A Stamp
Remember when you modified each pixel one by one to draw a heart? Good times, good times. This time, we'll make a stamp function and call it repeatedly instead.
First, we will need a helper function to convert pixel positions to pixel indices.
In the ColorCanvas class, we have implemented a buggy posToIndex() function that converts an (x, y) position into an index. We have also written a visualizer that tests this function called testPosToIndex().
Uncomment testPosToIndex() in initializeColorCanvas() and run the program. Based on what you see on your canvas and the positions colored in testPosToIndex(), can you find what's wrong with posToIndex()?
Fix the bug and be prepared to explain what the bug was.
Note that the convention for pixel positions in CS1230 is:
xis the horizontal axis;yis the vertical axis.- Position
(0, 0)is at the top-left corner.
Now, let's get to making that stamp!
In the ColorCanvas class, implement the drawFlower() function. This function should draw a flower centered on the input position (see figure 9 for an example of three such flowers).
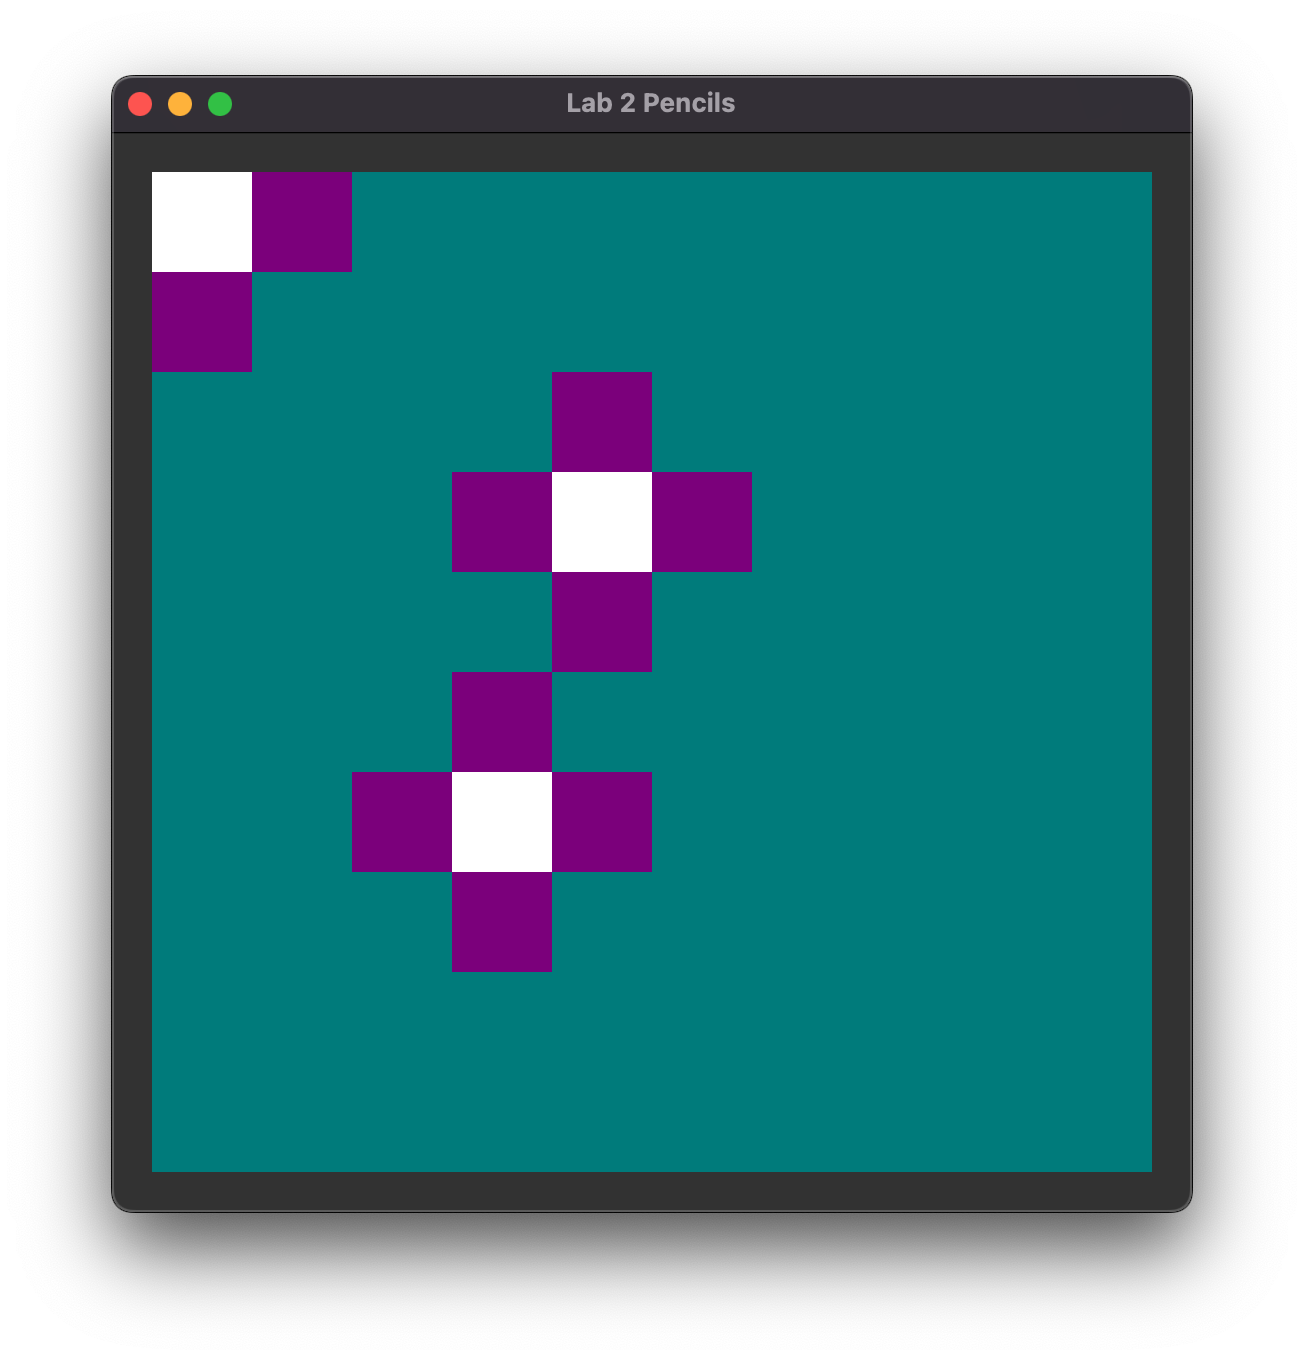
Call the stamp function a few times with different input positions in initializeColorCanvas(). Then, take a screenshot of your creation!
- Feel free to make your flower any color you like.
- Naturally, you're going to want to use your
posToIndex()function. - Don't forget to check for edge cases!
- As before, your command line argument should be:
color.
The Pencil Tool
Hope you had fun with that! For the last part of this lab, instead of modifying our canvas in code, we're going to try to modify it interactively with a Photoshop-like pencil.
For Your Info: Event Handlers
The key to implementing interactivity in most cases, Qt included, is using event handlers. These are functions that get called when an event is triggered, such as when a user presses down the left mouse button (LMB).
In subsequent tasks, you will need to implement the event handlers found in ColorCanvas in order to make your canvas interactive. They are mouseDown(), mouseMove(), and mouseUp(), and they are called when the LMB is pressed down, the mouse is moved, and the LMB is released, respectively.
A "Leaky" Pencil
First, we'll implement a "leaky" pencil that draws wherever the mouse touches:
Fill in the mouseMove() function in the ColorCanvas class.
- Feel free to choose the color of your pencil by changing the RGBA value of
m_pencilColorinColorCanvas.h. - Each pixel that your mouse hovers over should have its color set to the pencil color.
- Be sure to check that the input
(x, y)coordinate is within the bounds of the canvas. - As before, your command line argument should be:
color.
Proper Pencil
Then, we'll implement a proper pencil which only draws when the left mouse button is held down:

To implement the proper pencil, implement the mouseDown() and mouseUp() functions and modify the mouseMove() function in the ColorCanvas class.
- Ensure the pencil applies color only when the LMB is held down. Tip: set and use
m_isDown. - Make sure the pencil works even when the mouse is clicked once without being dragged (i.e.,
mouseDown()is called but notmouseMove()). - Be sure to check that the input
(x, y)coordinate is within the bounds of the canvas. - As before, your command line argument should be:
color.
End
Congrats on finishing the Pencils lab! Now, it's time to submit your code and get checked off by a TA. Be prepared to show the TA your 2 screenshots (from tasks 5 (heart) and 8 (flowers)), explain what the bug was from task 7, and your pencil.
Submission
Submit your GitHub link and commit ID to the "Lab 2: Pencils" assignment on Gradescope, then get checked off by a TA at hours.
Reference the GitHub + Gradescope Guide here.