Lab 5: Parsing
Please put your answers to written questions in this lab, if any, in a Markdown file named README.md in your lab repo.
Introduction
Welcome to lab 5! In this lab, you will learn about the data structures used to represent 3D scenes. You will write code that turns an easy-to-build, tree-based representation of scenes (SceneData) into a vector-based representation that's much easier to render an image with (RenderData).
Along the way, you will learn how lights, cameras, and primitives are represented, as well as how to traverse transformation/scene graphs so that everything in the scene has the right transform.
You will use the code you write in this lab for your remaining four projects, in both Ray and Realtime.
Objectives
- Learn about the data structures we'll use to represent 3D scenes, and
- Implement a parser that transforms
SceneDatatoRenderData.
Scene Data vs. Render Data
To visualize a compelling 3D scene, we need data about the stuff it contains: lights, cameras, and primitives (including textures, surfaces, and geometry). Depending on our intended use, there are more and less effective ways to store this data.
When building a scene, we use transformation graphs (also known as scene graphs) to make it easy to keep track of and modify the sizes, orientations, and positions of our primitives. For our purposes, a transformation graph is a tree-like data structure which organizes scenes based on the logical (and often spatial) groupings of objects in a scene.
We can think of this as the "default" representation of a scene, so we will call it SceneData.
However, when rendering a scene, we don't necessarily care about these groupings. Instead, what we'd really like is to be able to quickly obtain each primitive's final transform: thus, we store each primitive's cumulative transformation matrix (ctm, for short) with the primitive itself, in a vector/list.
We can think of this as the "render-optimized" representation of a scene, so we will call it RenderData.
Take a look at the two figures below. In this lab, your task will be to write a parser which transforms SceneData to RenderData.
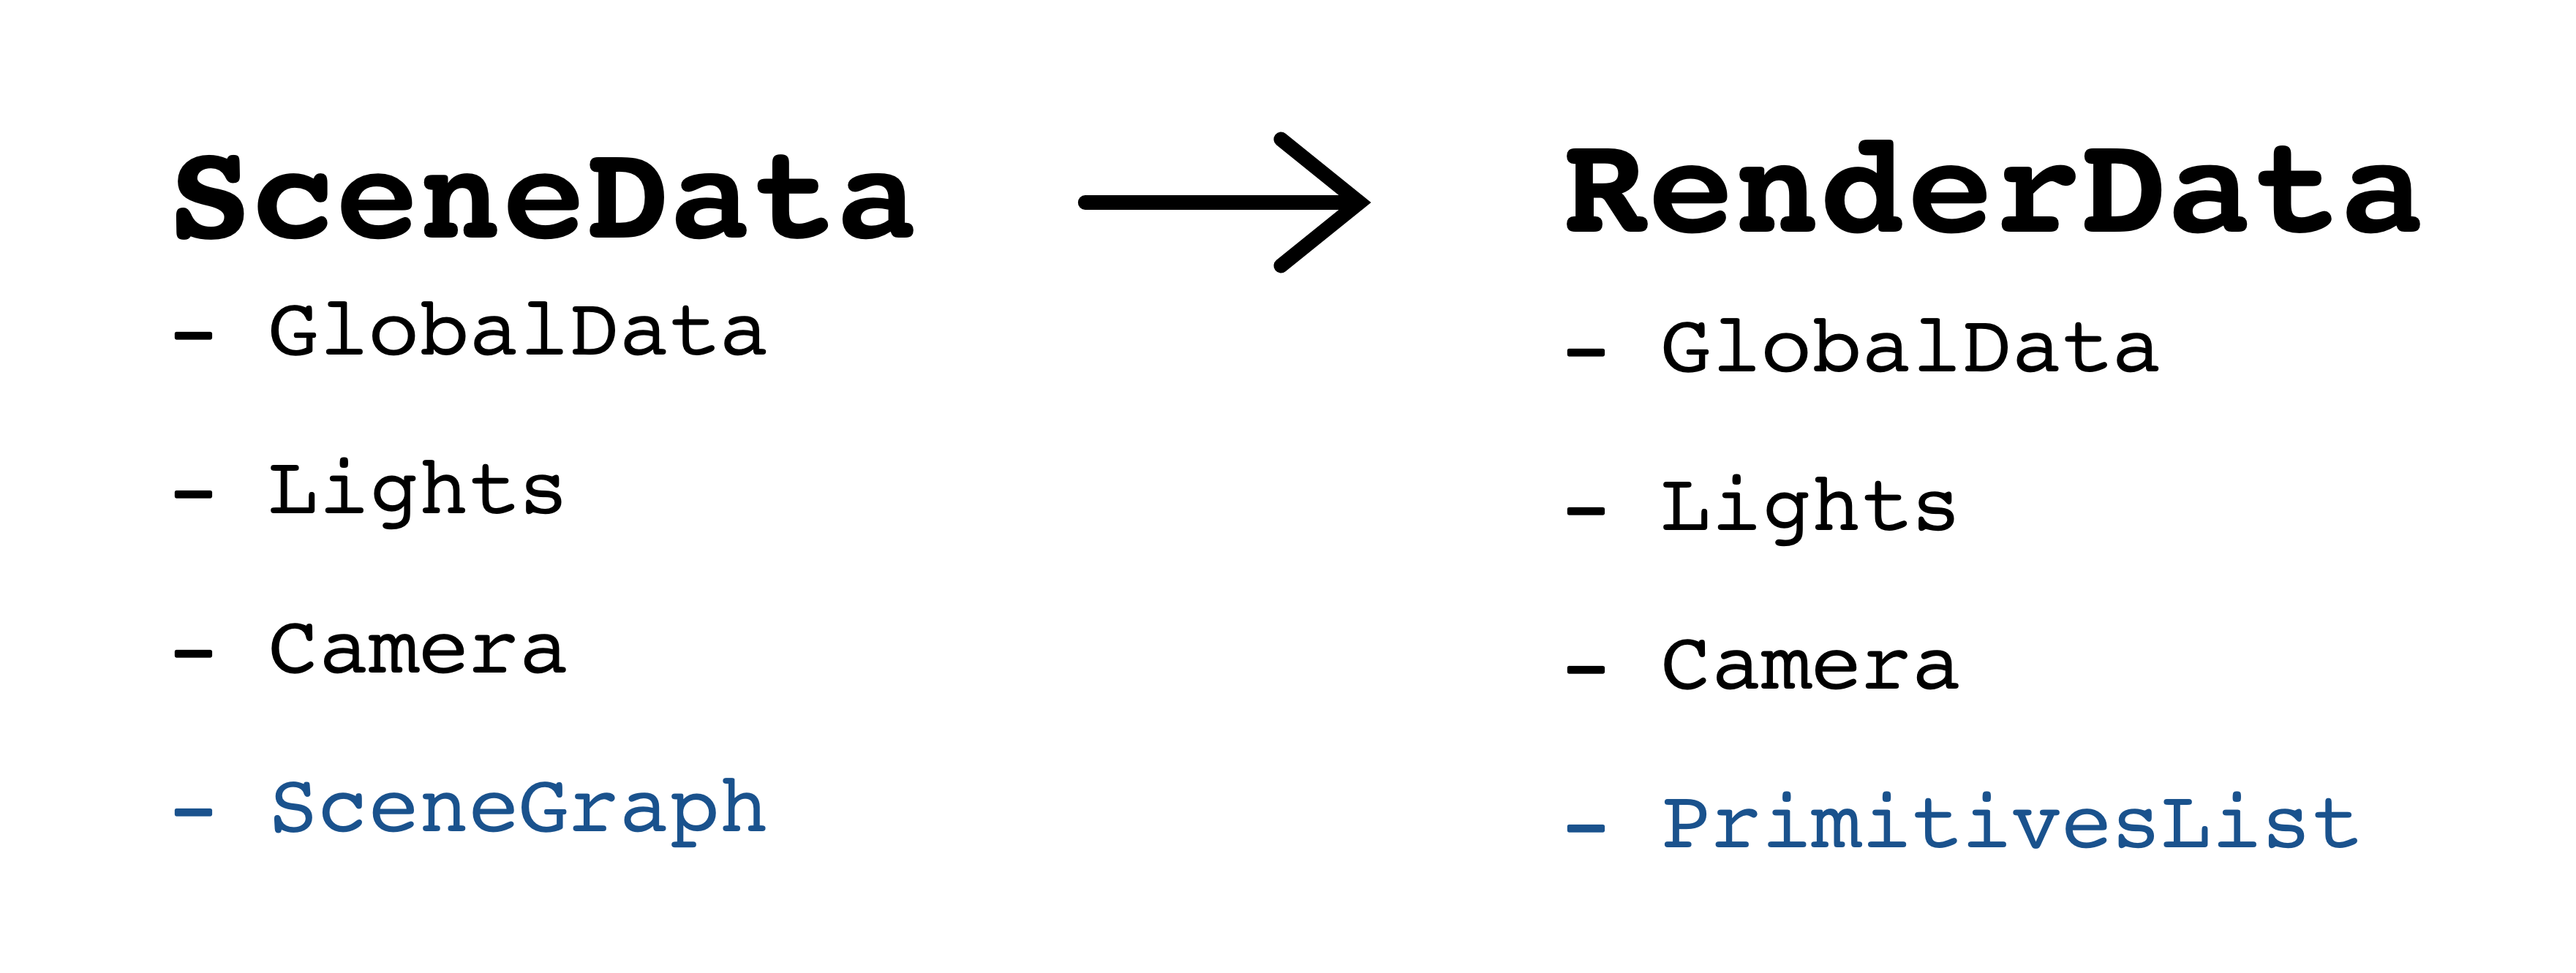
Transforming SceneData into RenderData. Conceptually, they store the same information, just in a different format!

In Figure 1, observe how the SceneGraph and PrimitivesList are the only things that differentiate SceneData from RenderData. Figure 2 shows how primitives and their transformations are stored differently in these data structures.
Extra: why do we use a vector/list to render primitives?
If you have started Project 3: Intersect, you might have reasoned that one of the reasons ray tracing is so computationally expensive is because we need to check for ray-primitive intersections. This is especially true when there are many primitives in the scene to check against.
We use a vector/list to iterate through all the primitives in the scene because it is simple to implement, and has traditionally been sufficient for the requirements of this course.
That said, there isn't any reason that this part of RenderData has to be a vector/list. If you want to get fancy, there are more efficient alternatives which allow for much faster ray-primitive intersection tests (see: "accelerated" data structures like octrees, bounding-volume hierarchies (BVHs), and KD-trees, all covered in lectures).
Scene Data
Let's take a look at src/parser/SceneData.h. This file contains all the data structures you need to build a scene, and we will go over each of them below.
Global Data
First, let's find out what SceneGlobalData is all about:
// Struct which contains the global color coefficients of a scene.
// These are multiplied with the object-specific materials in the lighting equation.
struct SceneGlobalData  {
    float ka; // Ambient term
    float kd; // Diffuse term
    float ks; // Specular term
    float kt; // Transparency; used for extra credit (refraction)
};
This struct contains data pertaining to the whole scene. Specifically, it contains color coefficients that will be applied to the shading of every object in the scene.
If you don't know exactly what these coefficients represent yet, that's not a problem. For this lab, you just need to know that each scene will need this global data for rendering purposes.
Lights
Next, let's check out LightType:
// Enum of the types of virtual lights that might be in the scene
enum class LightType {
    LIGHT_POINT,
    LIGHT_DIRECTIONAL,
    LIGHT_SPOT
};
To simulate different light sources in the real world, we will use three types of virtual lights: point, directional, and spot lights (more on them later).
Following that, here's SceneLightData:
// Struct which contains data for a single light
struct SceneLightData {
    int id;
    LightType type;

    SceneColor color;
    glm::vec3 function;  // Attenuation function

    glm::vec4 pos;       // Not applicable to directional lights
    glm::vec4 dir;       // Not applicable to point lights

    float penumbra;      // Only applicable to spot lights, in RADIANS
    float angle;         // Only applicable to spot lights, in RADIANS
};
Each light in our scene is represented with a struct that includes its LightType, its color, and other relevant information depending on the LightType.
- A point light is a single point in space that emits light equally in all directions (e.g. an infinitesimally small lightbulb). It is defined by its color and position.
- A directional light is a global light which simulates light from a source that is infinitely far away (e.g. the sun, as we experience it on earth). It is defined by its color and direction.
- A spot light is much more interesting—it is effectively a point light, but it emits light only in a cone shape (e.g. a flashlight). It is defined by its color, position, and direction, as well as a penumbra and angle, which describe its cone.
Documentation about virtual lights commonly used in 3D scenes can be readily found online, such as in the Unity3D manual.
Camera Data
For the camera, we'll inspect SceneCameraData.
// Struct which contains data for the camera of a scene
struct SceneCameraData {
    glm::vec4 pos;
    glm::vec4 look;
    glm::vec4 up;

    float heightAngle;   // The height angle of the camera in RADIANS

    float aperture;      // Only applicable for depth of field
    float focalLength;   // Only applicable for depth of field
};
As with our lights, our virtual camera is just a struct with the fields necessary to describe its properties. One important thing to note is that pos, look, and up are all defined in world space. They'd be pretty useless if they were defined in camera space.
Primitives
Next up, PrimitiveType:
// Enum of the types of primitives that might be in the scene
enum class PrimitiveType {
    PRIMITIVE_CUBE,
    PRIMITIVE_CONE,
    PRIMITIVE_CYLINDER,
    PRIMITIVE_TORUS,
    PRIMITIVE_SPHERE,
    PRIMITIVE_MESH
};
Much like with LightType, we use PrimitiveType to identify different types of primitives. This is used in a struct, ScenePrimitive, to describe a specific primitive in the scene:
// Struct which contains data for a single primitive in a scene
struct ScenePrimitive {
   PrimitiveType type;
   SceneMaterial material;
   std::string   meshfile; // Used for triangle meshes
};
Every primitive has both a type and material. The meshfile field will only be relevant if you'd like to implement triangle mesh rendering, an extra credit option for our Ray and Realtime projects.
material contains important information about what the primitive looks like (e.g. its color, how shiny it is, any textures, etc.). You can look at the definition of SceneMaterial for details, but it's fine not to understand any of the terms which haven't yet been covered in lecture.
Observe that, unlike the light or camera structs, there aren't any fields in ScenePrimitive that describe its transformation. This is because it's more practical to use scene graphs to manage this, especially when we have a lot of primitives!
Scene Graphs
Note that we use the terms transformation graph and scene graph loosely interchangeably.
Scene graphs store a tree-based, hierarchical representation of a scene, and express the spatial relationships between groups of objects. In this section, we'll look at how we can describe individual transformations, and then an entire scene graph.
Transformations
In lab 4, you learned to compose a series of translation, rotation, and scaling matrices into a single transformation matrix. This means that all permutations of those basic transforms can be written as a single matrix. However, when placing objects in a scene, it is much easier to just work with those basic transforms directly. So, that leaves us with four types of transformations:
// Enum of the types of transformations that can be applied
enum class TransformationType {
    TRANSFORMATION_TRANSLATE,
    TRANSFORMATION_SCALE,
    TRANSFORMATION_ROTATE,
    TRANSFORMATION_MATRIX
};
This type is then stored in a struct that contains the a transformation's specific information, SceneTransformation:
// Struct which contains data for a transformation.
struct SceneTransformation {
    TransformationType type;

    glm::vec3 translate; // Only applicable when translating. Defines t_x, t_y, and t_z, the amounts to translate by, along each axis.
    glm::vec3 scale;     // Only applicable when scaling.     Defines s_x, s_y, and s_z, the amounts to scale by, along each axis.
    glm::vec3 rotate;    // Only applicable when rotating.    Defines the axis of rotation; should be a unit vector.
    float angle;         // Only applicable when rotating.    Defines the angle to rotate by in RADIANS, following the right-hand rule.
    glm::mat4 matrix;    // Only applicable when transforming by a custom matrix. This is that custom matrix.
};
Instead of copying your code from Lab 4, you may find the following methods from the GLM library very helpful for constructing transformation matrices.
glm::translate()glm::scale()glm::rotate()
Scene Graph Nodes
Our scene graph is composed of nodes, each of which describes zero or more of the following:
- a series of transformations,
- a number of primitives, and
- a number of children nodes.
Take a look at the node struct, SceneNode, that we've defined:
// Struct which represents a node in the scene graph/tree, to be parsed by the student's `SceneParser`.
struct SceneNode {
   std::vector<SceneTransformation*> transformations; // Note the order of transformations described in lab 5
   std::vector<ScenePrimitive*>      primitives;
   std::vector<SceneNode*>           children;
};
If a SceneNode has transformations, those apply to both its primitives and children.
Example: how might a city scene be grouped?
If our scene describes a cityscape, it would be silly to describe every window's position by its distance from the center of the city. It would make much more sense to instead describe each window's position relative to the building it is a part of. Using the same logic, we might describe the building's position relative to its street, then the street's position relative to the city.
This way, "relocating" a building would only involve applying a single transform to the parent SceneNode which represents it. Then, every descendant of that SceneNode would have that transformation applied, too.
Cumulative Transformation Matrices
Now that we have our SceneTransformations and SceneNodes, we can begin to learn to derive cumulative transformation matrices for each primitive.
A cumulative transformation matrix (CTM) is the composition of all the transformations done to a single primitive, from the root SceneNode, down to the one which contains the primitive itself. This is best demonstrated with an example. Consider the scene graph below, which contains five primitives:
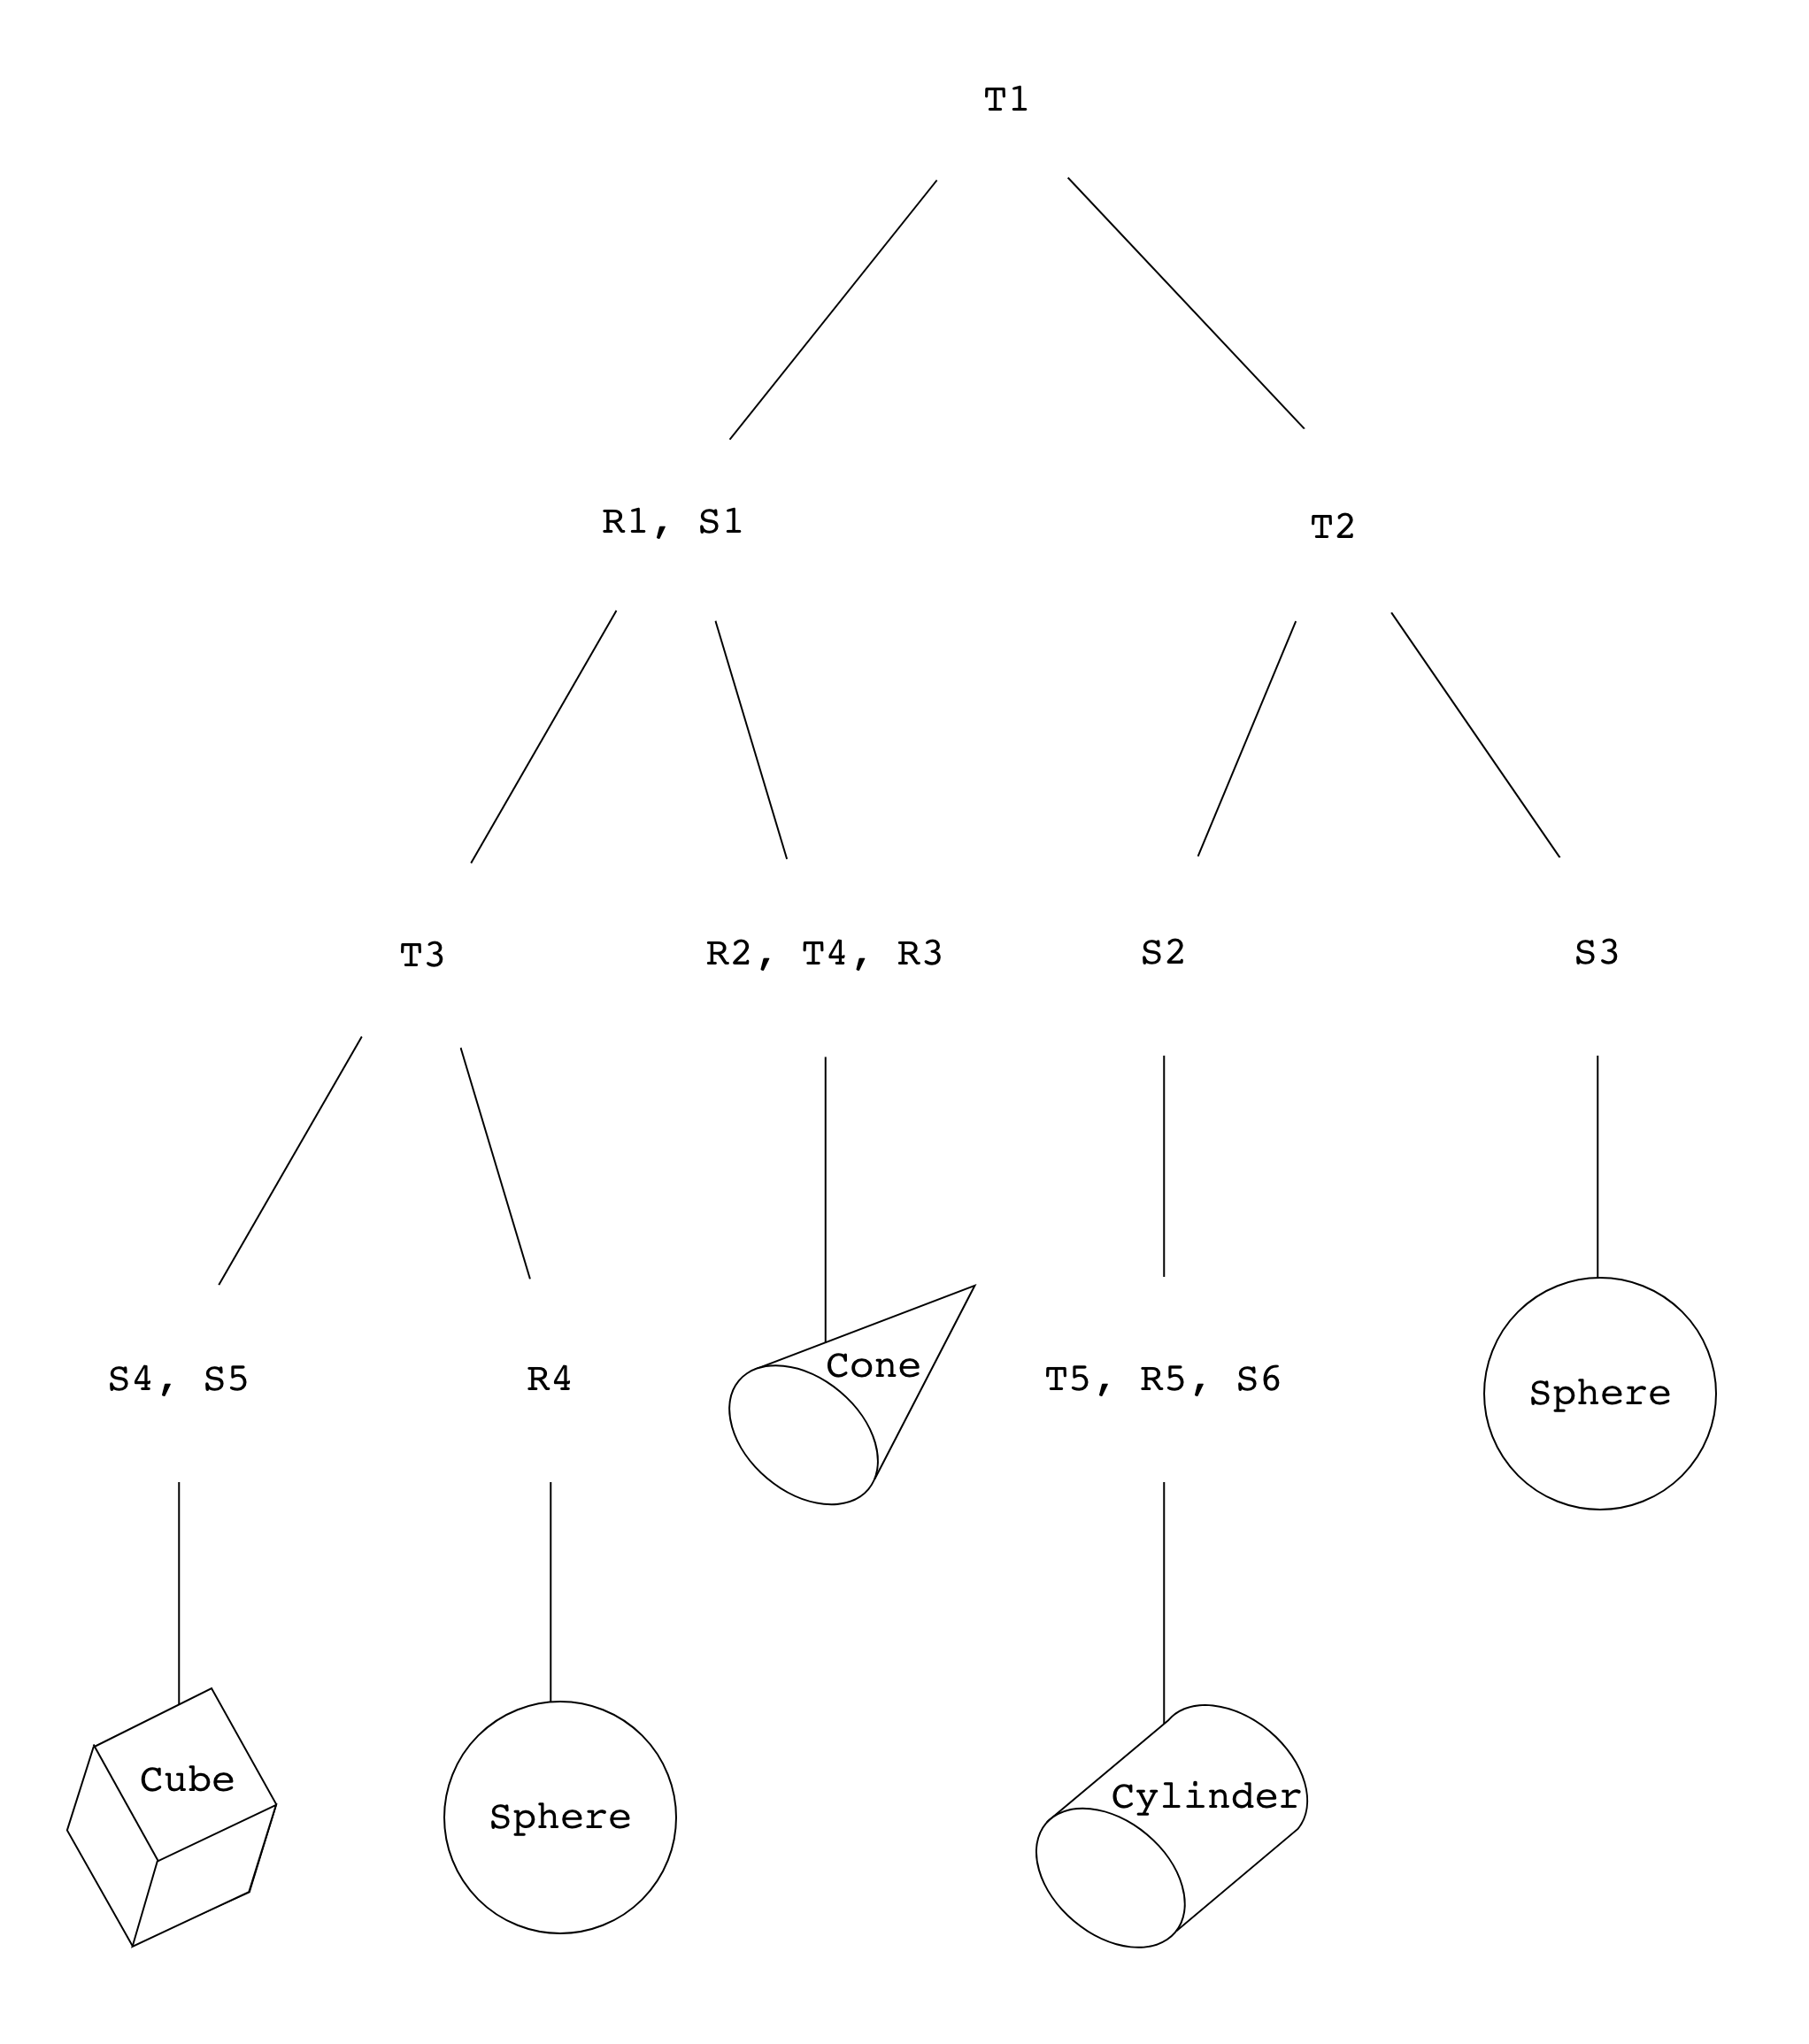
As usual, all nodes in this tree are SceneNodes.
In this specific example, the leaf nodes contain only one primitive each (no transformations or children). Meanwhile, the non-leaf nodes contain only lists of transformations (e.g. {T1} and {R1, S1}), plus a list of their children (easily determined by just looking at the tree).
Be aware that these properties are not true of all scene graphs!
Note that even though we've stored the primitives in their own, individual nodes here, there's no reason we can't just put the primitives in their parent nodes, alongside the transformations!
We use this tree in the same way we used transformation graphs in lab 4, following three basic rules:
- Transformations on non-leaf nodes are applied to their all of their descendants.
- If a node contains multiple transformations
{R1, S1}, described by matricesand respectively, then its total transformation is . - Each node's transformations are applied before its parent's transformations, i.e.
.
And here, finally, is your first task for this lab!
For the scene graph in Figure 3, express the CTMs for the cube, cone and cylinder in terms of the matrices found in the graph (e.g. T1, R2, etc.).
Keep the rules above in mind, especially the ones about ordering!
Build-As-You-Go
One naïve way to obtain CTMs would be to descend the scene graph from the root node each time we'd like to compute a primitive's cumulative transformation matrix. In fact, this might've been what you did in the previous task. However, this is less than ideal:
Describe a scenario in which doing the above would be especially inefficient.
A more efficient way to obtain each primitive's CTM would be to build a cumulative transform as we descend the tree.
Describe the steps you might take to build a cumulative transform as you descend the tree. What this might look like in code?
Practice Tree Traversal
Before we get further into the lab, let's first get you warmed up with traversing trees in a depth-first manner!
In this practice problem, you will be debugging a DFS implementation that descends a binary tree of words to build and print out sentences. A diagram of this tree can be seen below along with its expected outputs.
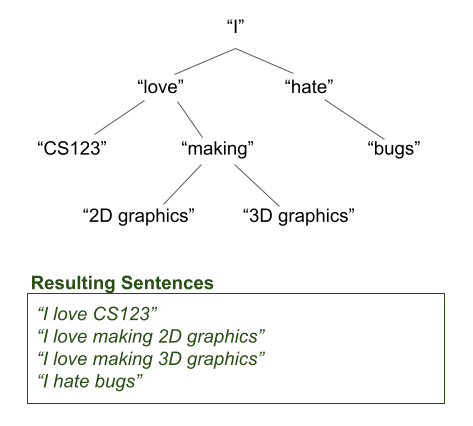
The implementation of this can be found in src/parser/sceneparser.cpp. Each word in the above tree is represented by a Word struct. Take a look at this Word struct below:
struct Word {
    std::string word;
    Word* left;
    Word* right;
};
Note that it contains a std::string word field that contains the actual word, as well as pointers to its left and right children.
We take care of initializing this tree of Word structs in dfsInitTree(). We have also implemented the function dfsPrintTree() that performs the actual
DFS algorithm that descends the tree to build and print the sentences in your terminal.
However, there's one problem— our dfsPrintTree() function is causing our program to crash and we need your help fixing it!
In parser/sceneparser.cpp, uncomment the function Sceneparser::debugDFS().
Then, run the lab, and notice that our dfsPrintTree() function is causing our program to crash! Use the debugger tool to find out what is causing the crash.
Fix dfsPrintTree() such that when you run the program successfully, your terminal should print out the following sentences:
I love CS123
I love making 2D graphics
I love making 3D graphics
I hate bugs
Be prepared to explain to the TA during checkoff what the bug was and how you fixed it!
Note: You can ignore the window that pops up when you run the program. It will be used in the later tasks.
Hint:
Try running the code with the debugger! Also, you may need to add some logic to the code.
Render Data
That was a lot of stuff to digest about scene graphs and SceneData! Please pretend this is a break in the middle of the lab, and feel free to imagine some charming waiting room music.
When you're ready, let's get cracking on turning our SceneData into RenderData.
Implementing SceneParser::parse()
Whenever we would like to load a scene, we call SceneParser::parse(). This can be found in src/parser/sceneparser.cpp:
bool SceneParser::parse(std::string filepath, RenderData &renderData) {
    ScenefileReader fileReader = ScenefileReader(filepath);
    bool success = fileReader.readJSON();
    if (!success) {
        return false;
    }

    // Tasks

    return true;
}
Our stencil already parses the JSON scene file for you (highlighted above).
All that remains is for you to populate renderData. Referring to its struct definition in sceneparser.h will help greatly.
Be aware that there is no SceneData struct. All of the information you need can be obtained by calling fileReader's methods; and you can find their declarations in src/parser/scenefilereader.h:
// All the methods that you will be using, from class `ScenefileReader`
SceneGlobalData             getGlobalData() const;
SceneCameraData             getCameraData() const;
SceneNode*                  getRootNode()   const;
The first step in populating renderData is to obtain global data and and camera data for the scene. In SceneParser::parse(), use the fileReader's methods to assign the following into fields in the renderData struct:
- Global data
- Camera data
Traversing The Scene Graph
Our next objective is to populate renderData.shapes, which is a std::vector<RenderShapeData>. To do this, we must traverse the scene graph and calculate the cumulative transformation matrix for each of the primitives.
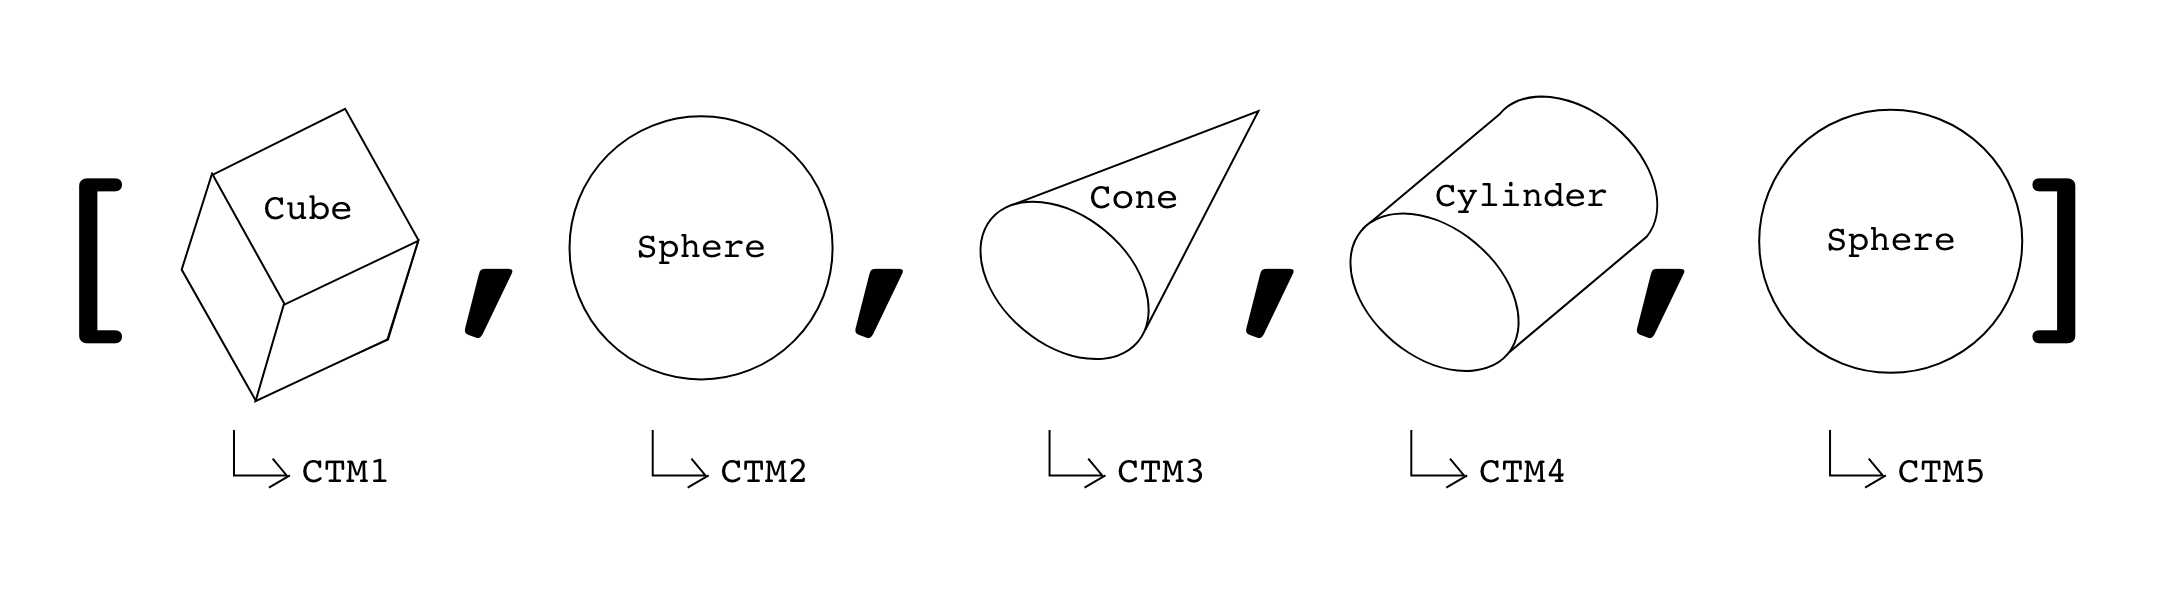
You can think of renderData.shapes as being a list of primitives and their CTMs.
This is a much bigger task than the others in this lab. If you get stuck, remember that you can collaborate with others in this course!
First, get the root node of the scene graph from the fileReader.
Also, clear() renderData.shapes. You will be appending to this shortly.
Then, traverse the tree in a depth-first manner, starting from the root node of the scene graph. While you are traversing the tree, build your cumulative transformation; for each primitive you encounter, you should: (1) construct a RenderShapeData object using the primitive and its corresponding CTM, and (2) append the RenderShapeData onto renderData.shapes.
Similarly, for each light you encounter (remember that each node in the scene graph contains primitives, lights, and transformations), you will also need to construct a SceneLightData object and append it onto renderData.lights.
- It will be very helpful to write a recursive helper function to do this.
- When constructing
SceneLightDatafor each light, the light's position and direction should be in world space. (Note: the light's position in light-space is at the origin and its direction in light-space is given by itsdirproperty. How can you convert that to world space using the ctm?) - If you do write a helper function, think carefully about whether you should be passing arguments by reference or by value.
Testing Scenes
You should now be able to test if your parser is able to properly load scenes. You can load up any .json file (like primitive_salad_1.json or ambient_total.json in the resources directory), by first running the lab, and then using File > Open in the window that pops up.
Note: on macOS, the File option will be on the menu bar instead.
If all goes well, you should get outputs like these:
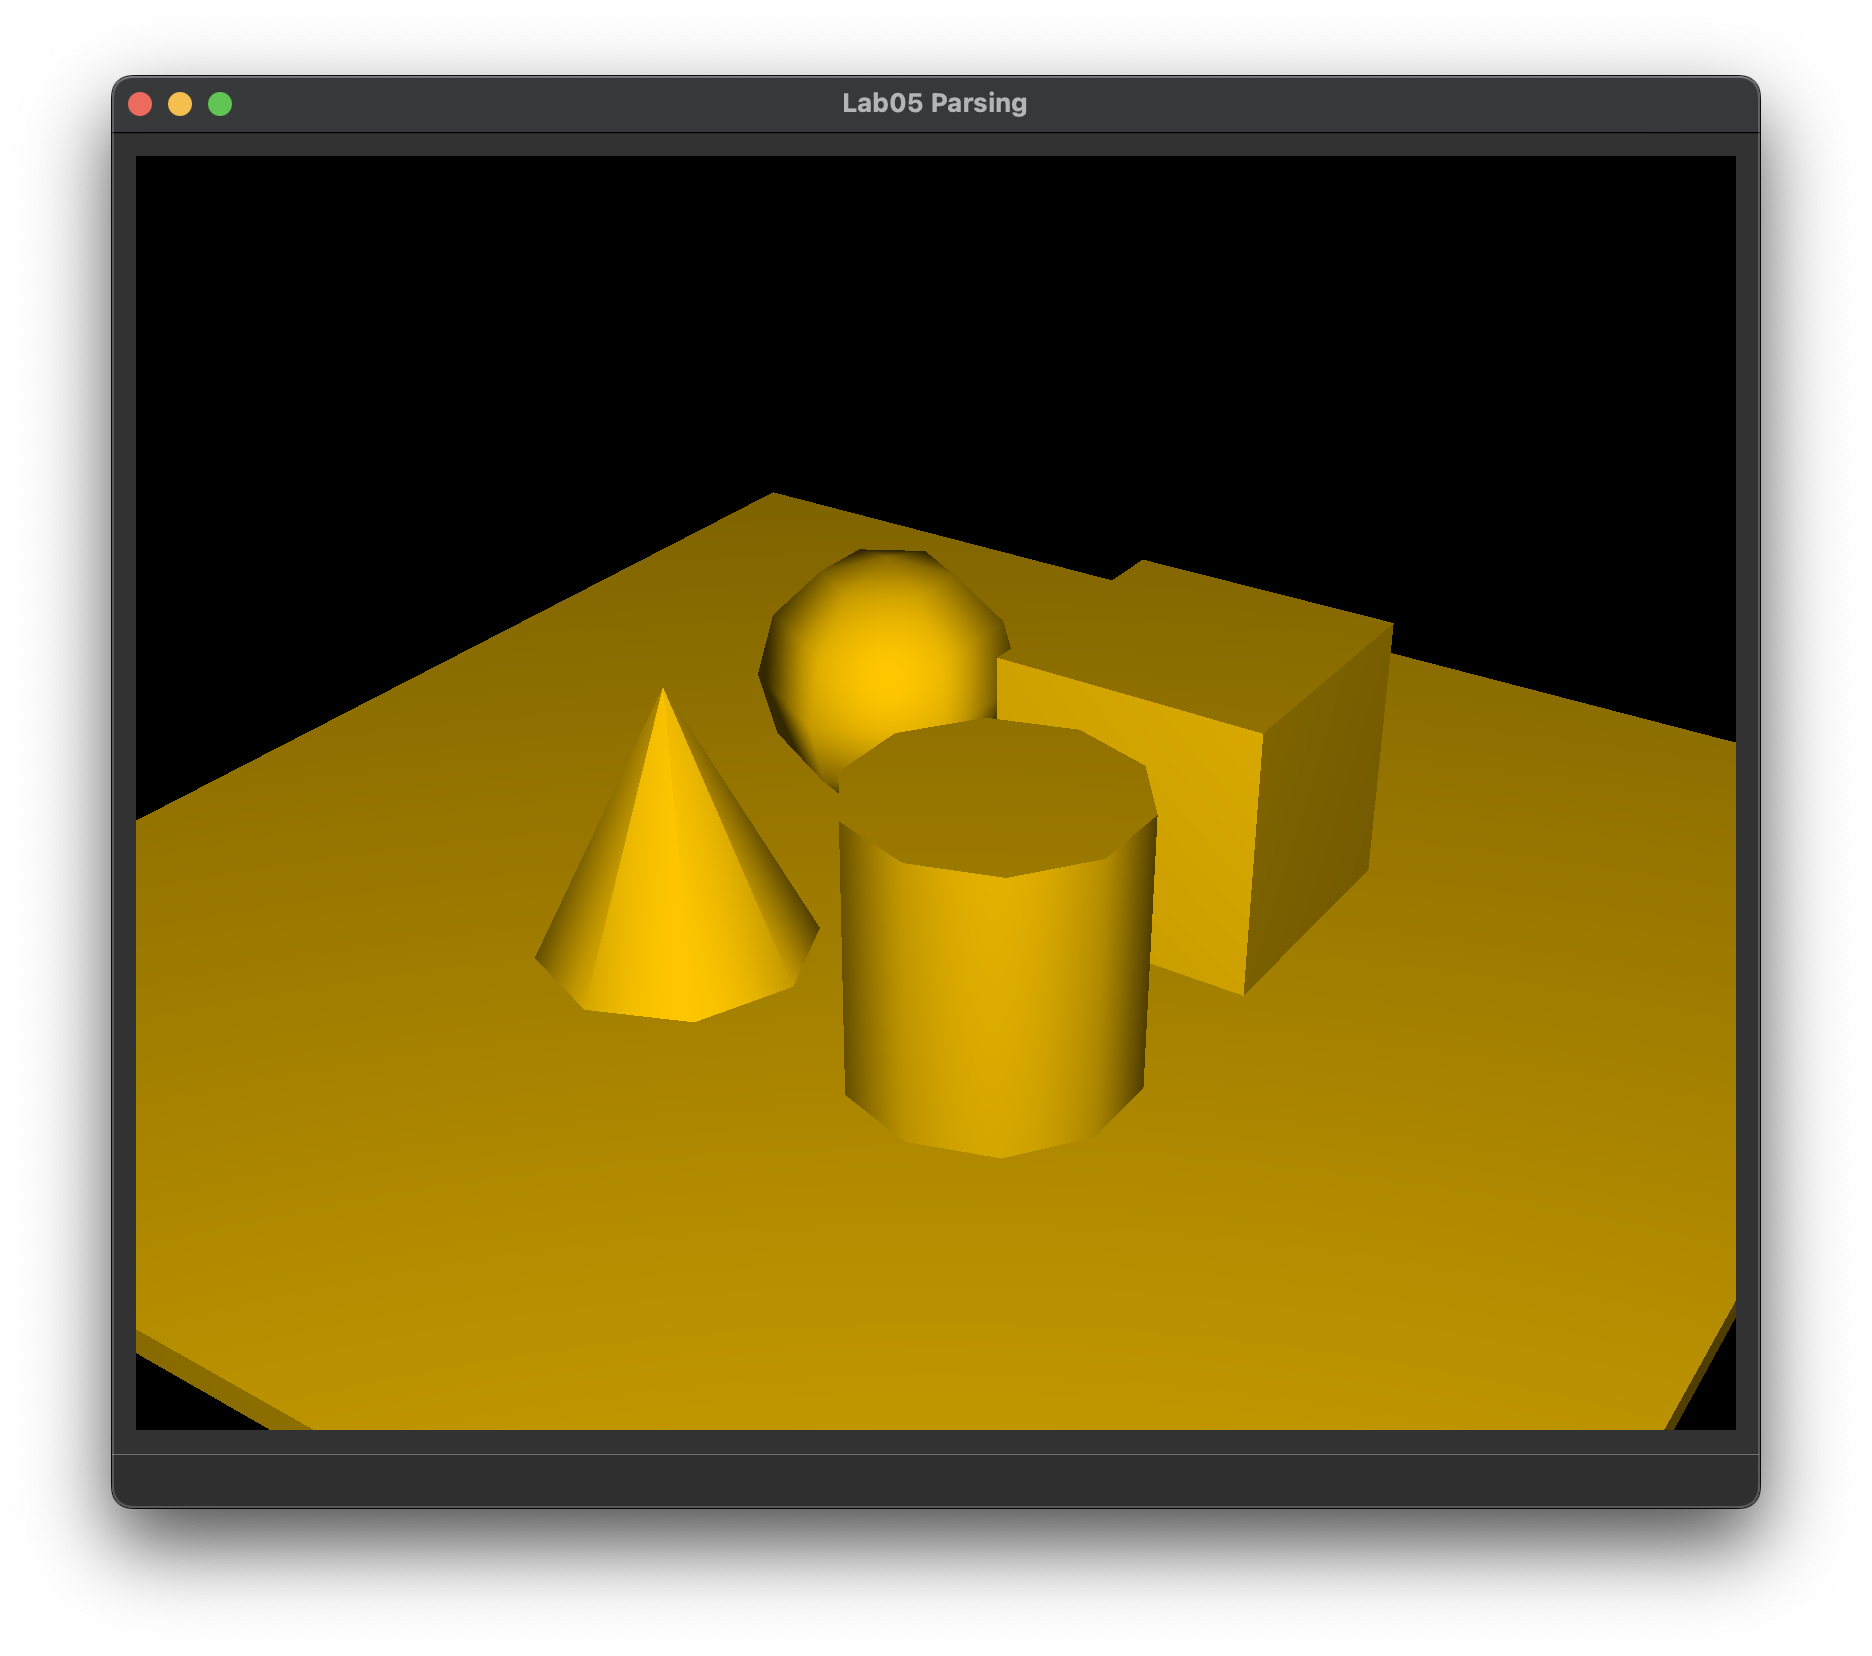
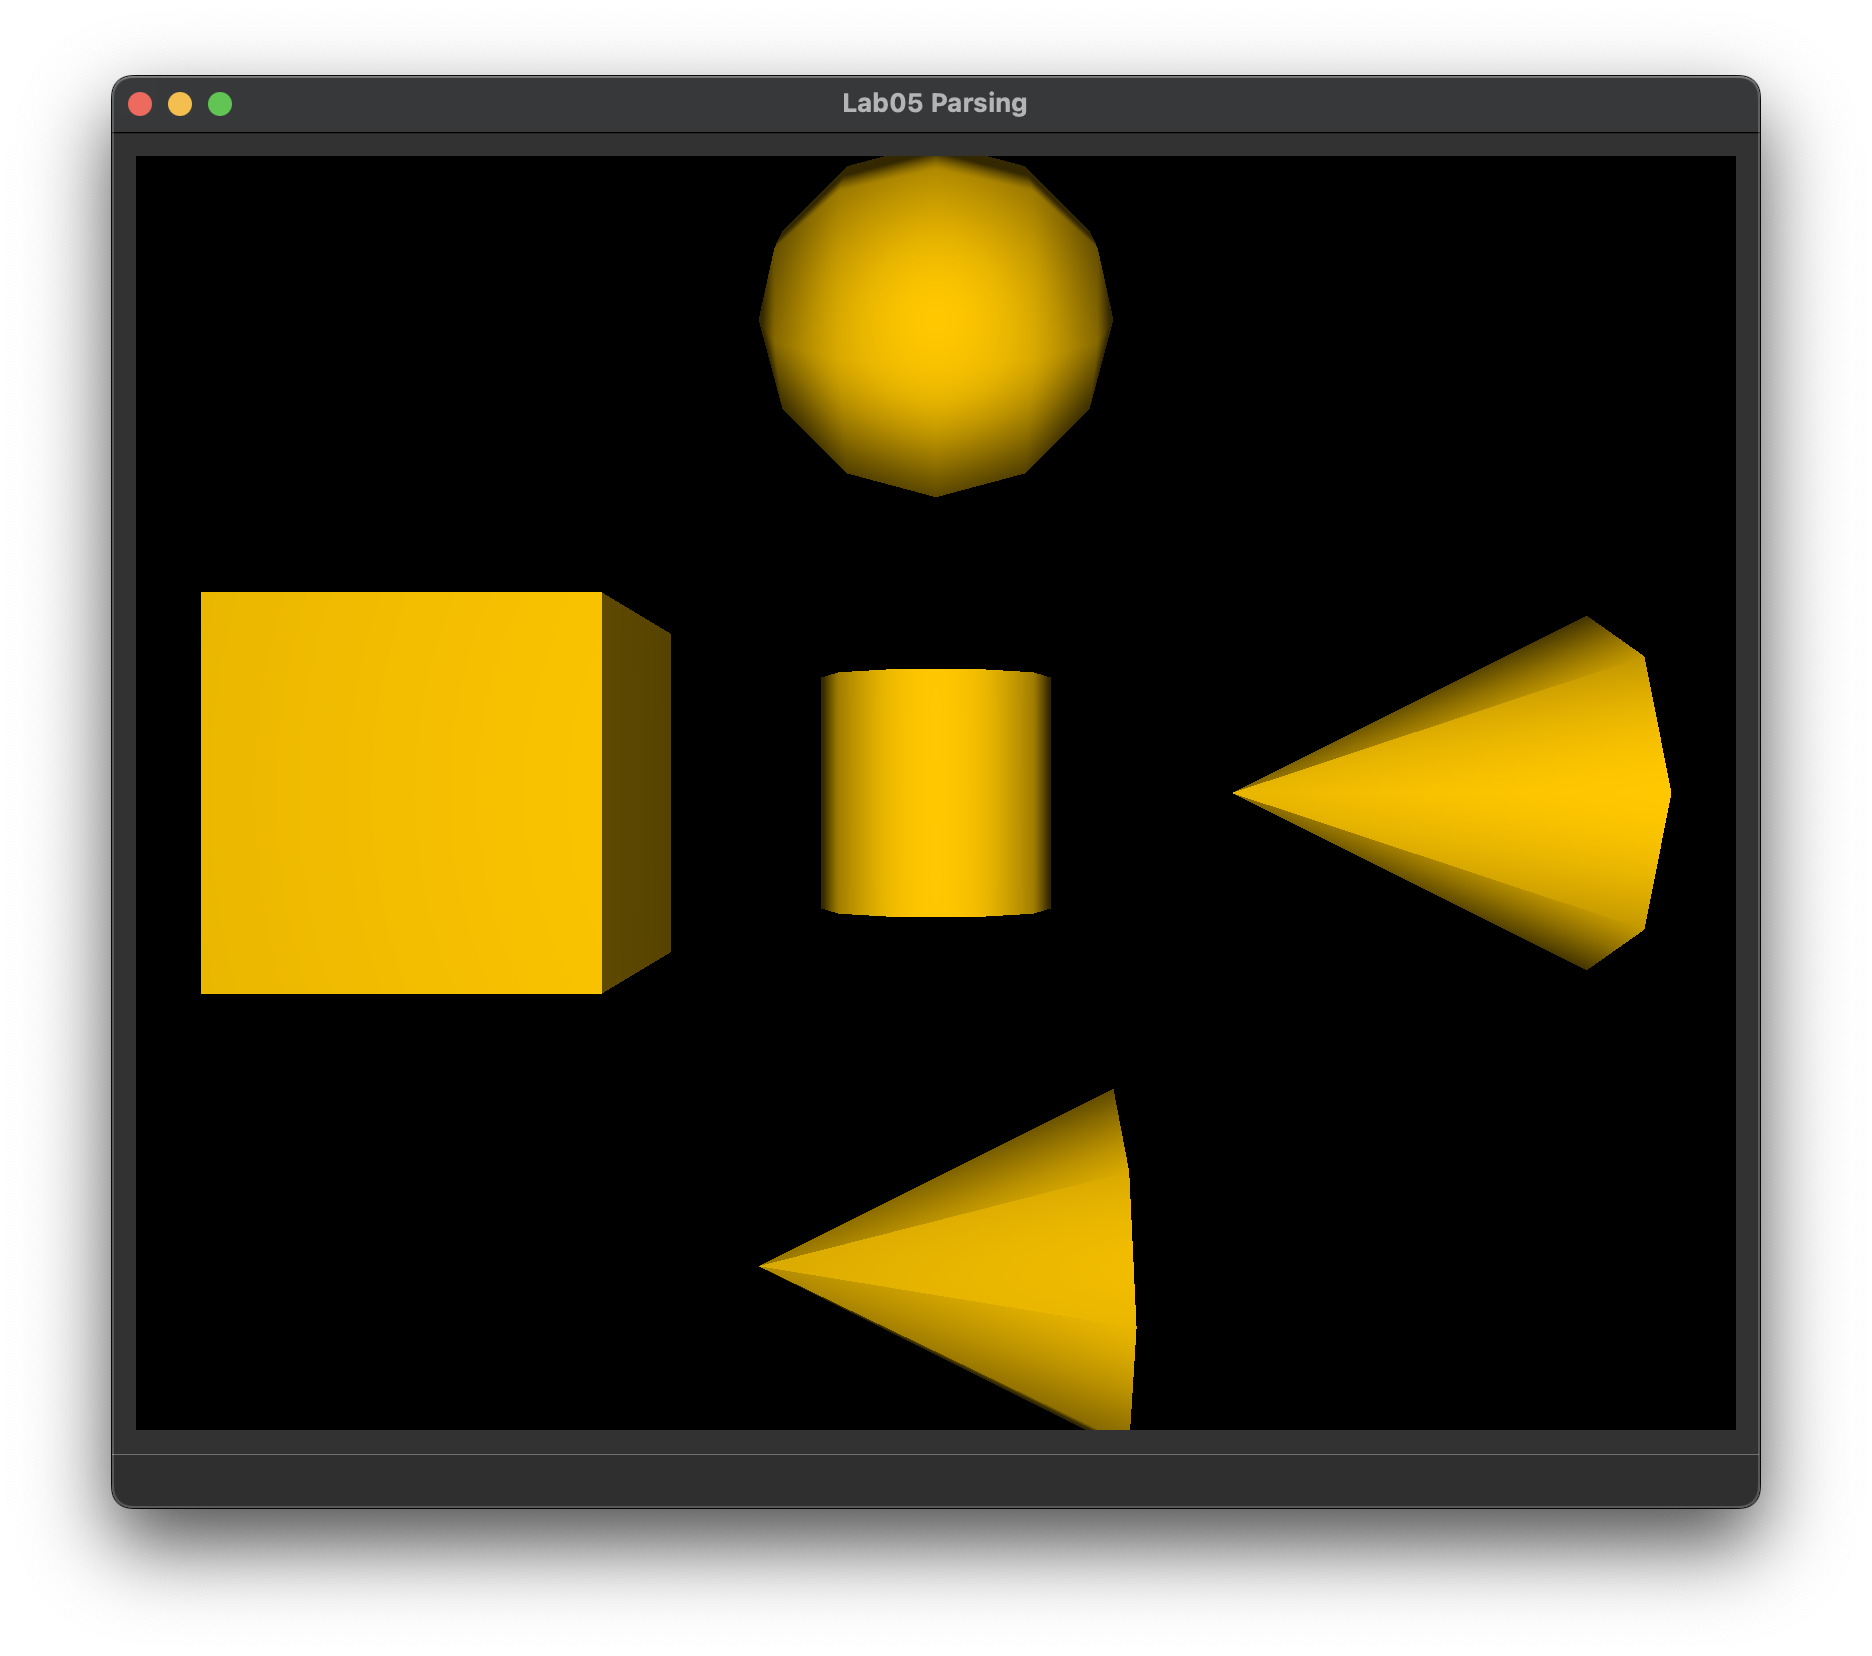
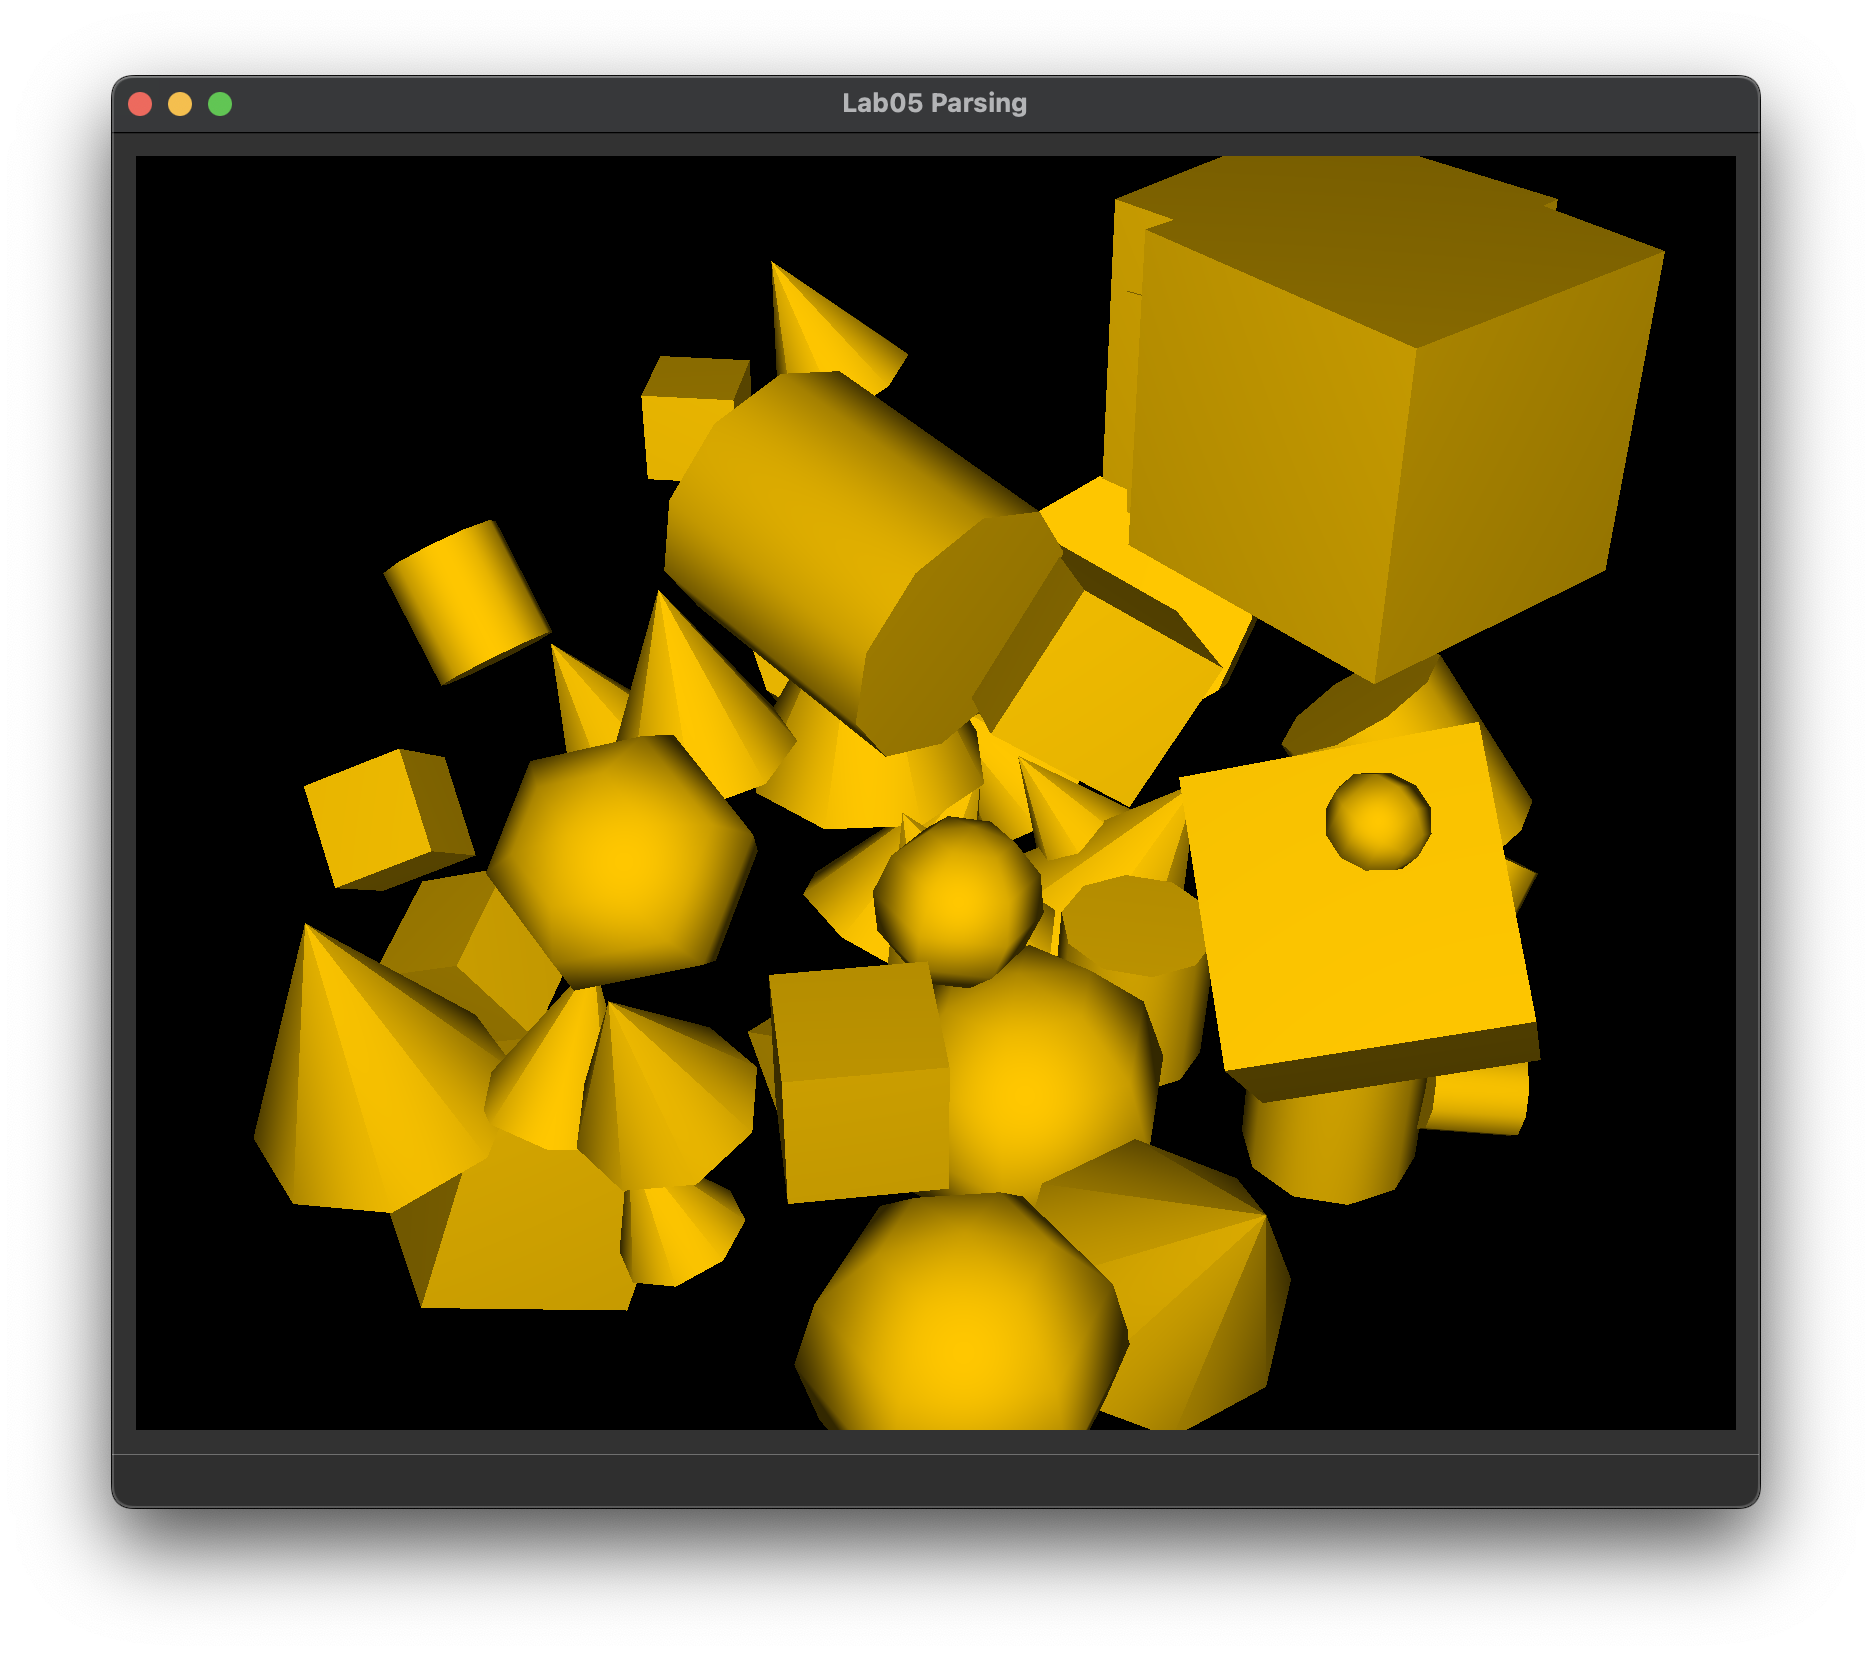
What you should see if your parser can load directional_light_1.json, ambient_total.json, and primitive_salad_1.json correctly.
Note: loading scenes into the window will help you test that your parser got the camera, primitives, and transformations right, but not necessarily the lights, since the shading done by our support code is very basic, and does not use the scene's lights.
Extra: Creating Your Own 3D Scene(s)
You might want to work with the scenefiles directly for a final project, in order to create your own 3D scenes.
Scene files are written using the JSON format, which our ScenefileReader reads for you.
You can refer to this lab for the conceptual aspects of scenefiles, but for the specifics of the JSON format, you should check out the dedicated page in the Docs tab.
End
Congrats on finishing the Parsing lab! Now, it's time to submit your code and get checked off by a TA. You should have your answers to all conceptual questions ready in your README.md file (tasks 1-3), show that task 4 prints out the correct sentences, and you should be able to show that your parser correctly loads scenes into the window.
Submission
Submit your GitHub link and commit ID to the "Lab 5: Parsing" assignment on Gradescope, then get checked off by a TA at hours.
Reference the GitHub + Gradescope Guide here.