Lab 9: VBOs & VAOs
Please put your answers to written questions in this lab, if any, in a Markdown file named README.md in your lab repo.
Introduction
Tip: There are a few tasks in this lab. Before you get started, take a look at the conceptual questions in section 9 and keep them in mind as you go through the handout!
Welcome to the world of OpenGL!
In the last lab, you learned how to construct vertex data for various shapes and put them into a container as continuous floats. What you didn't know is that this representation is actually how OpenGL stores its vertex data as well!
Objectives
- Understand what vertex buffer objects and vertex array objects are, and how to use them,
- Learn about per-vertex attributes and layouts, and
- Draw triangle meshes (which you have been creating in the last lab!)
Stencil Code
In this lab, you will be working primarily within the following files:
debug.h: Contains a namespace with a single functionglErrorCheckwhich you use in task 2.glrenderer.cpp: in particular, the functioninitializeGLwhich gets everything setup to render, and the functionpaintGLwhich is called "every" frame to perform the actual rendering.
We have already included the following functionality for you:
- A
shaderLoaderto read and compile the shader source files. - A default shader that is already loaded and bound/deleted in appropriate places.
- Setting up QT OpenGL context to draw in.
Getting Started With OpenGL
Be aware: in this lab, you will not be able to see any (meaningful) visual output until you complete the final drawing task.
In the code you wrote for the last lab, your mesh data was stored in C++ structures on the CPU. In this lab you will create OpenGL specific objects to both store and describe the data that can be used for drawing on the GPU.
These objects are: Vertex Buffer Objects (VBOs) and Vertex Array Objects (VAOs).
At the moment, you can think of a VBO as a dumb container, like a C++ vector or array: it doesn't have any semantic understanding of the data that it contains.
This understanding is provided by a VAO, which acts as a "translation manual". A VAO tells the GPU what data is in its associated VBO, and what format that data is in.
Despite VAO having "array" in its name, it is the VBO, and not the VAO, which is the array of per-vertex values.
Using The Khronos Documentation
When learning a new application programming interface (API), it's always good practice to explore its documentation.
APIs are described by their specifications, which tell you how they can be used. OpenGL is no exception: it is maintained by the Khronos group, which also provides extensive documentation on its functions (for all OpenGL versions).
The home page for the OpenGL 3.1 specification can be found here.
While our project stencil code is configured to use the newer OpenGL 4.1, all the OpenGL functions we will be using are contained within the OpenGL 3.1 spec.
Let's take a look at a function to see what the docs tell us about it!
Find the function glGetError() and open its documentation.
Pay attention to the different sections:
- The first section, Name, gives the function name along with a very short description of what it does. If you are trying to understand a new function, you will almost always have to dig deeper.
- The second section, C Specification, gives the type signature of the function in question.
- In cases where a function has input parameters, there will be an intermediate section titled Parameters which gives short descriptions of each input parameter and (occasionally) what values they can take on.
- The third section, Description, gives you much more information about how the function is used and sometimes information about the parameters in question (such as the OpenGL error enums as we see here).
- The fourth section, API Version Support, tells us in which OpenGL versions this function can be called. All of the functions we will require you to use in your labs and projects will be supported in OpenGL 3.1, but you may want to check this section if you use any other functions (e.g. for extra credit features).
While working on this lab (and all subsequent CS 1230 assignments), we strongly recommend having the docs open in another tab for reference. For each function we explain, we'll also link to their relevant page in the docs.
Debugging In OpenGL
In this section, you will be working in
debug.h.
Any time OpenGL is incorrectly used, instead of crashing the program, you might be presented with a blank screen with no error messages. That'd make it really difficult to debug things. Luckily, OpenGL does some work behind the scenes for us.
Each time OpenGL detects a function has been used incorrectly, it will set an error flag behind the scenes. But how do we know what error flags are currently set? In the previous section, you looked at the documentation for a function called glGetError. This function will return one of these stored error flags and clear it from storage. Unfortunately, the order in which flags are returned is random, so the best way to overcome this if you encounter errors is to check the flags and check them often.
In addition to this, each time you check for errors, it is important to call glGetError in
a loop until it returns GL_NO_ERROR indicating all errors have been cleared. In debug.h,
we have provided you the following function which does this:
inline void glErrorCheck(){
  GLenum error = glGetError();
  while(error != GL_NO_ERROR){
    std::cout<<error<<std::endl;
    error = glGetError();
  }
}
Feel free to use this header file in your OpenGL projects. You are not expected to understand namespace and inline; to use the glErrorCheck function in another file, just include this header file and call the function as Debug::glErrorCheck().
This function is very useful! However, if we call it multiple times in different locations throught our program, it can be difficult to determine which call is producing an error.
Let's change our function to take in a file name and line number so we can include that information when we print out errors:
Add two input parameters to the glErrorCheck function, the first being a const char* for the file name, and the second being an int for the line number. Edit the print statement to include this information to make the debug statements more descriptive (Include the file name and line number).
This is great, but it's a pain to manually type out the file name and line number every time we call the function. Luckily, C++ provides two preprocessor macros, __LINE__ and __FILE__, which get replaced at
compile time to an int of the current line number and char* of the current file name, respectively.
As such, each time you call this function, you could instead write:
Debug::glErrorCheck(__FILE__, __LINE__);
We can make this even simpler by using something called a preprocessor directive. A preprocessor directive is indicated by the use of a hash symbol in the beginning. You're already be familiar with at least one such directory: #include.
The preprocessor directive we will be using is called #define. This has a signature of:
#define identifier replacement
The way it works is that the preproccessor will replace every instance of the identifier in the code with what is put in the replacement.
After defining our glErrorCheck function, add the following preprocessor directive:
#define glErrorCheck() glErrorCheck(__FILE__, __LINE__)
Now we can call the function with no arguments (just as we did originally), and the preprocessor will do the tedious work of writing in the arguments for us.
The OpenGL State Machine
For the rest of this lab, you will be working in
glRenderer.cpp.
Instead of defining a bunch of instances of objects and calling methods on them directly, OpenGL functions as a state machine. This means that it keeps track of some overarching meta-object with different settings and conditions which affects every operation it performs. In OpenGL, this meta-object is called the context. Thus, you will have to change your programming mindset when working with OpenGL functions.
There are 2 "genres" of functions you will work with:
- State-Setting: a function which changes the state of the current OpenGL context.
- State-Using: a function which uses the current state parameters in order to achieve an output.
Just like how action and comedy came together to bring us the Spy Kids film franchise, these function "genres" are NOT mutually exclusive: some functions will do both state setting and state using.
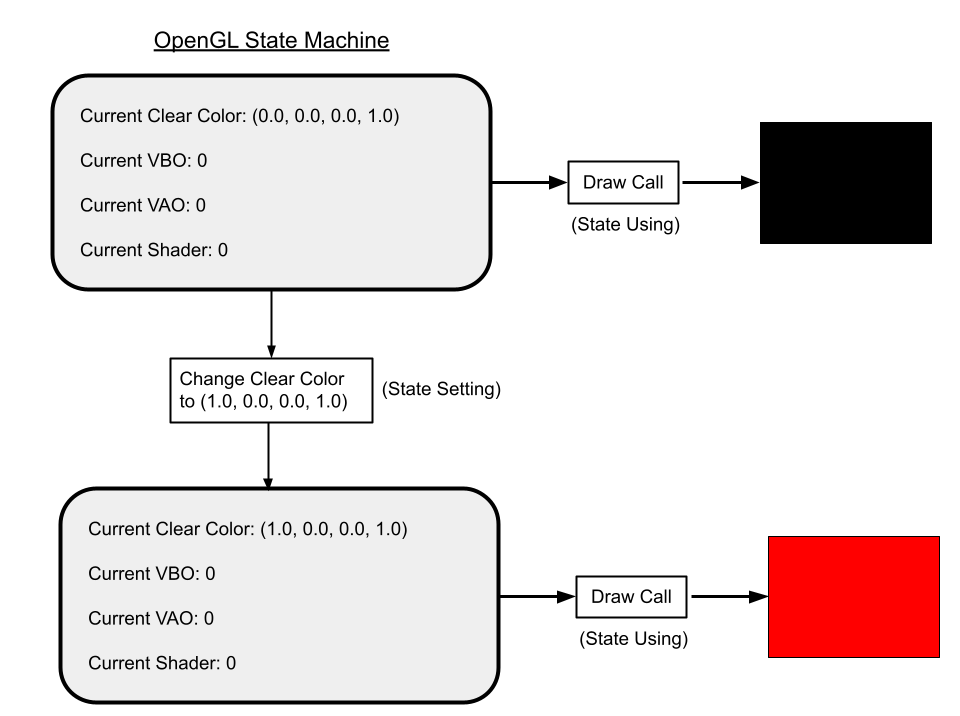
Visualization of the OpenGL State Machine. Here, we show how using the state setting function glClearColor
changes the state of the context, and how using the state using function glClear uses the state of the
context to clear the screen to a particular color.
It is important to be careful about managing OpenGL's state during the execution of your programs. There are two strategies for this:
- Assume Nothing: When writing a function that uses OpenGL, consider that the state could be anything. Explicitly set the values of the state parameters you depend on.
- Default Configuration: Decide on a set of reasonable default state values, and set the state to these values at the start of your application. Anywhere you change one of these state parameters, restore the parameter to its previous value after you're done rendering a component of the scene.
For the purposes of these labs, we will primarily be using the second option.
Search the docs for the glClearColor function and call it at the start of initializeGL() to set our default state and change the background color to anything you like! Run the program to see what it does.
Qt Creator OpenGL functions
Before continuing, with knowledge of what the OpenGL state machine or context is, we can now greater understand Qt's inner workings and some of its OpenGL-specific functions.
intializeGL
This is called once near the start of the program after the constructor of glrenderer.cpp has been called. It also is called before the first call to paintGL(). However, you cannot use any draw calls in this function. Rather, we use it to initialize any OpenGL related information we may need, after the GLEW initialization calls as commented.
What is GLEW?
GLEW (GL Extension Wrangler Library) is an extension loading library. Its purpose is to determine at run-time which OpenGL features are available (version and extensions) and to load function definitions from your graphics driver for you to use.
paintGL
This is called whenever the OpenGL context changes, i.e. when you make some state-altering OpenGL call. This is an optimization Qt makes to not redraw a screen that isn't any different than before.
Vertex Buffer Objects
Shapes in OpenGL are broken down into a collection of triangles, each of which is defined by three vertices. So far, we have been processing all of our scene data on the CPU, but in order to draw using OpenGL, we need to send a list of vertices to the GPU. We'll use Vertex Buffer Objects (VBOs) to do this.
Creating A Vertex Buffer Object
Let's jump straight in by creating a VBO!
Generate a single VBO in initializeGL() and store its ID in m_vbo. You may find the
following function useful:
void glGenBuffers(GLsizei n, GLuint *buffers);
n: the number of vertex buffer objects to create. The type GLsizei is an OpenGL alias indicating it is an integer representing some size
buffers: the pointer this function will fill in with an ID for the generated buffer. This way you can refer to it later by the same stored ID. Multiple buffers can be filled in using a pointer to the first element of an array of sufficient size or some pointer followed by sufficient allocated space. GLuint is an OpenGL alias for an unsigned int.
Adding Data
Binding A VBO
Congratulations, you have made a VBO! But…it currently holds no data! Let's fix that. As said before, OpenGL is a state machine, so in order to interact with our created buffer, we need to bind it to the current state.
In initializeGL(), bind your previously created VBO. You may find the following function
useful:
void glBindBuffer(GLenum target, GLuint buffer);
target: an enum indicating which type of buffer you are binding. For our purposes, useGL_ARRAY_BUFFER.
buffer: the ID of the buffer that should be bound (hint: remember the GLuint we created in the last step?).
Now our state is all set up to transfer data into our buffer container!
Before we do this, we actually need some data to put inside. Let's construct a std::vector that represents a single triangle.
Defining A Triangle
A triangle is defined by 3 vertices. For now, let's assume that these vertices carry information only about their position. In in the last lab you worked with vertex normals, and later in this lab, you will learn about even more attributes that vertices can have.
As a reminder: in OpenGL, the screen is defined as in the image below:
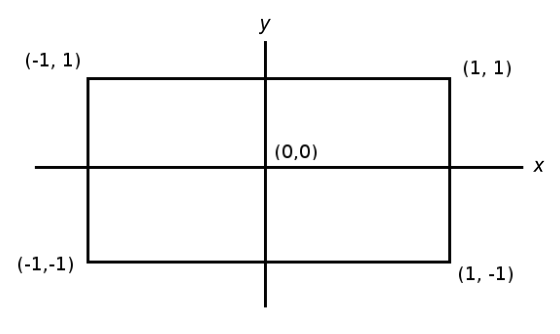
Pick 3 points that would make a nice triangle. Set the z values for all of these points to 0.
Remember that in OpenGL, triangles are defined with vertices ordered counter-clockwise. Revisit lab 8 if you need to
Putting Data Into A VBO
Now how will we actually put this information into our VBO? Let's take a look at the function to do so first:
void glBufferData(GLenum target, GLsizeiptr size, const void *data, GLenum usage);
target: This is the same argument seen inglBindBuffer.
size: the size, in bytes, of the input data array. Something likesizeof(GLfloat) * data.size().
data: a pointer to the first element of the input data array. If you are using anstd::vector, be sure to use its.data()method to get this pointer!
usage: an OpenGL enum representing how the data will be used. For our purposes, the usage parameter should beGL_STATIC_DRAWwhich indicates we don't expect to change the data, so OpenGL can make optimizations based on that.
Lets take a closer look at the data parameter. The function expects a pointer to an input data array, but we don't have that array yet! Let's use a std::vector to construct our data container. In OpenGL, rather than separating out values for each individual vertex, it expects all of them mashed together into one contiguous collection (as you did in the previous lab). The VAO (which you will learn about soon) keeps track of where the attributes are for us!
In initializeGL(), construct a std::vector<GLfloat> containing your three triangle points in a contiguous
series of floats.
What is GLfloat?
Because some data types are inconsistent in size across different operating systems, OpenGL likes to standardize them with its own custom types. In OpenGL, GLfloat will always store 4 bytes of data.
To obtain the pointer required by the data argument to glBufferData, we can use the data() method of the std::vector
object. This will return a pointer to the first element as needed.
For size, while we can manually input the size of our data, it is much easier
to let the program calculate that for us. The size of our data is going to be equal to:
We can compute the first part using std::vector methods. For the second part,
we can take advantage of the sizeof() function and pass in the data type stored
in our vector (e.g. sizeof(GLfloat)).
In initializeGL(), pass a triangle's worth of data into your VBO.
Vertex Array Objects
Right now we have we have a mashed up array of vertex data that OpenGL isn't sure how to parse. To solve this we will use a VAO or Vertex Array Object which will tell OpenGL the structure of our data.
Vertex Attributes
At the moment, the only data we have cared about is the position of each vertex. But each vertex can have many more attributes than just its position. Consider colors, texture coordinates, or (as you saw in the previous lab), normals. It is our job to tell OpenGL what attributes we care about and where to find them in the VBO.
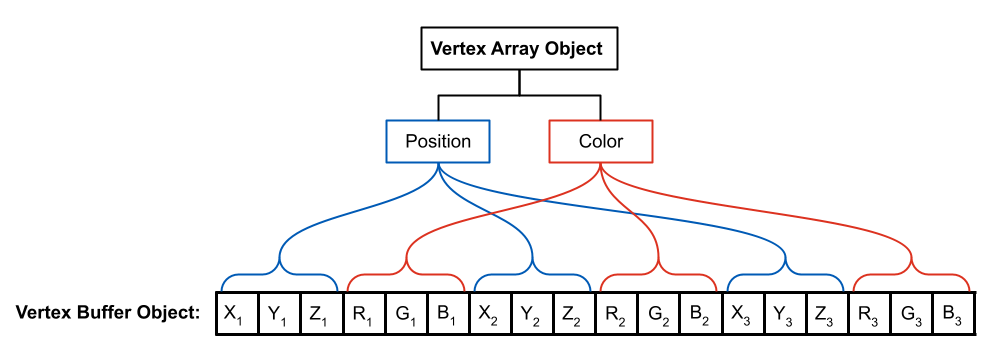
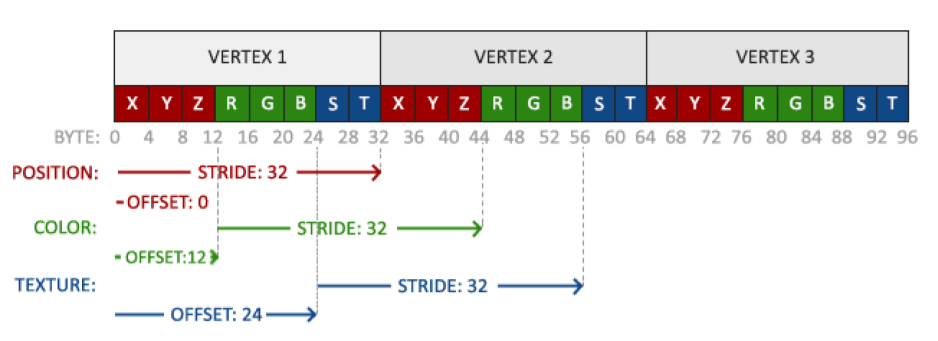
Consider again this figure, which shows a data layout containing positions and colors interleaved:
Add colors of your choosing as RGB values (no alpha value!) to each vertex and integrate them into your previous triangle data vector in initializeGL().
Does your std::vector look familiar?
It should! This is the same format of data we worked with in the last lab. Without knowing it, you were actually creating VBO/VAO-ready data with position and normal attributes--keep that in mind when working on the project.
Creating A VAO
Now let's tell OpenGL that we have this extra attribute by making a VAO!
In initializeGL(), generate a single VAO and store its id in m_vao. You may find the following function useful:
void glGenVertexArrays(GLsizei n, GLuint *arrays);
n: the number of vertex array objects to create.
arrays: the pointer this function will fill in with an ID for the generated array. Similarly toglGenBuffers, you can also fill in an array or segment of continuous memory with pointers to multiple vertex array objects.
Binding A VAO
Next, to actually use this VAO, we need to bind it.
In initializeGL(), bind your VAO. You may find the following function useful:
void glBindVertexArray(GLuint array);
array: the ID of the VAO we wish to bind
Utilizing A VAO
Now that the VAO is bound, we can actually use it to let OpenGL know the structure of our VBO.
For each attribute, we need to do two things:
- Let OpenGL know we are identifying an attribute and which one
- Specify the location and layout of the attribute in the VBO data.
For the first part, we rely on the following function:
void glEnableVertexAttribArray(GLuint index);
index: the index of the attribute we are identifying. By index, this does not refer to an index into our data vector. Rather, this is just some unique unsigned integer we use to identify each attribute. We pick this value ourselves; in the next lab, Shaders, you will see how we use this index when doing shader programming. In this lab, because we have written the shaders for you, we have assigned position to have index 0 and color to have an index of 1.
For the second part, we use a more complex function:
index: the same index as used inglEnableVertexAttribArrayabove.
size: the length of one vertex's instance of this attribute, not the size in bytes. For a position (consisting of 3 floats), this would simply be3. For an attribute that has 5 ints, this would be5.
type: the type of variable used for each component in the attribute. For GLfloats, this would beGL_FLOAT.
normalized: this parameter has to do with the types you use as data and whether you need to scale their values; for now, just useGL_FALSE. If you wish to know more, OpenGL specifies that having normalized set to GL_TRUE will convert any signed values to range [-1, 1] and any unsigned values to the range [0, 1]. This may be useful for converting a uint8_t to floating point representation for example.
stride: the size, in bytes, between two vertices. E.g. for position, this would be the distance (in bytes) between the x coordinate of the position of the first vertex and the x coordinate of the second vertex.
offset: the offset, in bytes, of the first vertex's instance of the attribute in the array of data. For example, in figure 6 below, the offset of the color attribute is3 * sizeof(GLfloat). We strongly reccomend to leave the offset in (length of data) * (size of data) format to stay organized. Important: To cast this offset into avoid *(as expected by this function), we need to usereinterpret_cast<void*>().
What is GL_FLOAT?
GL_FLOAT is a built in OpenGL enum that is used in gl functions as an argument indicating a type of GLfloat. It should not be used as a type itself! Read more here about OpenGL types.
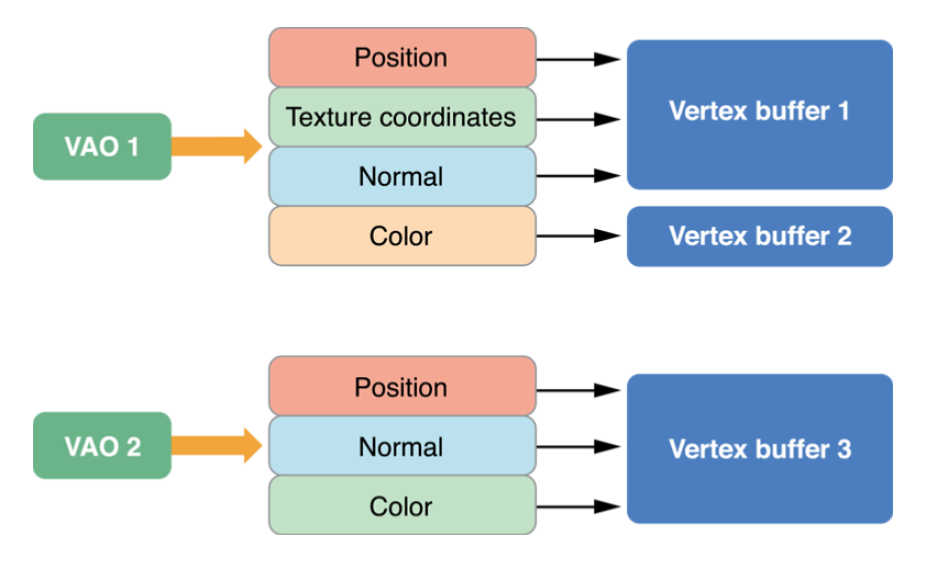
Note: These two functions (glEnableVertexArrayAttrib and glVertexAttribPointer) will assume they apply to whichever VBO is currently bound, so be careful of your state when using them. In fact, you can store separate attributes of the same object in different VBOs and link them together with a single VAO, as in figure 7 below:
Add the two attributes of position and color to your VAO in initializeGL().
Then verify that you have the correct parameters with our verifyVAO() function that we have provided for you.
For example if your triangleData contains:
[
Then your VAO should know how to parse the vector to only get the data it needs.
For Position:
[
For Color:
[
How do I use verifyVAO()?
If, for example, you have the following call:
glVertexAttribPointer(0, 2, GL_FLOAT, GL_FALSE, 4, reinterpret_cast<void*>(0));
Then to verify that OpenGL is interpreting the VBO the way you intended, you would call verifyVAO() with the same arguments:
verifyVAO(triangleData, 0, 2, 4, reinterpret_cast<void*>(0));
Note: While it seems counter intuitive to write extra code or functions to debug an issue, it can sometimes save you hours when dealing with more complicated problems! We have provided the
verifyVAO()function as an example of a sanity-check function that you may implement in the future to help you debug OpenGL issues.
Unbinding Objects
Earlier, we discussed common approaches to handling the OpenGL state machine. Here, we will implement these ideas by keeping a common default state set. When we started, VBO and VAO IDs 0 were bound, which means no VBO or VAO was bound. Let's return to that starting condition before we exit the initializeGL() function.
Unbind your VBO and VAO at the end of initializeGL(). To do so, bind ID 0.
Drawing In OpenGL
Drawing Overview
Now, you're ready to draw the triangle you worked so hard to create.
Here are the general steps you ought to follow. In this lab and for the projects, this will be done in paintGL:
- Clear the screen using
glClear(GL_COLOR_BUFFER_BIT | GL_DEPTH_BUFFER_BIT) - For each shader you want to use:
- Bind the shader using
glUseProgram(GLuint program); - For each VAO you want to draw with the current shader:
- Bind the VAO
- Draw using
glDrawArrays(GLenum mode, GLint first, GLsizei count) - Unbind the VAO
- Unbind the shader using
glUseProgram(0);
- Bind the shader using
Notice how all operations using a specific shader or VAO are surrounded by a bind and an "unbind" call!
You will only be responsible for step 1 and steps 2.b.i through 2.b.iii. Since we're using just one shader and one VAO (in this lab), we can collapse this into a linear sequence of steps:
In paintGL(), before glUseProgram(), clear the screen.
In paintGL(), after glUseProgram(), bind our VAO.
The glDrawArrays Call
Now let's actually draw the VAOs.
In the middle of paintGL, draw our triangle. You may find the following useful:
void glDrawArrays(GLenum mode, GLint first, GLsizei count);
mode: the type of primitive to render. In all of our assignments in CS 1230, we'll useGL_TRIANGLES.
first: the starting index for OpenGL to look in our VBO (this will usually be0).
count: how many vertices to draw.
After drawing the triangle in paintGL, return to default state by unbinding our VAO.
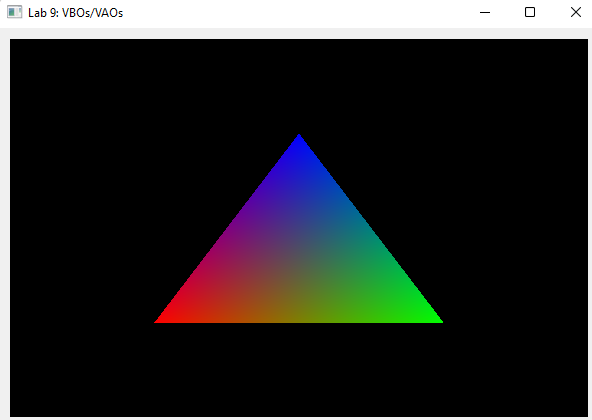
At this stage, you finally will be able see an iconic rainbow triangle somewhat similar to this:
Memory Management
So far, by calling glGenBuffers() and glGenVertexArrays(), we have allocated space to store our data and objects. This memory is not automatically freed when it goes out of scope.
To free this memory (and avoid memory leaks), we must call on the various "glDelete()" functions at our disposal. In this lab, we'll use two of these:
glDeleteBuffers()which applies to VBOs, andglDeleteVertexArrays()which applies to VAOs.
In general, all "glDelete()" calls follow the following pattern:
void glDelete_______(GLsizei n, const GLuint *object);
n: how many of the object to delete.
object: a pointer to the object being deleted. Or, as we could create multiple within an array or continuous segment of memory, the pointer to the beginning of this memory can also be passed in.
In finish(), free your VBO and VAO memory.
Conceptual Understanding Check
Using OpenGL functions and managing its current state can be a big change from what you're used to working with in CS1230 so far. Check your conceptual understanding before starting Project 5 by answering the following questions.
- In your own words, in 1-2 sentences each, describe what a VBO and VAO is used for.
- List out the steps you need to take to pass an array of data to the GPU using a VBO and VAO. You can describe this in words or with pseudocode (don't just copy and paste the code you used in the lab!), and you shouldn't need many more than 10 steps to do this.
- What should you remember to do with your VBO and VAO in your
finish()function to avoid memory leak problems? - Why should we remember to also unbind our shader and VAO every time we bind it? (Recall the two strategies for managing OpenGL's state mentioned in the handout, and think about which one we use.)
Remember to put your answers in the README.md for this lab.
End
Congrats on finishing the VBOs & VAOs lab! Now, it's time to submit your code and get checked off by a TA.
Submission
Submit your GitHub link and commit ID to the "Lab 9: VBOs and VAOs" assignment on Gradescope, then get checked off by a TA at hours.
Reference the GitHub + Gradescope Guide here.