Lab 1: Setup & C++
Please put your answers to written questions in this lab, if any, in a Markdown file named README.md in your lab repo.
Introduction
Welcome to CS 1230!
The purpose of this lab is twofold: to set you up with what you'll need to work on assignments locally, and to ease you into C++, the programming language we'll be using in this course.
If you have any questions or run into any issues, please let us know over Ed or during TA hours. We'll do our best to help!
Objectives
- Complete our Getting Started form,
- Install Qt & Qt Creator locally on your computer,
- Build and run a starter Qt program using the Qt Creator IDE, and
- Learn about the basics (and subtleties) of C++.
Getting Started
We assume that you're already familiar with using Github Classroom to accept assignments, Ed to ask questions, and Gradescope to submit work. If you need a refresher on any of this, check out this page.
Please fill out our Getting Started form as you complete the steps below:
- Read our course's collaboration policy,
- Join the CS 1230 Ed discussion page (sign-up link),
- Enroll in this course over on Gradescope using our entry code,
K3387G, - Accept this lab's assignment from Github Classroom, and
- Clone the resulting repository to your local machine.
At this point, you should have a copy of this lab's repository. All set? Let's get started!
Qt and Qt Creator
In CS 1230, we will be using Qt and Qt Creator to develop, build, and run all our projects and labs. Before we walk you through how to install them to your local machine, here's a brief description of each:
- Qt is a software used for building graphical user interfaces (GUIs) and cross-platform applications, e.g. for smart TVs or in-vehicle displays.
- Qt Creator is an integrated development environment (IDE) included with each Qt install. It provides useful tools for developing in C++, which you'll learn about later in the course.
We will be using Qt 6.2, which is a long-term support version. As for Qt Creator, any version is fine—it'd be easiest to just use the one that comes with your Qt install.
But I'd rather work in VS Code / Emacs / Notepad++ / etc, instead of in Qt Creator!
If you know what you're doing, you may certainly write code in your IDE of choice. In the past, students have successfully used other IDEs for writing code, before using Qt Creator to build and run their projects.
That being said, the CS 1230 course staff will be using Qt Creator to grade your assignments. Thus, you'll probably want to install Qt Creator anyway, if only to test that your code works as expected when running with it.
Installation
If you're using a department machine, skip this section. Simply open a terminal and run the following to open Qt Creator:
qtcreator
Qt and Qt Creator will take up ~3GB of space in total.
Warning for students using MacOS
Before start installing Qt, please first use the following command to check whether you have Xcode Command Line Tools installed.
xcode-select -p
If your console outputs the following, which means that you have already installed some version of Xcode, you are good to continue.
/Applications/Xcode.app/Contents/Developer
Otherwise, please follow our Xcode CLT Installation Guide before proceeding.
Instruction | Screenshot (click to expand) |
|---|---|
| Download and open the appropriate Qt installer for your operating system from the Qt installer page. |  |
| Follow the instructions on the installer to create a free Qt account (or use an existing one). |  |
When prompted, opt for a Custom Installation. | 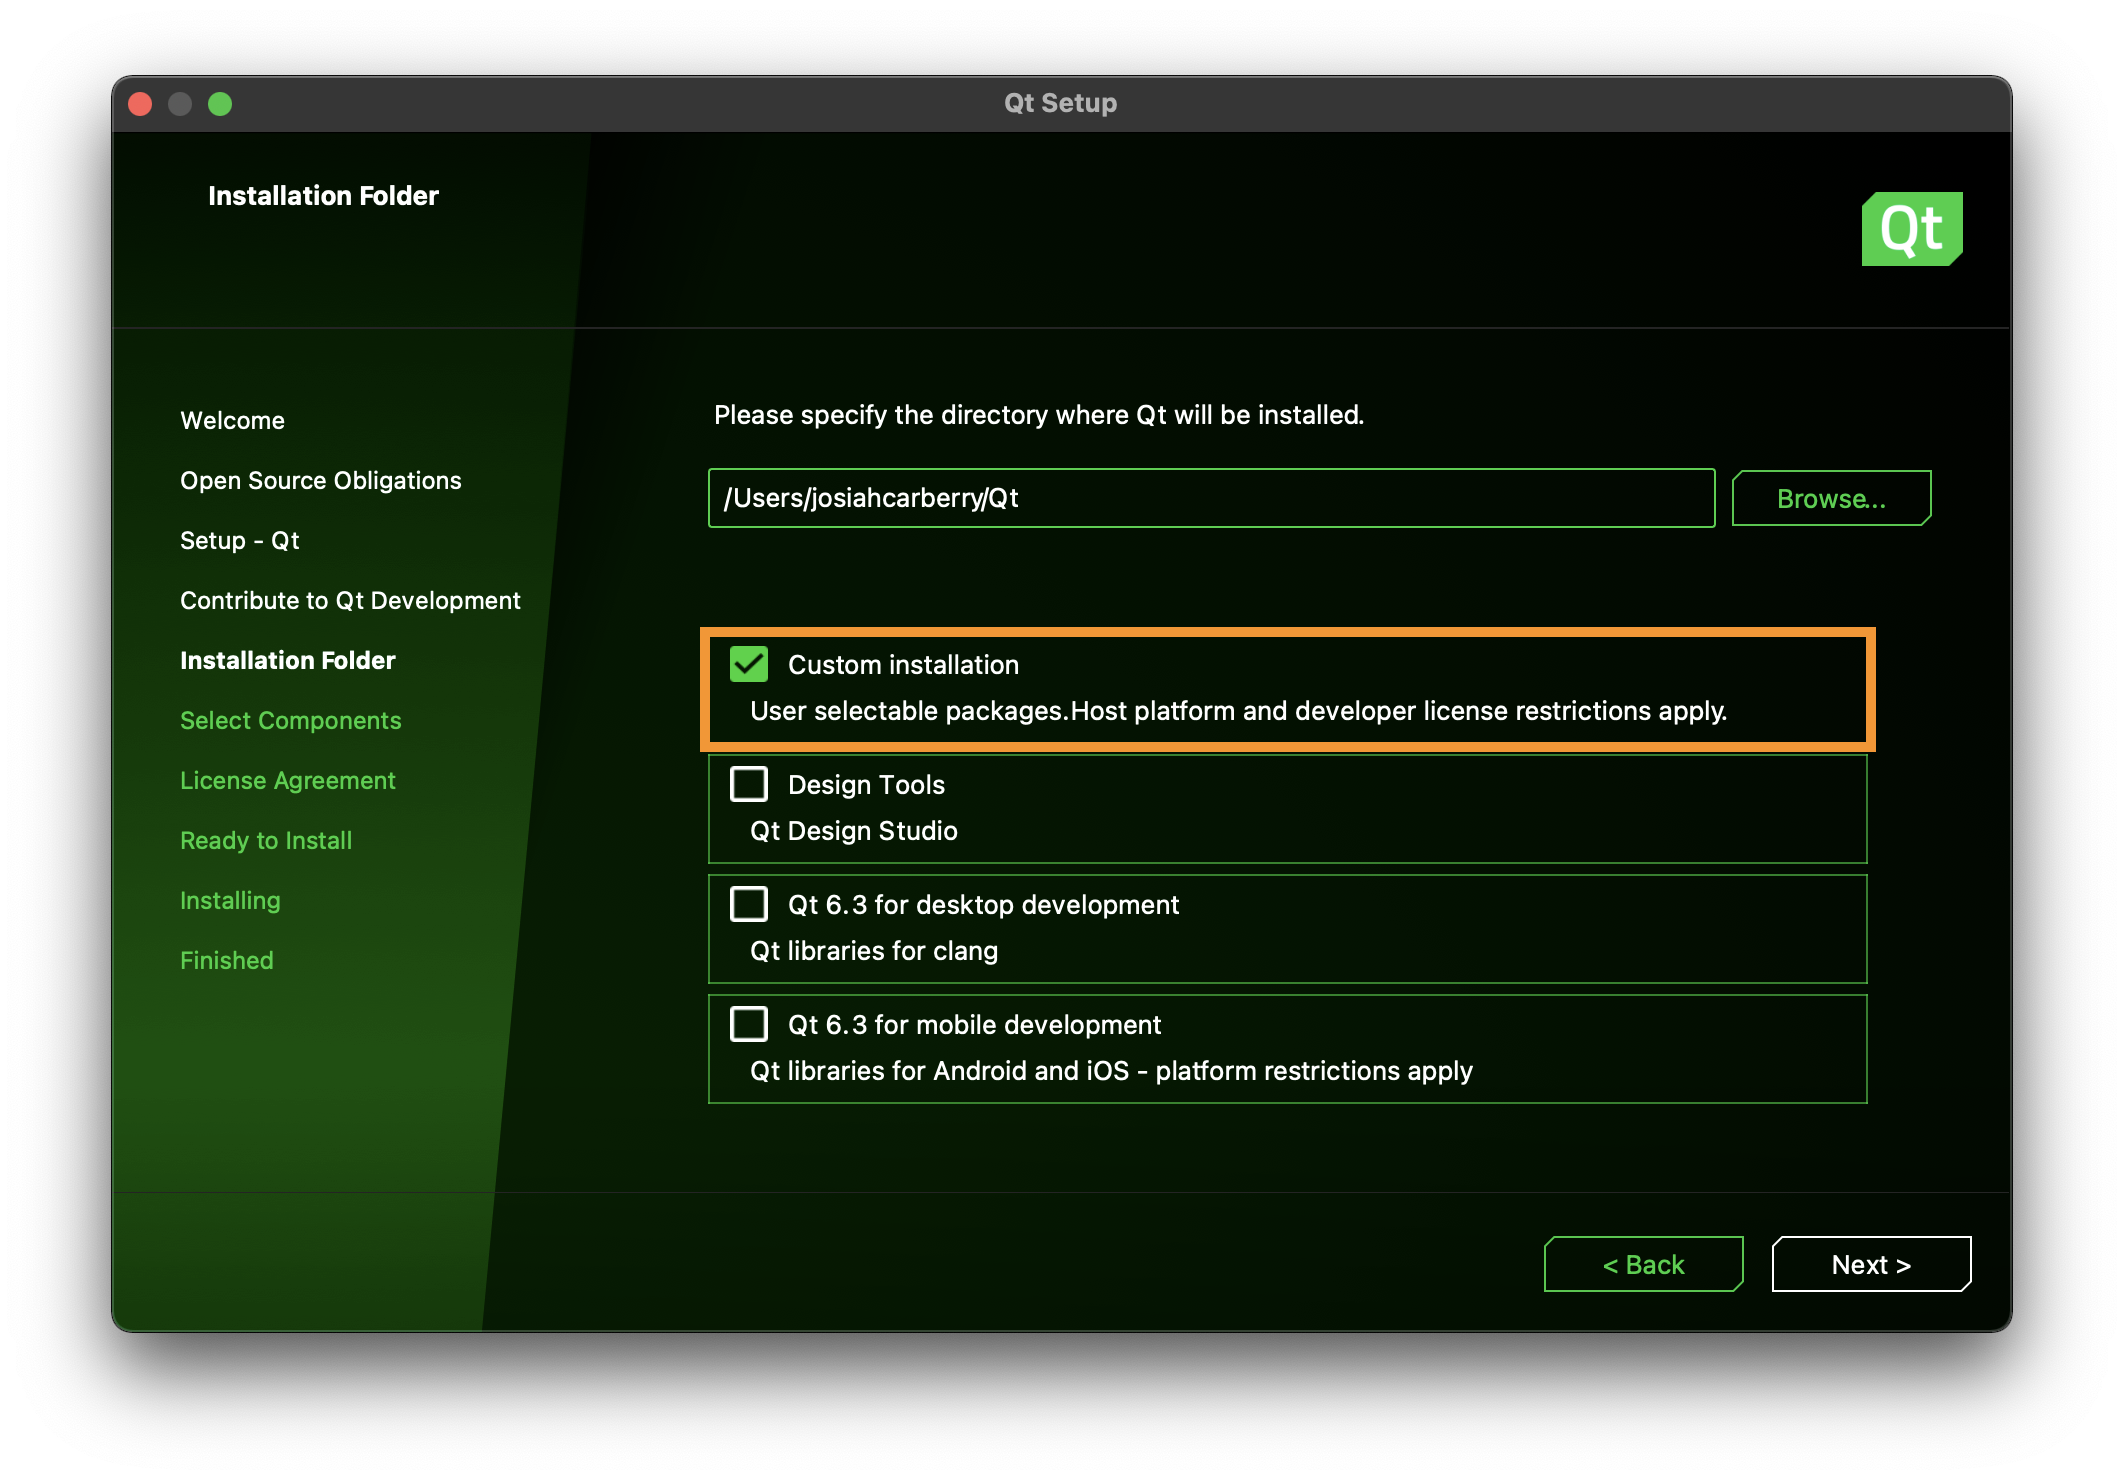 |
| On the next page, select (at least) these three: 1. Qt 6.2.4 > MinGW [...] (Windows) or Qt 6.2.4 > MacOS (MacOS),2. Dev. and Designer Tools > CMake [...], and3. Dev. and Designer Tools > Ninja [...].Note 1: Qt Creator will be installed as well. You do not have to select it. Note 2: you may opt to install more components, but be warned that this will take up a lot more space on your machine! | 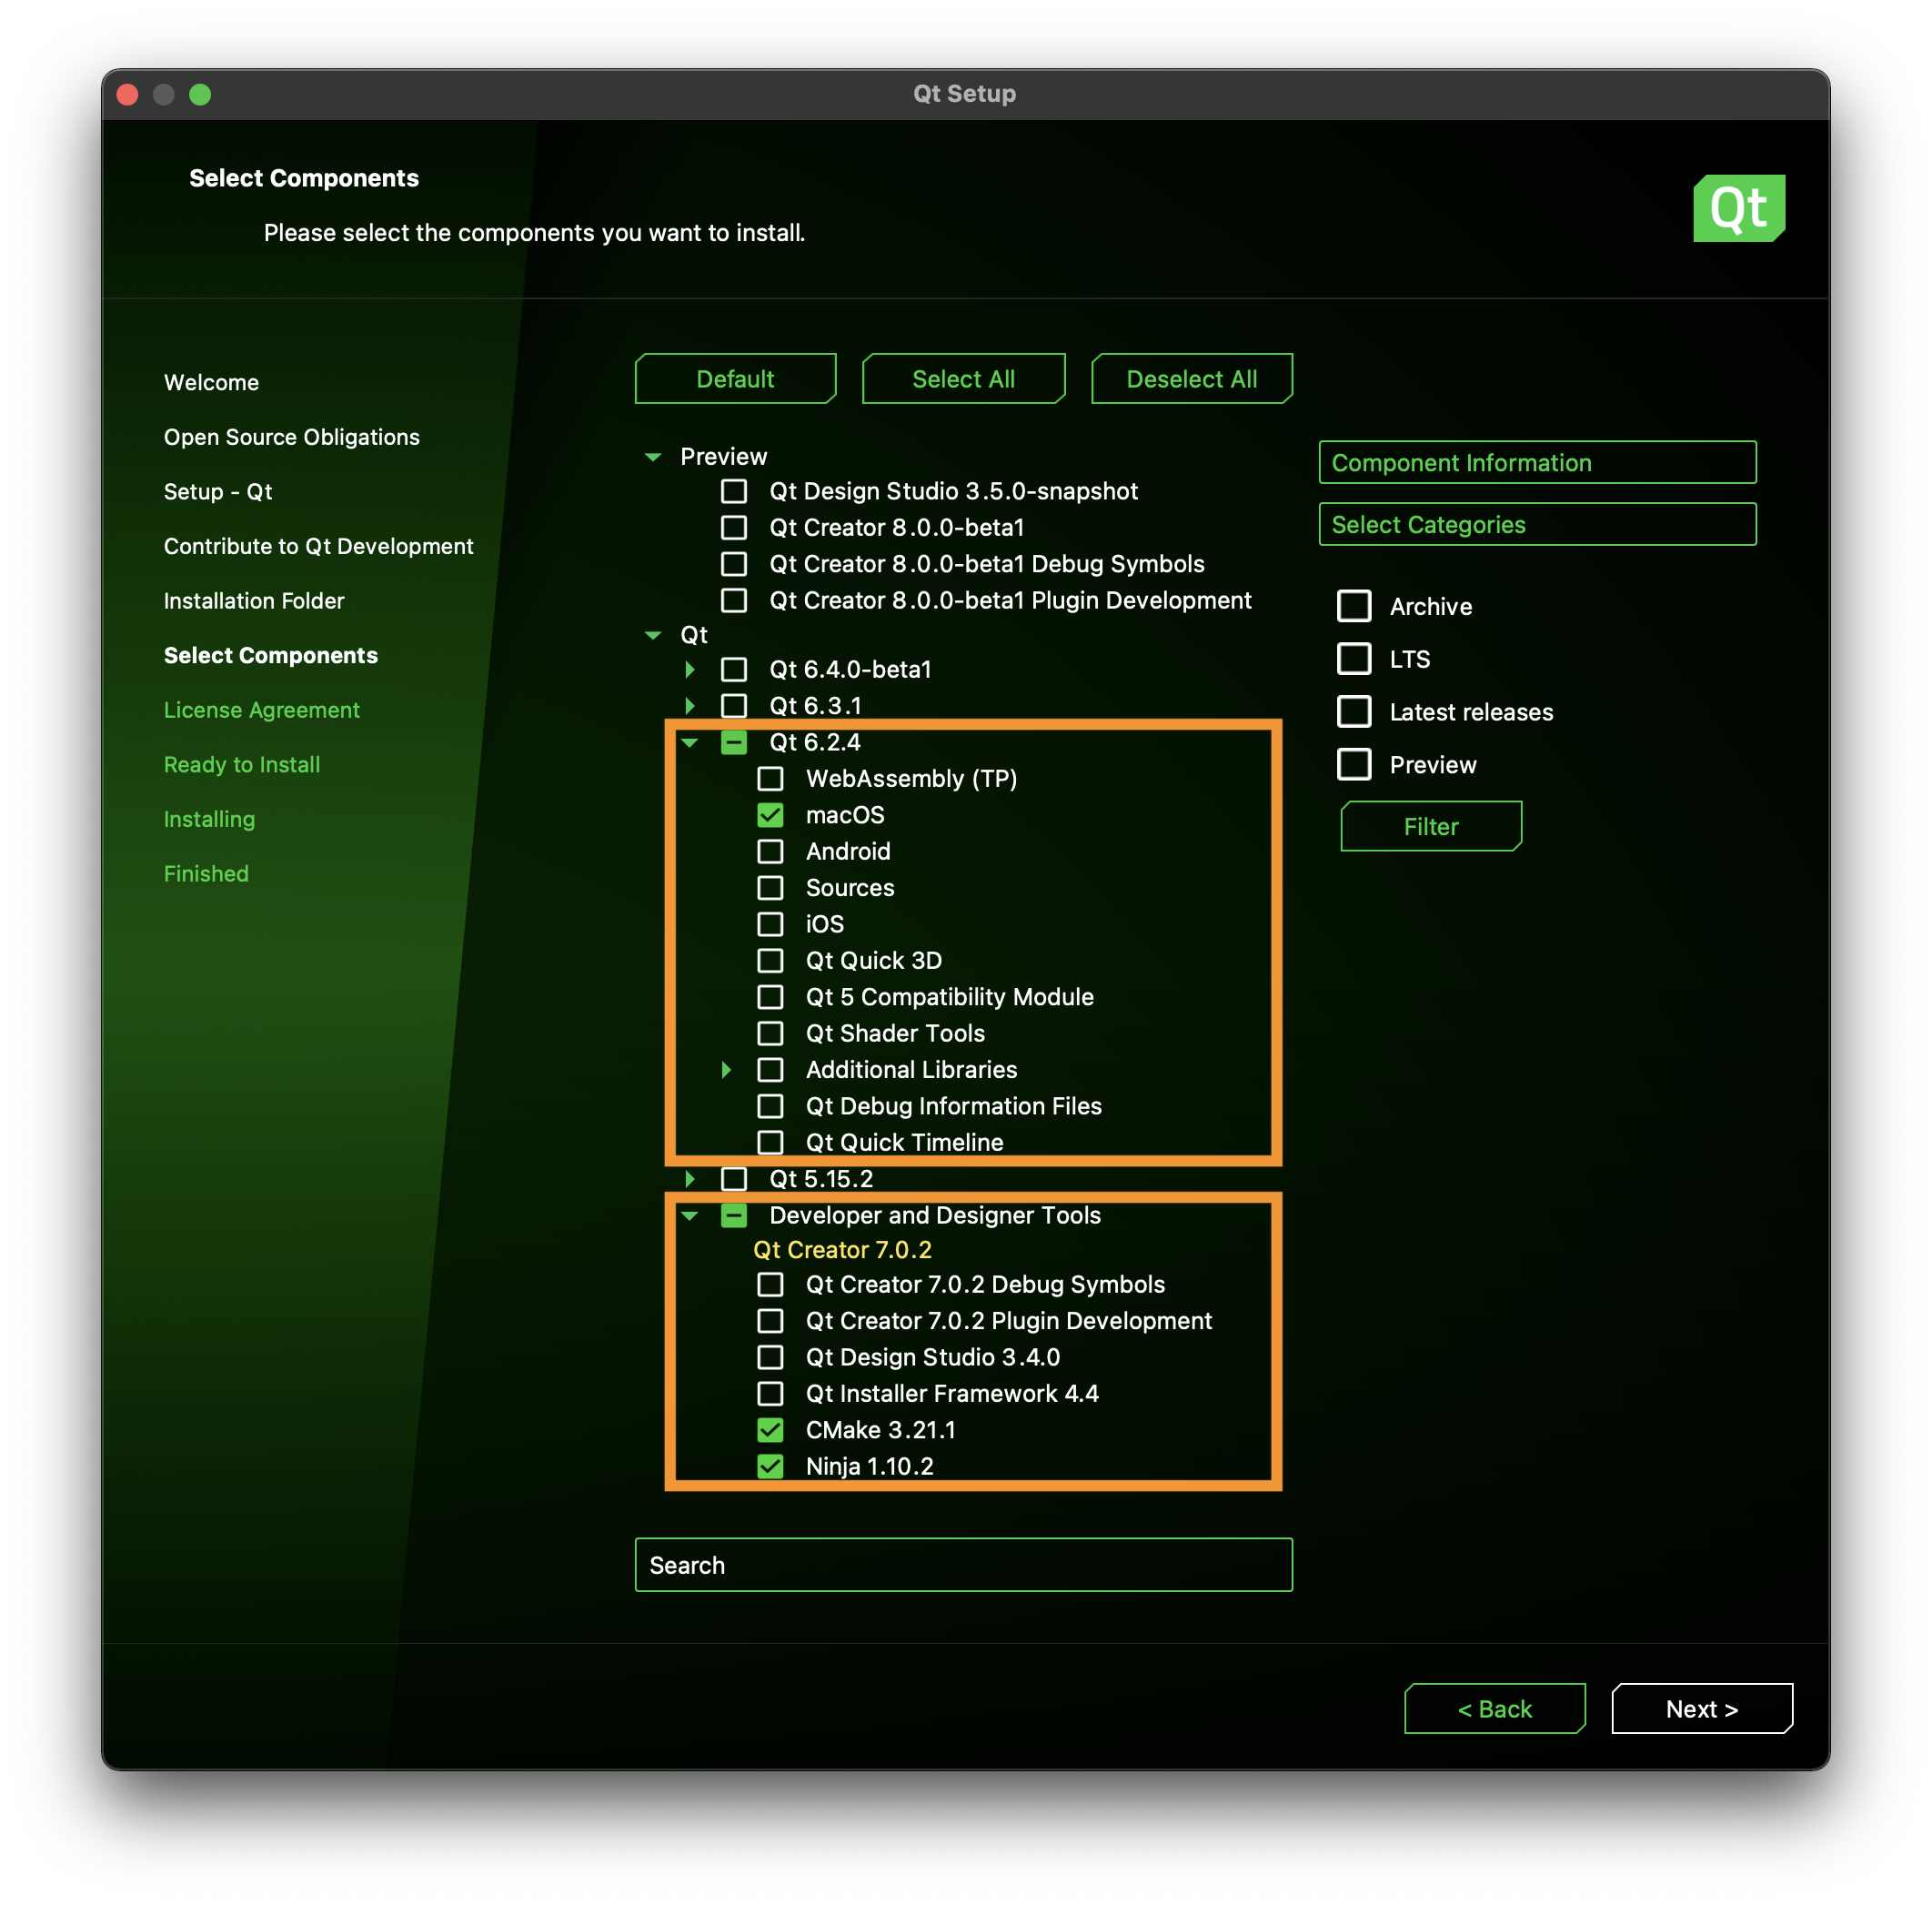 |
| Proceed with the installation. Once finished, launch Qt Creator. | 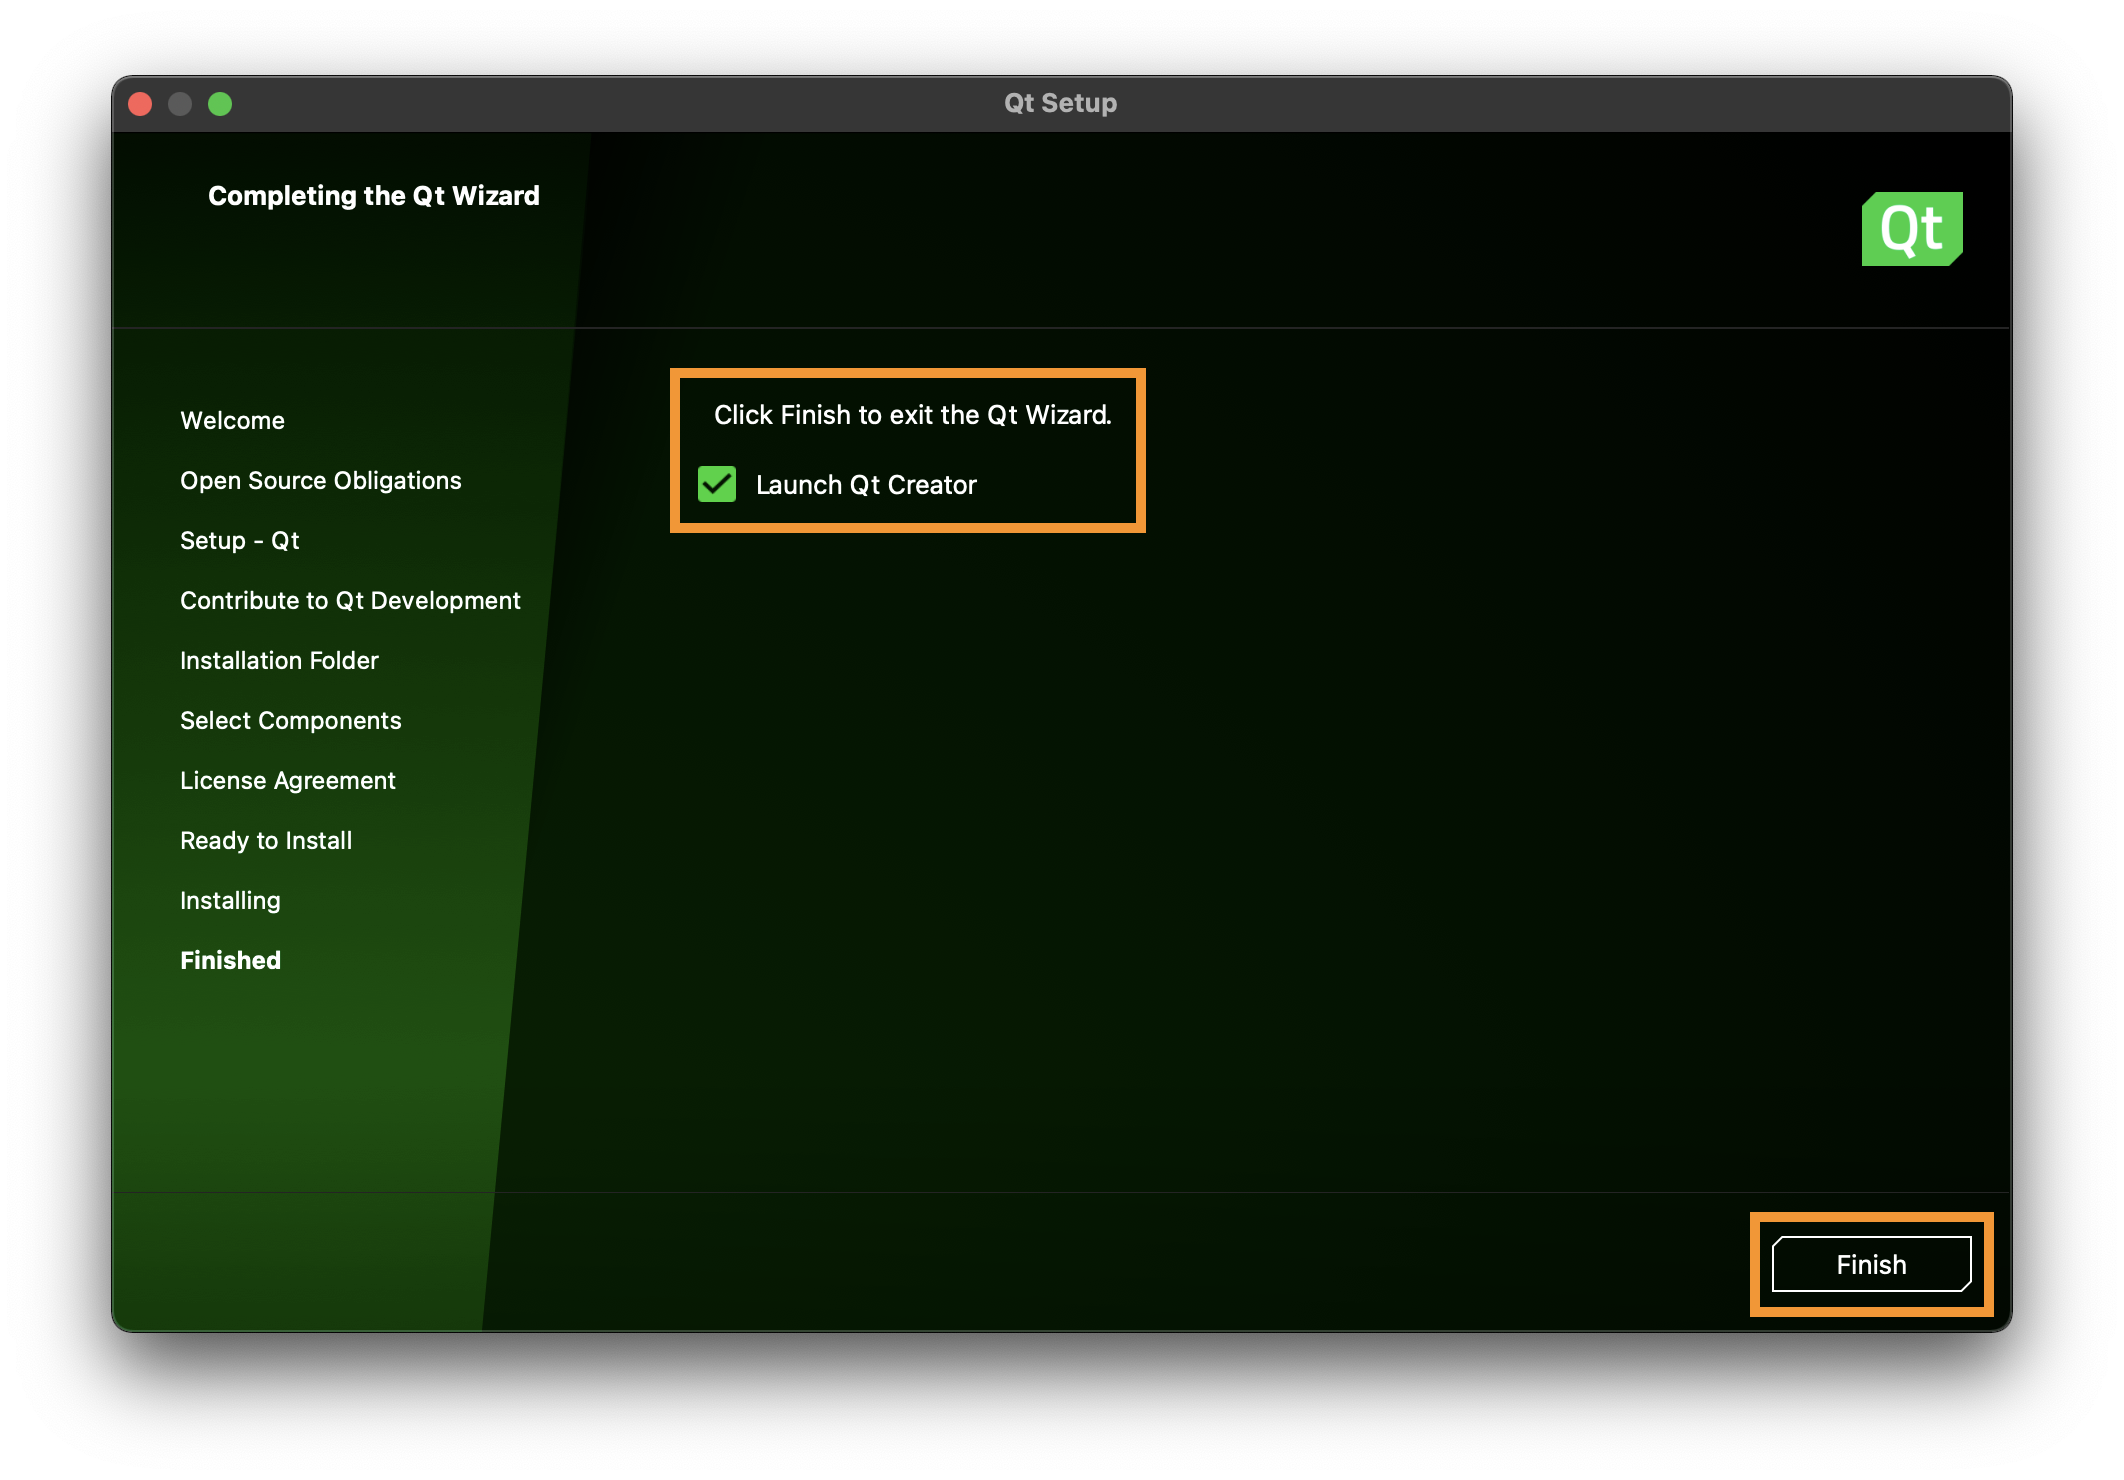 |
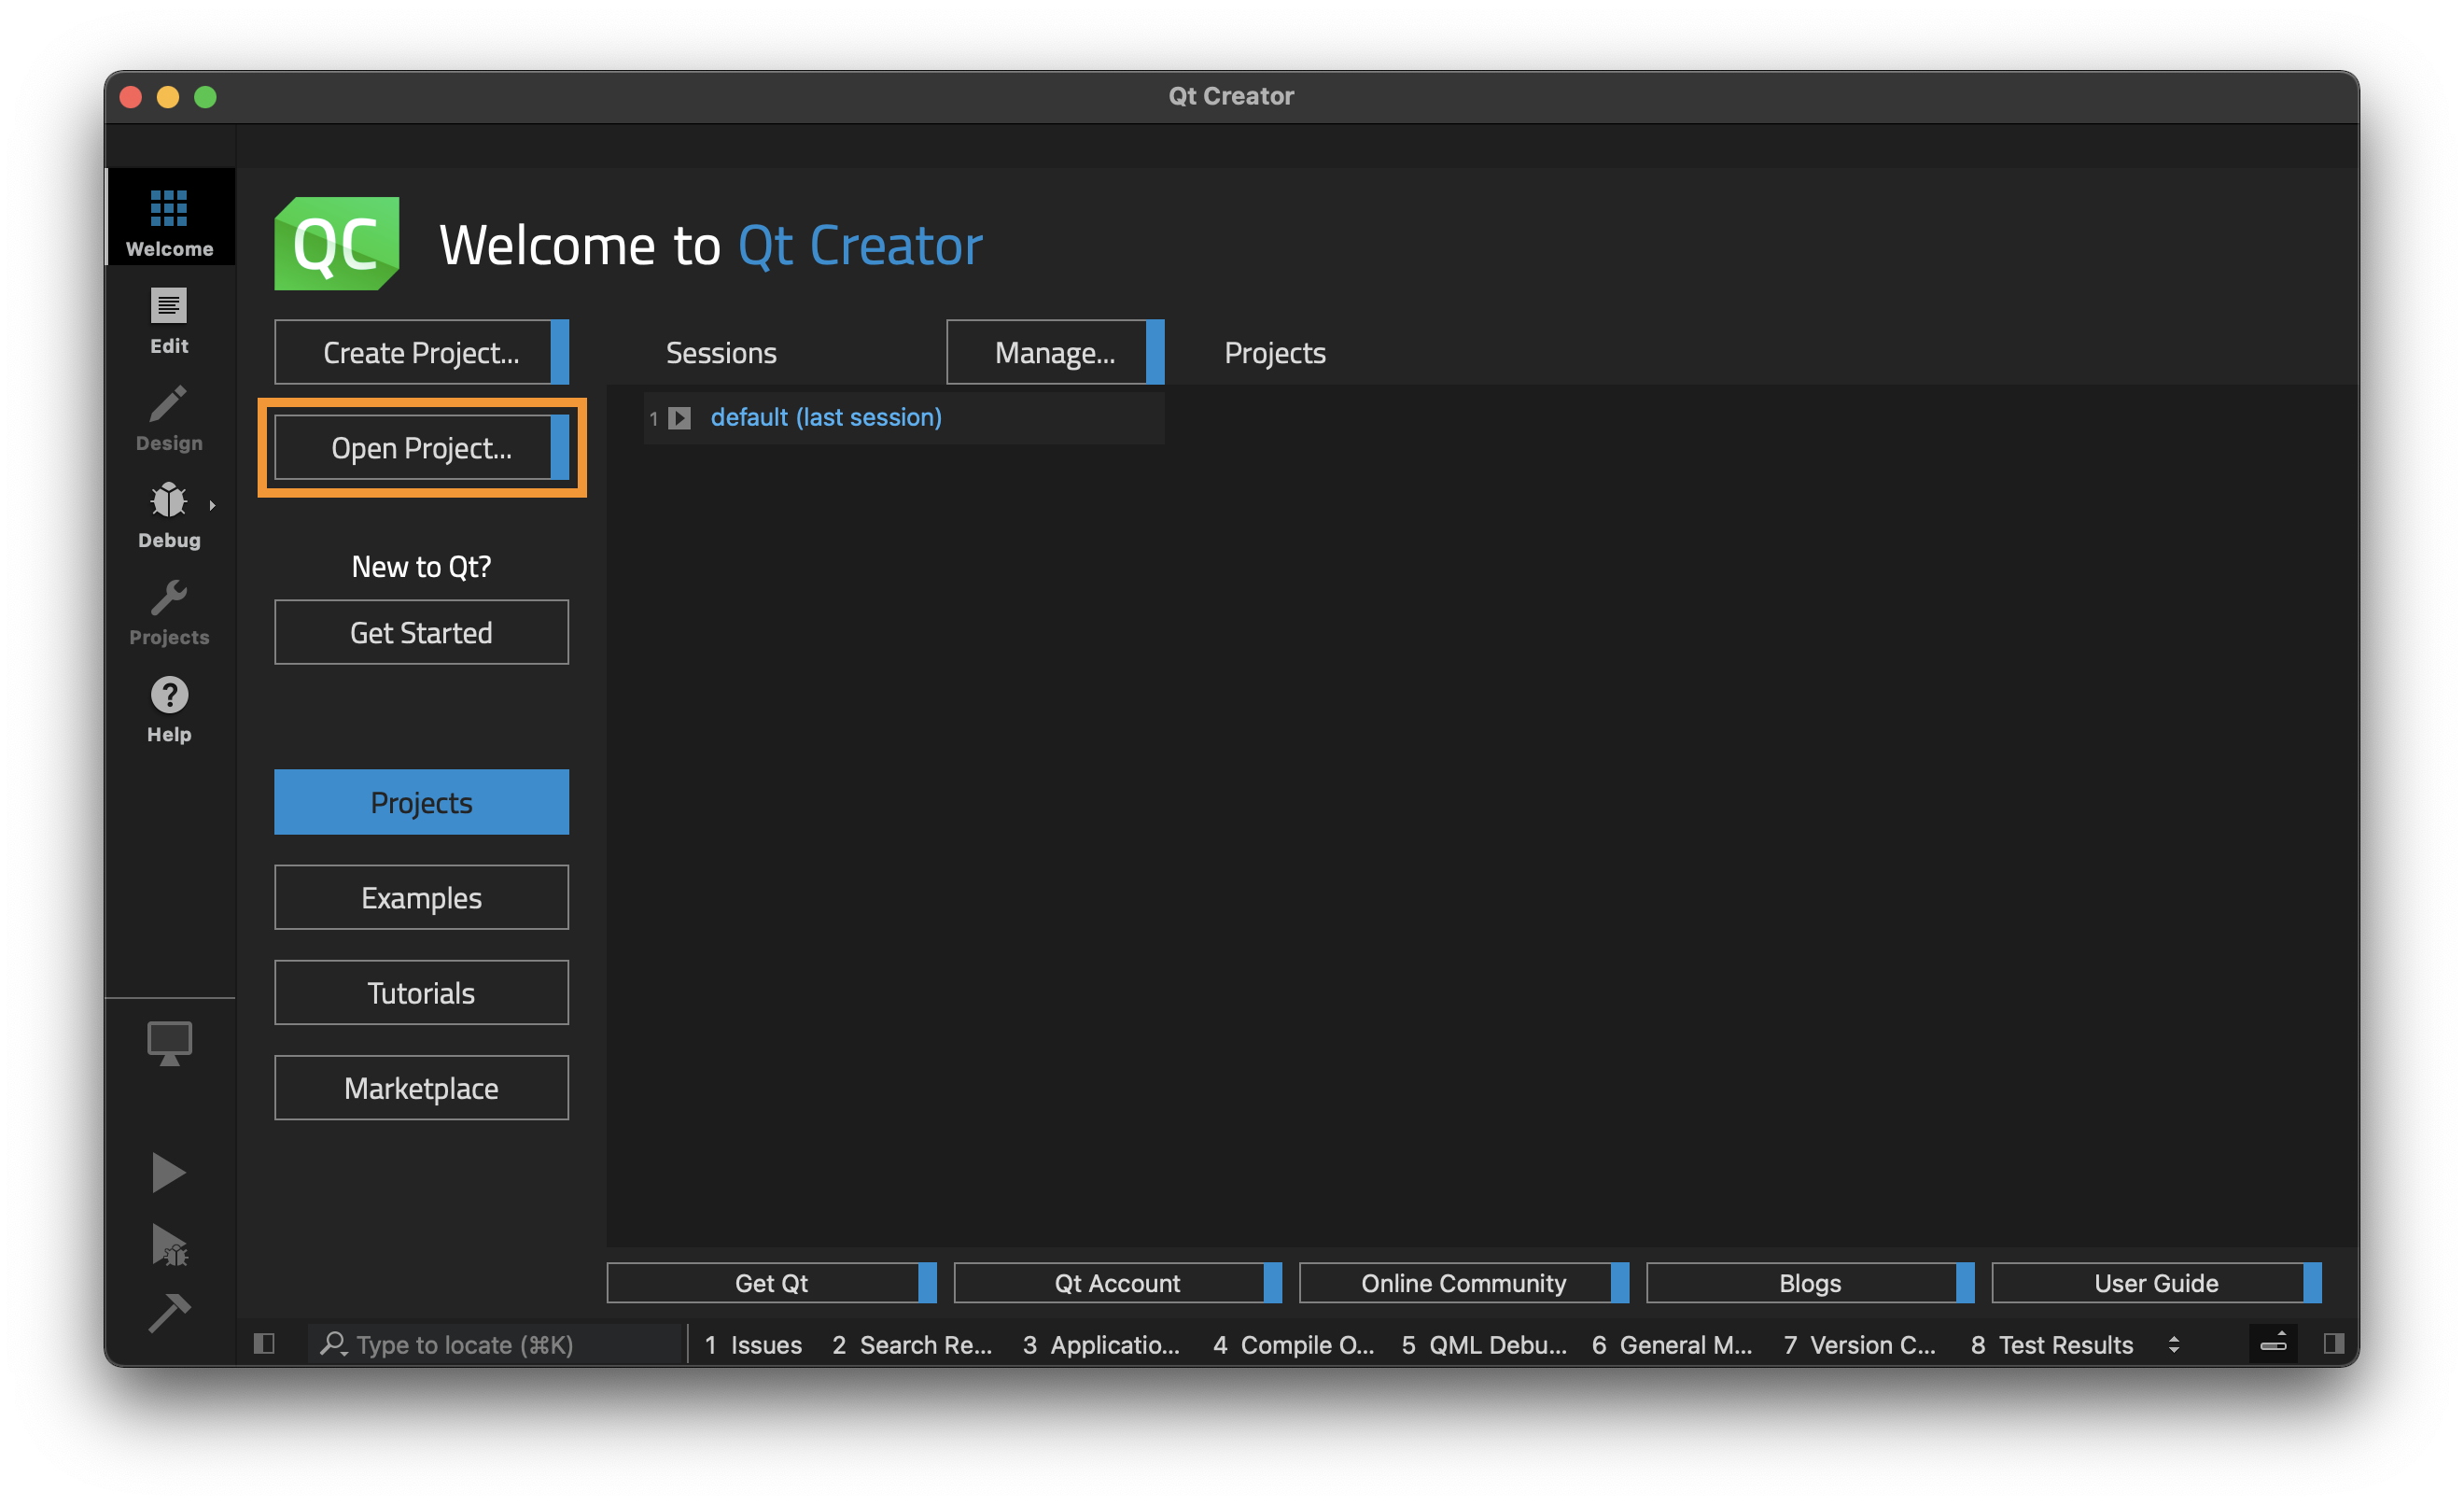
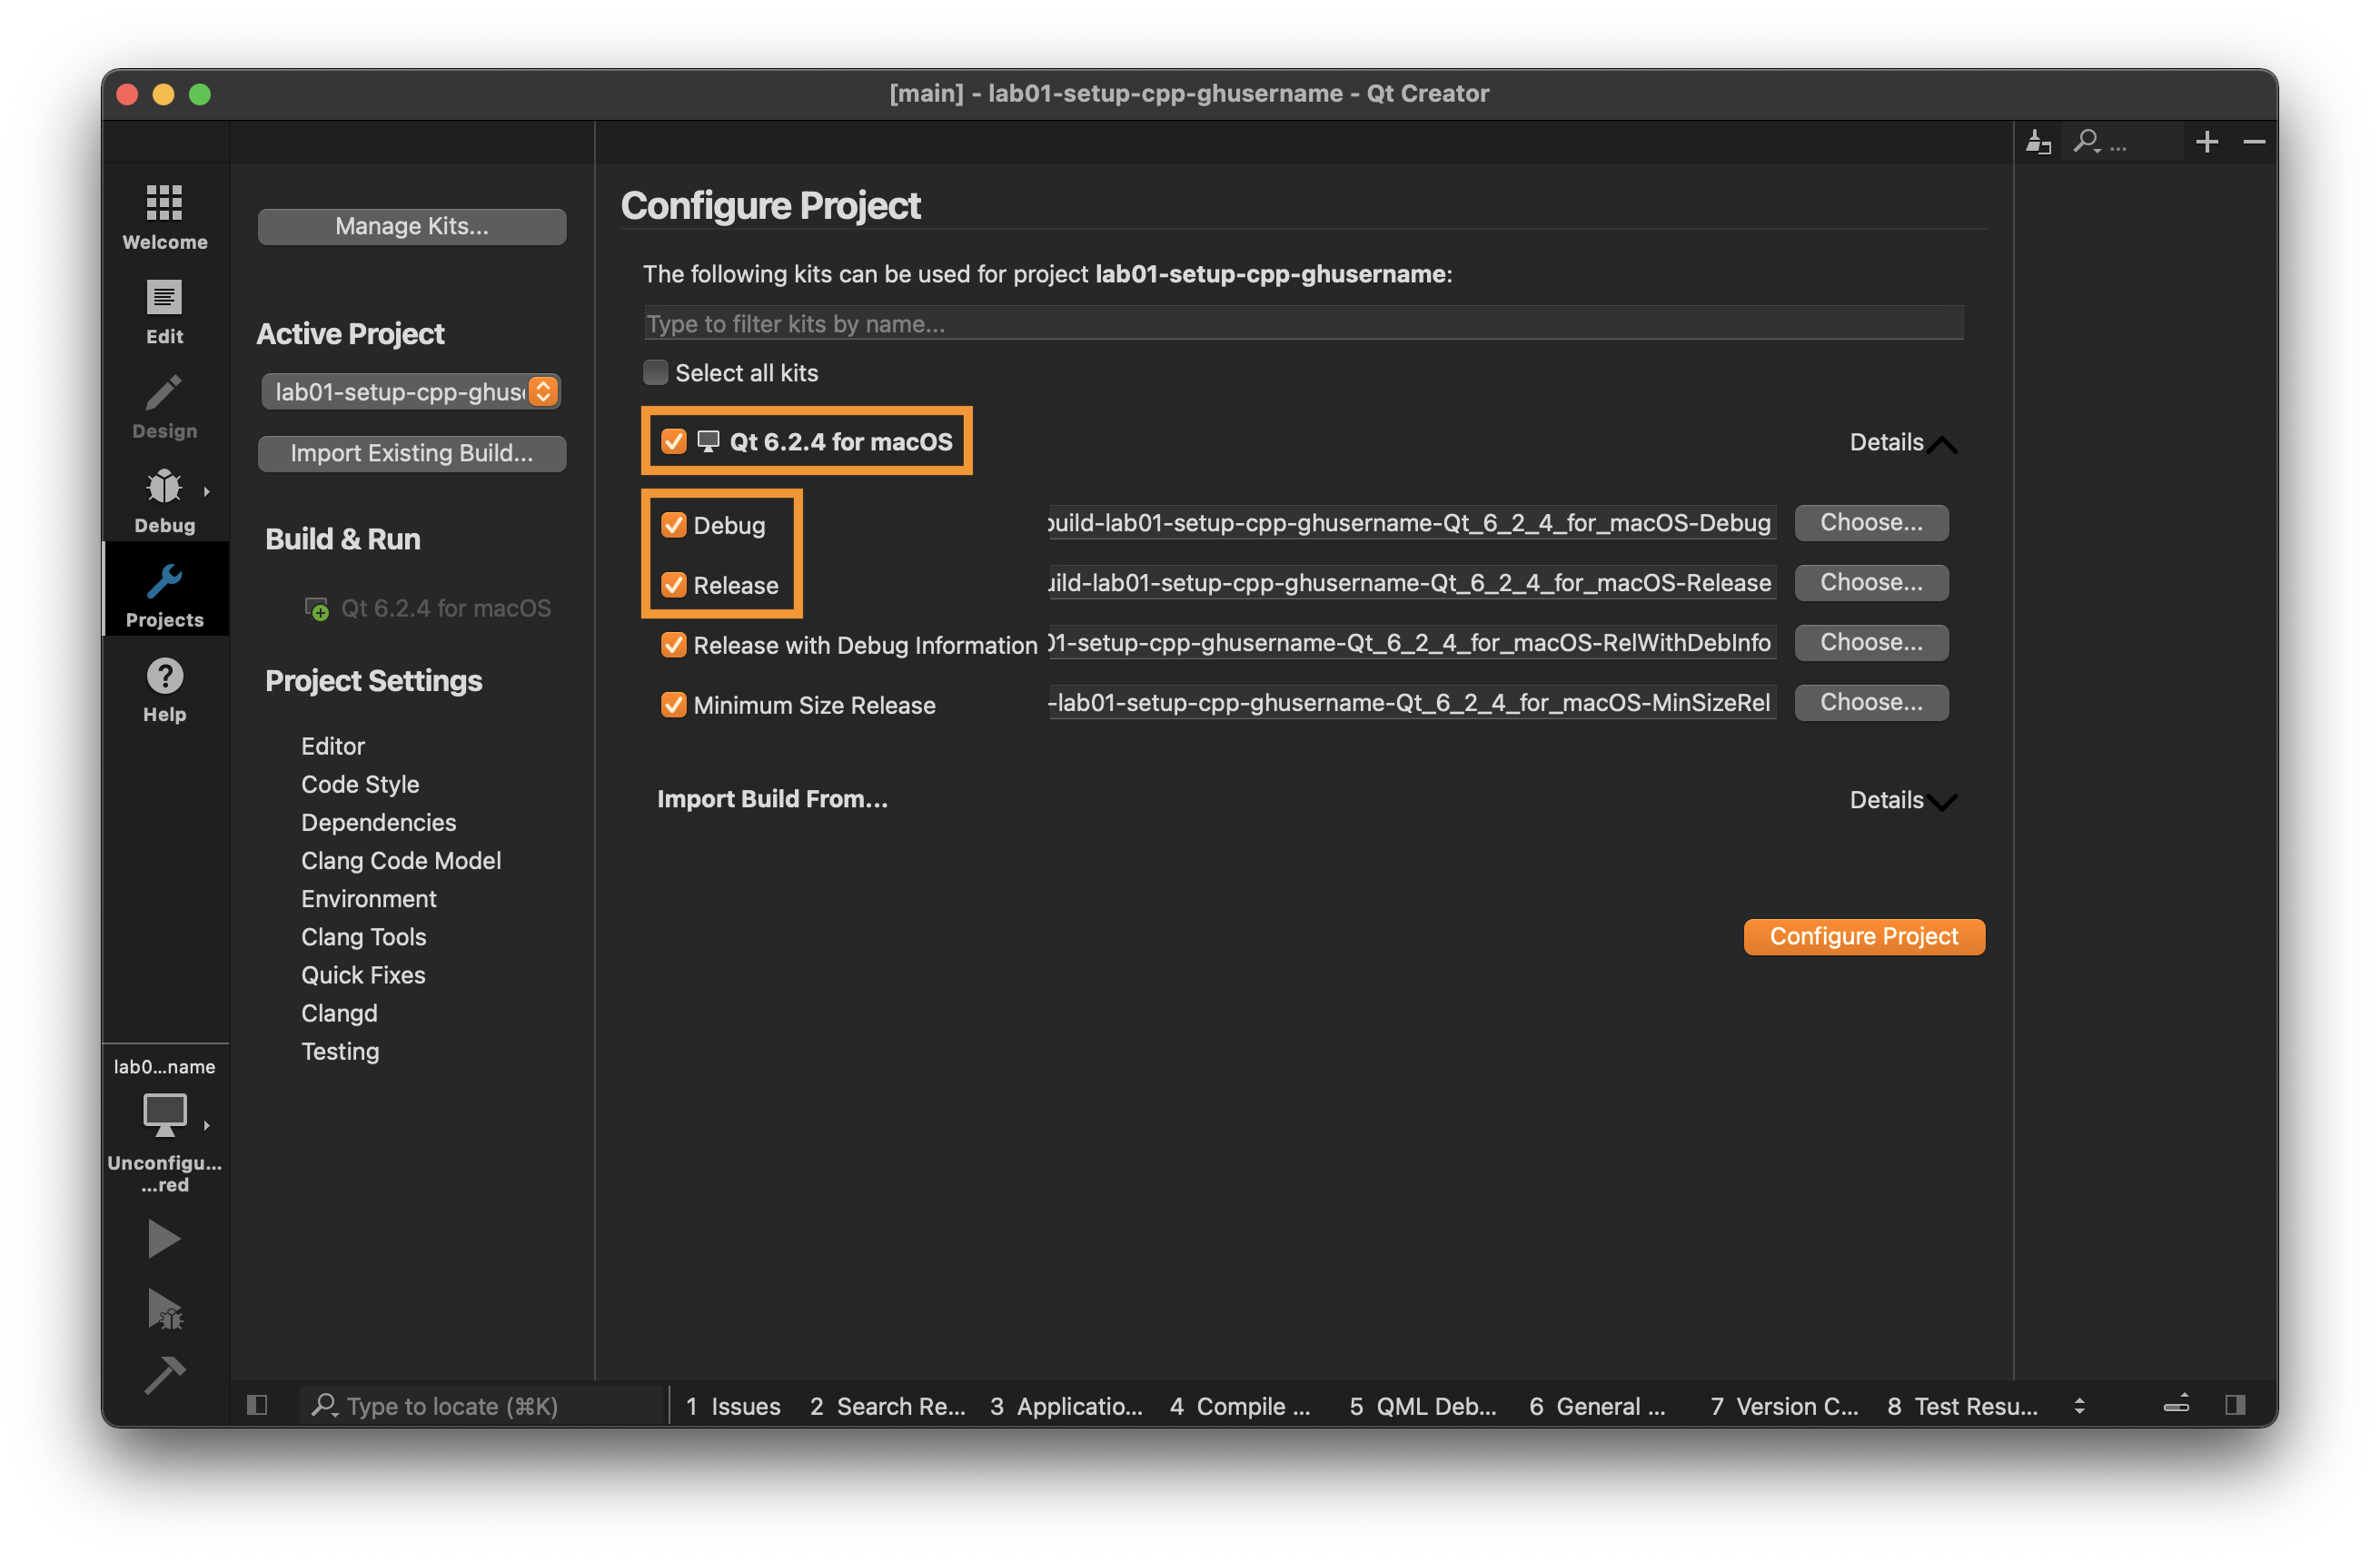
Opening a Project
After that, you should be taken to the Edit tab!
Using Qt Creator
Warning for students using Apple Silicon (i.e. M1, M2 macs)
Apparently, QtCreator has a critical bug that hasn't been fixed on Apple Silicon. Some TAs have encountered this issue on M1 macs, and we suspect this could also happen for M2 macs.
If you are opening your projects that are placed in the directories protected by macOS, such as Desktop, Downloads, or Documents, QtCreator may endlessly display prompts to ask for file permission, even if you have granted access.
Should you ever encounter this, press option + command, then right-click on the QtCreator icon in the dock, you should be able to force quit the application.
Here are the two workarounds we recommend and have verified:
- Simply do not place any of your project inside the protected directories of macOS, OR
- Use the command
~/Qt/Qt\ Creator.app/Contents/MacOS/Qt\ Creatorto launch QtCreator from the terminal. Note that this assumes you used the default installation destination—if you didn't, modify the path appropriately.
If these two options do not work for you, please contact us as soon as possible!
Sidebar View
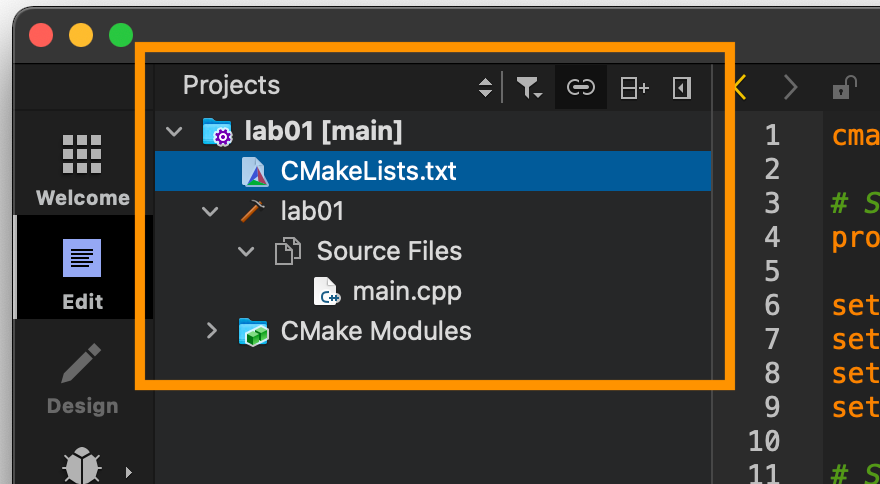
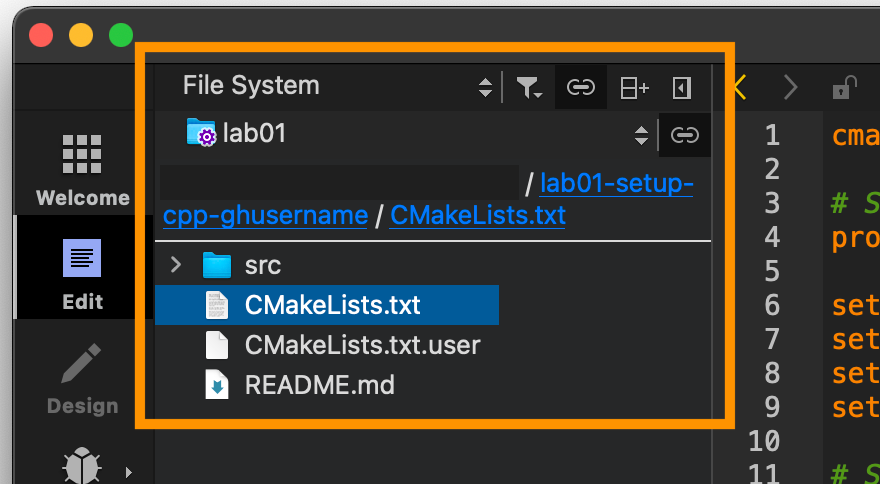
In the left sidebar, Qt Creator displays content based on the currently-selected 'sidebar view'. The two views you'll find mose useful are the Projects and File System views. Projects view shows a list of projects open in the current session, and the source, header, and other files for each; meanwhile, File System view shows all files in the currently selected directory.
We recommend using the Projects view most of the time! You can switch views by clicking on the dropdown menu at the top.
Project Settings
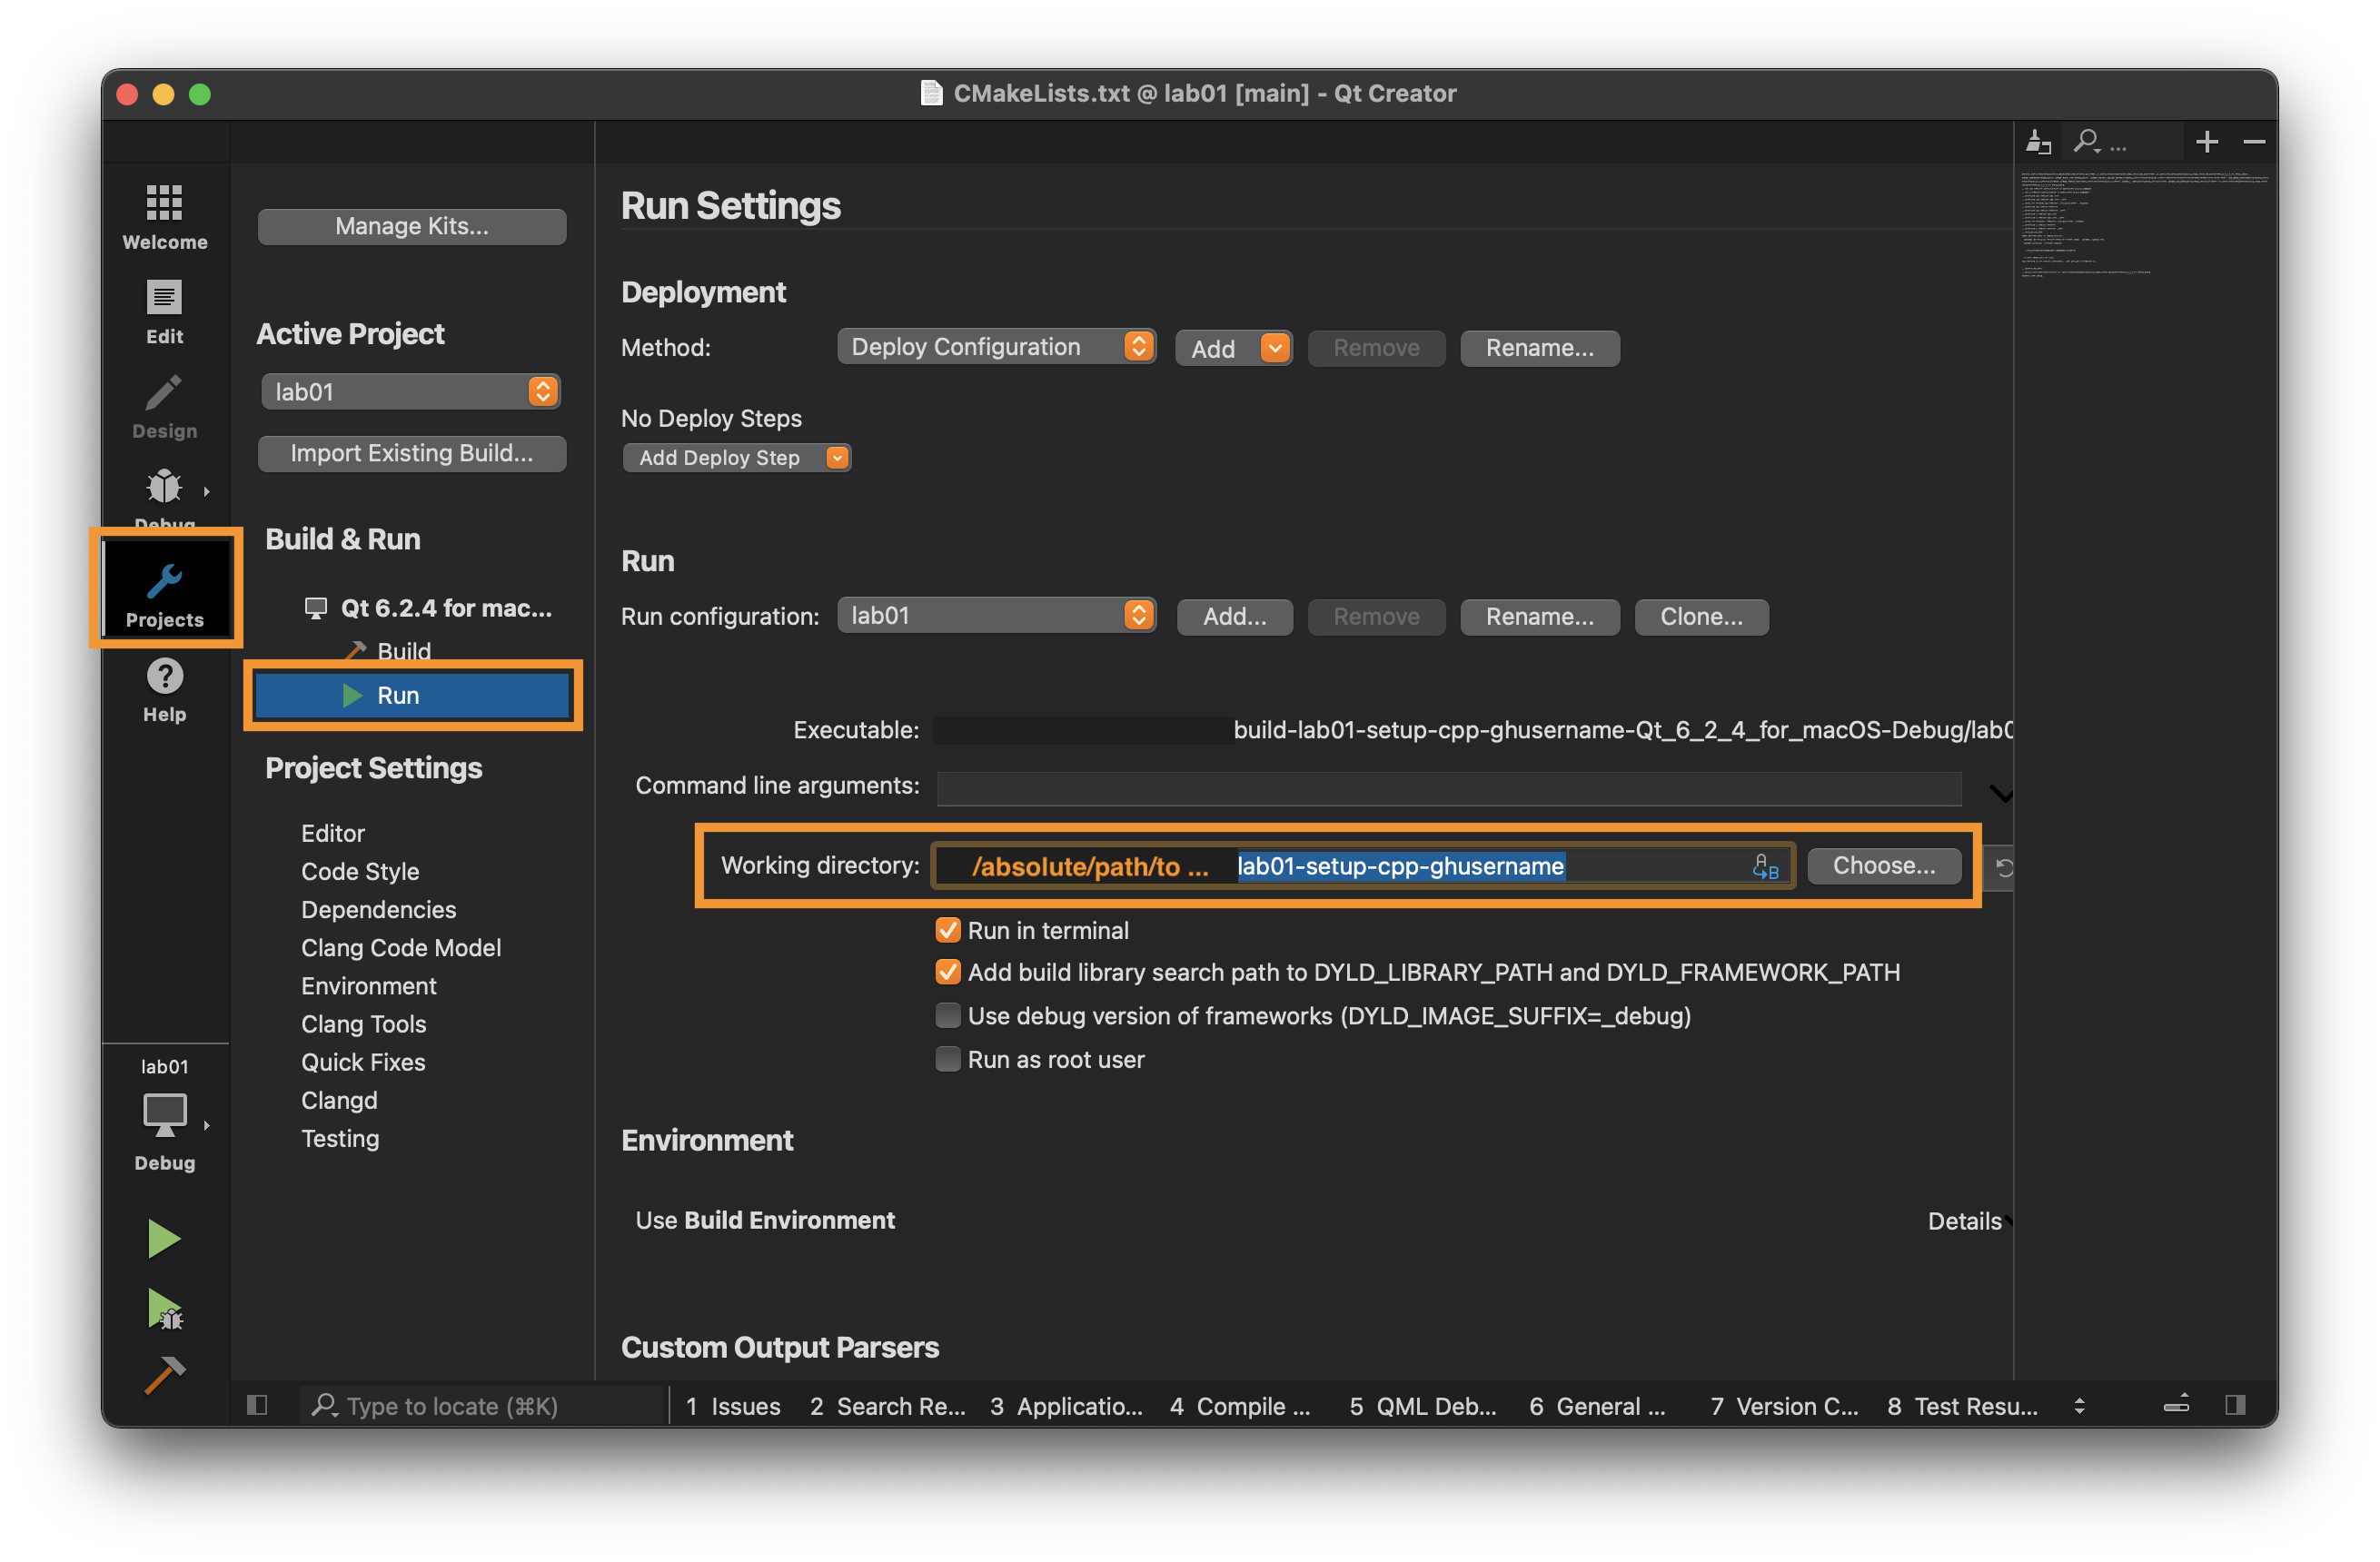
To modify the currently-selected project's settings, click 'Projects' on the left-most sidebar of your screen. These settings are divided into 'build' and 'run' settings.
In run settings, you can edit your command line arguments, which will be important for later assignments. For now, the most important setting you can edit here is your working directory.
For all assignments in CS 1230, you should always change your working directory to the parent folder of your project's CMakeLists.txt.
Extra: what is the significance of the working directory?
C++ is a compiled language, so an executable is produced at the end of the build process. The working directory is the directory from which this executable will be run.
Two important points follow:
- This executable will be generated in a new build directory, which will be a "sibling" of your project's source directory. For example:
∟ build-lab01_setup_cpp_ghusername-<kit-name>-Release/ (build directory)
  ∟ lab01                                              (the executable)
∟ lab01-setup-cpp-ghusername/                          (source directory)
  ∟ CMakeLists.txt                                     (the file you opened in Qt Creator)
  ∟ src/
  ∟ resources/
    ∟ images/
- By default, your project's working directory will be set to this build directory.
This is a problem because your application might try to access files using a file path relative to the source directory, but incorrectly looks for those files relative to the build directory.
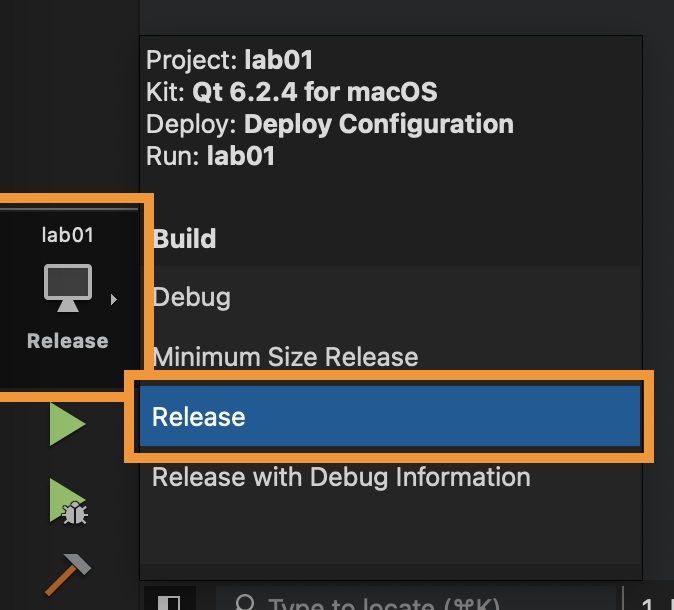
Meanwhile, in build settings, you can select your build configuration from Debug, Release, and (possibly) others. A Debug build contains additional information internally that will be important if you're using the debugger, whereas a Release build is optimized to run faster.
We recommend using the Release configuration for all non-debugging work. Note that you can set the build configuration using a dropdown on the bottom left:
Running Your Project
Finally, you can run your project by hitting "Run"; this is the green play button in the above image. This will run your project in whatever build mode is currently selected.
When you're ready, hit "Run".
You should see that the application runs and exits with error code 0 (no error).
You just ran a simple C++ program! Of course, it did nothing, but we can easily change that in the next section 🙂.
C++
Hello World
A simple C++ program that does nothing (like the one you just ran) looks something like this:
// A C++ program always starts from the main() function.
// main() returns an integer indicating how the program exited
int main() {
  // Though this function body is empty, it still returns an int!
  // In C++, if control reaches the end of main() without encountering
  // a return statement, the effect is that of executing `return 0;`
}
In order to modify this function to print "Hello world", we must first include the input/output library (iostream), which is a part of the C++ standard library.
#Include-ing Files
In C++ files, you can #include other files to gain access to functions, types, macros, and variables declared in those other files. For example, in our Hello World program, we can #include the iostream header file at the top of our main.cpp file like so:
#include <iostream> // Lines that begin with `#` do not require semi-colons
Note the use of angle brackets around
iostream. In C++, you should use angle brackets for standard library files, but you should use double quotes for files within your own project.
Accessing Things in a Namespace
Imported functionality is usually grouped under a namespace, and we can access things within a namespace using the double-colon (::) operator. For example, since we included iostream in our Hello World program, we now have access to the following things in the std namespace:
std::cout: prints things tostdout, i.e. the terminal or the "output" window in Qt Creator.std::endl: inserts a newline character and flushes the output stream.
std::cout is usually used in tandem with the insertion operator (<<). This inserts characters into the current output stream, and it works like string concatenation with + in some languages.
The insertion operator can also be used with std::endl to insert a newline, in place of \n.
We are now ready to write something to the terminal.
- Include
iostreaminmain.cpp. - In
main(), usestd::coutandstd::endlto print"Hello, world!"to the terminal. - Run your program, and verify that it behaves as expected. Hello, world!
Extra: two other potentially useful iostream objects
std::cinreads from stdin (terminal input), in a blocking manner, andstd::cerrprints to stderr (terminal error messages)
std::cin is usually used in tandem with the extraction operator (>>). It's highly unlikely that you'll use this in CS 1230, though.
Now, we can get into the fun stuff!
Primitive Types
C++ is a typed language. It comes with several primitive types, including...
- integer-like types (integers, booleans, characters)
- floating point types
- arrays (specifically, C-style arrays)
- functions and lambdas
- pointers and references
Some of these you might already know from languages you've learned before. Others, such as pointers and references, are C++ concepts that we'll expand on in later sections.
Note that strings are not a primitive type in C++, as string literals are simply
chararrays. However, the standard library does provide thestd::stringtype, which allows us to perform common string operations.
Variables
When defining a variable, we have to declare its type.
int x = 42;
double y = 3.14;
Alternatively, we may use auto to tell the compiler to deduce the variable's type, based on how we've initialized it. This could be useful if its type has a very long name, or if we're not sure about its exact type.
auto z = 2.71; // type of z deduced as double

// I'm not exactly sure about the type of this string literal
auto w = "random string abcd";
Functions
The same rules also apply to functions: we must declare their return types and the types of each parameter.
int plusOne(int x) {
  return x + 1;
}
Just as with variables, we may use auto in place of a specific return type—the compiler will deduce the return type from the return statement in the function body.
We may also use auto for trailing return type declarations (i.e. declaring the return type after the parameters, instead of before the function name). This could be useful for reducing visual clutter.
auto plusOne(double x) { // Using auto instead of a specific return type
  return x + 1;          // Return type deduced as double
}

// Trailing return type declaration (note the "->float")
// This is identical to "float plusOne(float x)"
auto plusOne(float x)->float {
  return x + 1;
}
Overloading
Defining multiple functions with the same names, but different type annotations, allows you to do something called overloading, which you might be familiar with from languages like Java.
int plusOne(int x) {
  return x + 1;
}

auto plusOne(double x) {
  return x + 1;
}

auto plusOne(float x)->float {
  return x + 1;
}

auto x = plusOne(42); // calls plusOne<int>
auto y = plusOne(3.14f); // calls plusOne<float>; note the float literal indicated by the letter "f"
auto z = plusOne(2.71);  // calls plusOne<double>
Generic Functions
We can improve the code in the example above by making our function generic. This is easy to do in C++: we simply change the type of its input parameter to auto.
auto plusOne(auto x) {
  return x + 1;
}

auto a = plusOne(1230); // a == 1231, instantiates plusOne<int>
auto b = plusOne(6.5f); // b == 7.5f, instantiates plusOne<float>
auto c = plusOne(3.14); // c == 4.14, instantiates plusOne<double>
Extra: what actually is an auto parameter?
A function with at least one auto parameter, such as our generic plusOne, is known as an abbreviated function template.
Extra: Lambdas
There are also function-like entities in C++ called lambdas. We'll not explain them in detail since functional programming is outside the scope of this lab. However, you are welcome to play with them and ask questions about them on Ed.
You may need to use lambdas for certain extra credit features, such as multithreading, in your future assignments. To get you started, a toy example is shown below.
Example
auto plus(auto increment) {
  return [=](auto x) {
    return x + increment;
  };
}

// Observe that functions are "first-class" in C++
auto apply(auto operation, auto x) {
  return operation(x);
}

auto x = apply(plus(20), 22); // x == 42
auto y = apply(plus(-1.1), 4.24); // y == 3.14
You can find more information about lambdas here.
A Warning About Type Deduction
Type deduction is very powerful in C++. For instance, most typed languages do not allow type deduction on function signatures like C++. However, overusing it has a negative impact on the readability and maintainability of your code, and it can cause unexpected compilation errors/crashes.
You should be very careful to strike a balance between type declaration and type deduction to maximize your code clarity. We recommend only using auto for local variables in function bodies and for "generic" functions. Whenever possible, explicitly declare types in function signatures.
We can now write functions and use them to process different things!
- Write a function
timesTwowhich takes anint, returns anint, and does what the function name suggests. - Add
std::cout << timesTwo(21) << std::endl;to yourmainfunction.
You should see 42 when you run the program.
Let's use what we learned and make timesTwo more interesting!
- Change the signature of
timesTwoand make it generic. - You might also need to change the definition in the function body of
timesTwoif you used multiplication for the previous task. Note that multiplication is not defined forstd::string, but addition is, so how do you express "times 2" in the form of addition? - Add the following print statements to your
mainfunction:
std::cout << timesTwo(123) << std::endl;
std::cout << timesTwo(3.14) << std::endl;
std::cout << timesTwo(std::string{ "abc" }) << std::endl;
You should see 246, 6.28, and abcabc when you run the program.
Structs and Classes
Going beyond primitives, we can create custom types in C++ by combining existing types and bundling them with functions.
These custom types are known as structs/classes, and they can be defined using the struct/class keywords respectively.
Structs and classes are almost the same things in C++, with the only difference being that structs have public member access by default and classes have private member access by default. The basic form of a struct is shown as follows:
struct Rectangle {
  double length;    // A data member, also known as a field
  double width = 1; // Fields can have default values
  // Note: fields must be explicitly typed; you cannot use type deduction here

  // A member function, also known as a method
  double calculateArea() {
    return length * width;
  }

  // This member function modifies the struct instance's state
  void makeItASquare(double sideLength) {
    length = sideLength;
    width = sideLength;
  }
};
Here's how we can create instances of Rectangle:
// Create an instance of Rectangle
auto x = Rectangle{ .length = 2, .width = 4 };

// Field names can be omitted. Values in the brackets will
// be assigned to each field sequentially

// Equivalent to Rectangle{ .length = 4, .width = 3 }
auto y = Rectangle{ 4, 3 };

// Equivalent to Rectangle{ .length = 5, .width = 1 },
// because of the default value
auto z = Rectangle{ 5 };
And here's how we can use those instances:
// Remember that structs have public member access by default.
// If this Rectangle was a class, you'd have to declare the
// relevant fields/methods public to do this

// Getting and setting fields
auto oldLength = x.length;        // oldLength == 2
x.length = 4;

// Calling member functions
auto newArea = x.calculateArea(); // newArea == 16
x.makeItASquare(oldLength);       // x.length == x.width == 2
A warning about constructors and other special member functions
If you have any experience in class-based OOP, you probably know that you can use constructors to initialize an object, instead of initializing it field-by-field (aggregate initialization).
However, we generally recommend that you do not manually define your own constructors.
Instead, we suggest using aggregate types where possible.
Improper handling of constructors and other special member functions* can break value semantics for your type, and cause unexpected bugs or resource leaks.
And, while it is entirely possible that you may never encounter or notice such a bug even if you do use special member functions, we still recommend using aggregate types as the less error-prone option.
* special member functions = default constructors, copy constructors, move constructors, copy assignment operators, move assignment operators, and destructors
Let's add more behaviors to our Rectangle type and enhance its capabilities!
- Add a method
calculatePerimetertoRectangle. - Add
std::cout << Rectangle{ 7, 8 }.calculatePerimeter() << std::endl;to yourmainfunction.
You should see 30 when you run the program.
Now that we've seen what we can do with Rectangle, are you ready to create a new type from ground zero?
- Create a
Circletype using thestructkeyword. Circleshould contain a fieldradiusof typefloat, and two methodscalculateAreaandcalculatePerimeter.- Tip: to use
, you can use std::numbers::pi. - After completing your
Circletype, create a few instances ofCirclein yourmainfunction, and call some of their methods.
See if your Circle instances exhibit the expected behaviors when you run the program.
Now, we have 2 types Rectangle and Circle, with the same member functions calculateArea and calculatePerimeter. Can we define one printShape function that works for both types?
Generic Functions (Reprise)
If you have previous experience in OOP, you might think of defining a Shape interface with a printShape() abstract function, and have both Rectangle and Circle both implement Shape. This is unnecessary in C++.
Remember the generic functions we learned in the previous section? If a function has a parameter of auto type, it is allowed to be anything! We can pass Rectangle and Circle instances to it just like that!
Extra: more on templates, for those familiar with programming languages
The reason behind this magic is that C++ templates are structurally typed, and they do not enforce parametricity. The lack of parametricity means when a type parameter gets reified by an actual type T, the type information of T is not erased in the body of the function template. This allows template definition to rely on any ad-hoc property of T, including inspecting what T actually is. Such capability enables templates to simulate features commonly seen in a dependently-typed system, or an untyped language.
// a function template that only accepts containers with no more than 42 elements
// simulating a dependently typed function
auto f(auto x) requires (x.size() <= 42) {
    // empty
}

f(std::array<int, 10>{}); // OK
// f(std::array<int, 43>{}); <- error

// a function template whose return type depends on its input
// simulating an untyped function
auto g(auto x) {
    // if the input can be invoked like a function
    // the return type is the same as the input's return type
    if constexpr (requires { x(); })
        return x();
    // otherwise return type is int
    else
        return 42;
}

auto x = g([] { return 2.71; }); // x is of type double
auto y = g("aaa"); // y is of type int
Navigate to the empty function printShape.
void printShape(auto shape) {
  // Your code here
}
Complete its definition, so that when you pass in either a Rectangle object or a Circle object, it prints:
Area: /* area of the shape */
Perimeter: /* perimeter of the shape */
Call printShape in main() with different Rectangle and Circle instances, to see if printShape exhibits the expected polymorphic behavior.
Other Standard Library Utilities
Besides iostream, the C++ standard library provides us with many useful utilities, and we'll focus on the four most commonly used ones: its containers and strings.
Arrays
std::array is a fixed-length array.
Example
#include <array>

auto x = std::array<int, 3>{}; // Must declare element type and length

// Element type and length can be deduced if you immediately initialize
// the array with values
auto y = std::array{ 3.14f, 2.71f };

// Getting and setting array elements
auto z = y[0]; // z == 3.14f
x[0] = 42; // now, the zeroth element of x is 42

auto [a, b, c] = x; // Arrays can be unpacked: a == 42, b == 0, c == 0

// Commonly used array methods
auto lengthX = x.size();
auto underlyingPointer = x.data(); // we'll explain pointers later

// Arrays can be looped over element-wise
for (auto element : y) {
  std::cout << element << std::endl; // prints 3.14, then 2.71
}
Vectors
std::vector is a dynamic-length array. Unlike std::array, it allows us to insert or remove elements at any time, and it has mostly the same capabilities as std::array. However, std::array is slightly more performant as it doesn't require dynamic memory allocation.
Example
#include <vector>

auto x = std::vector<int>{}; // Must declare element type

// Element type can be deduced if you immediately initialize
// the vector with values
auto y = std::vector{ 3.14f, 2.71f };

// Manipulating vector elements
auto z = y[0]; // z == 3.14f
x.push_back(42); // add an element to the end of the vector
x.push_back(123); // add another element after the 42 we just inserted
x.pop_back(); // remove the element we just added

// Commonly used vector methods
auto lengthX = x.size();
y.reserve(20); // Pre-allocate memory for more elements. Its length stays the same
x.resize(10); // Resize the vector, actually changing its number of elements (length)
auto underlyingPointer = x.data(); // we'll explain pointers later

// Vectors can be looped over element-wise
for (auto element : y) {
  std::cout << element << " "; // prints 3.14, then 2.71
}
Tuples
std::tuple is a heterogeneous container—it is capable of storing elements of different types. It is most commonly used to achieve multiple return values in C++.
Example
#include <tuple>

auto makeTuple(auto x, auto y) {
  return std::tuple{ x, y };
}

auto [x, y] = makeTuple(42, 3.14); // tuples can be unpacked, x == 42, y == 3.14

// This is a variadic function template: it takes any number of arguments, each of any type
// It is unlikely that you'll need to use variadic functions for this course
auto doubleEach(auto ...x) {
  return std::tuple{ x + x... };
}

auto [a, b, c] = doubleEach(12, 2.71, std::string{ "abc" });
// a == 24, b == 5.42, c == "abcabc"
Strings
std::string provides basic string operations in C++. You can find its documentation here.
Example
The example below shows you how to create string objects, or convert string literals to std::string
#include <string>

auto x = std::string{}; // Create an empty string
auto y = std::string{ "hello!" }; // Convert a string literal to a std::string

using namespace std::literals; // Use this namespace to create std::string literals
auto z = "abcd"s;              // Create a std::string literal, note the s suffix
z += "efgh";                   // Use + to concatenate strings
Iterating Over Containers
Defining containers is one thing, but we also need to know how to operate over the elements. There are two primary methods for iterating: the range-for loop, and index-based iteration.
// range-for
for (auto element : container) {
  // use element
}

// index-based
for (auto index = 0; index < container.size(); ++index) {
  auto element = container[index];
  // use element
}
Note that a more efficient way of doing the range-for loop is to use an ampersand after auto. You will learn more about what this means in the section on references.
// reference based range-for
for (auto& element : container) {
  // use element by reference
}
Now that we've learned the basics of containers and strings, let's try using them!
- Create an array of
std::strings. You're free to pick eitherstd::arrayorstd::vector. - Fill the container with some strings.
- Apply
timesTwoto each string element in the container. Hint: you cannot use the range-for loop you saw above to modify container elements, you'll see why in the following section when we explain references. - Print each string element in the container, and see if the result is what you expect.
Pointers and References
Every entity in our program, from variables to functions to constants etc, all exist somewhere in memory, and they all have a unique memory location called a memory address.
A pointer is an integer storing a memory address, and it allows us to manipulate the object at that address. We can obtain a pointer to almost anything in C++ by taking its address using the address of operator &. The obtained address will be of a pointer type, denoted by the target object type followed by an asterisk *.
int x = 42;
int* px = &x; // px is a pointer to an integer, pointing to x
auto px2 = &x; // type deduction works for pointers too, type of px2 deduced to int*
auto* px3 = &x; // partial type deduction works too, px3 is a pointer to some deduced type, auto deduced to int
// pointer variables themselves also reside somewhere in memory, you can get a pointer to pointer
auto ppx = &px; // ppx is of type int**, a pointer to a pointer to an integer
// let's see where x is located in (virtual) memory!
auto MemoryAddressOfX = reinterpret_cast<unsigned long long>(px); // cast pointer to largest integer type
std::cout << MemoryAddressOfX;
The first thing we can do with a pointer is to access the entity at the address that the pointer points to. This can be achieved by using the dereference operator which also has the form of a star *. For pointers to non-primitive types, we can also use -> to access its members.
auto x = 42;
auto y = Rectangle{ .length = 4, .width = 2 };
auto px = &x;
auto* py = &y; // you could still write out * along with auto to make it extra clear that it is a pointer.

// This is how we access the object that a pointer points to
auto x2 = *px; // x2 == x == 42
auto y2 = *py; // y2 == y == Rectangle{ .length = 4, .width = 2 }
auto a = py->calculateArea(); // same as y.calculateArea()
auto yLength = py->length; // same as y.length
Dereferencing a pointer also allows us to modify the object that it points to
auto x = 42;
auto y = Rectangle{ .length = 4, .width = 2 };
auto px = &x;
auto py = &y;

*px = 123; // this sets x to 123
py->width = 3; // this sets y.width to 3

std::cout << x; // you should see 123 here
std::cout << y.width; // you should see 3 here
Let's see what we can do with pointers!
Navigate to the empty function inplaceTimesTwo. It has the same functionality as our previous generic timesTwo, however, it modifies the input variable in place rather than returning a new value.
void inplaceTimesTwo(/* ??? pointerToSomeVariable */) {
    // your code here
}

auto x = 21;
auto y = std::string{ "abcd" };

inplaceTimesTwo(&x);
inplaceTimesTwo(&y);

std::cout << x; // you should see 42 here
std::cout << y; // you should see "abcdabcd" here
- Uncomment the
pointerToSomeVariableparameter, replace???with a proper type declaration. (hint: bothautoandauto*can represent a pointer of any type). - Complete the function body using what we learned.
- Uncomment the supporting code in
main()for task 9, execute the program and see if you get the expected result.
You might've noticed that pointers are somewhat unwieldy to use; we have to first take the address of something, then dereference the pointer. This can be simplified by the use of references. A reference is essentially a dereferenced pointer, meaning the entity at a particular memory address. You can find more information about the connection between pointers and references here. The reference type is denoted by the entity type followed by &.
int x = 42;
int& refx = x; // a reference to x, it has the same memory address as x
auto& refx2 = x; // we may use type deduction with references, type of refx2 deduced to int&

refx = 123; // this sets x to 123 because refx and x share the same memory address
std::cout << x; // you should see 123 here
One thing we have to be careful about with references is that we always have to spell out & in the type declaration when creating a reference, whether we're using type deduction or not. Otherwise, we'd be creating a copy rather than a reference.
int x = 42;

int& refx = x; // a reference to x, same memory address as x
auto& refx2 = x; // a reference to x, same memory address as x

int y = x; // this is a copy of x! it's a new variable with its own unique address!
auto y2 = x; // again, it's a copy with its own unique address!
This is because C++ has value semantics by default.
Extra: To be precise...
This is known as lvalue-to-rvalue type decay in C++ terminology.
Now that we know C++ makes a copy when creating something from another unless specified otherwise (i.e. creating
a reference). We should really change most of the parameter types in our function signature to references unless
it's something trivial like an int or double. Otherwise, a full copy will be made for every object we passed
to the function, and it could lead to serious performance problems!
void func(std::vector<int> things) {
    // empty
}

void betterFunc(std::vector<int>& things) {
    // empty
}

auto things = std::vector{ 1, 2, 3, 4 };

func(things); // 'things' will be shallow-copied when you call func(), because it gets passed by value!

betterFunc(things); // no copy will be made here! because 'things' gets passed by reference!
// This also means if betterFunc modifies 'things' in any way in its function body, it will be reflected here
The same also applies to looping over containers. You need to use references in a range-for loop to modify elements.
auto things = std::vector{ 1, 2, 3, 4 };
// this copies every element in 'things'
// not ideal if the element type is not trivial to copy
for (auto x : things) {
    std::cout << x << std::endl;
}

for (auto& x : things) { // this loops over each element by reference
    x += x;              // which also enables you to modify the elements
}

// now things = [2, 4, 6, 8]
Let's try our hand at references!
- Navigate to the empty function
doubleEachElement, this function takes any container and doubles each element in the container.
void doubleEachElement(/* ??? container */) {
    // your code here
}
- Uncomment the
containerparameter, and replace???with a proper type declaration. (hint: references work with generic parameters too!). - Complete the function body using what we learned.
- Pass different
std::arrayandstd::vectorobjects todoubleEachElementin yourmainfunction.
Print the results after doubleEachElement calls, and see if it matches your expectation!
End
Congrats on finishing the Setup & C++ lab! Now, it's time to submit your code and get checked off by a TA. If you wish to have a deeper understanding of C++ or learn advanced C++ features to better your program design, you can find more information in our advanced C++ tutorial coming soon!
Submission
Submit your Github repo for this lab to the "Lab 1: Setup & C++" assignment on Gradescope, then get checked off by a TA during lab hours.
You will not get credit for having completed the lab, unless you get it checked off!
