Project 1: Brush
You can find the algo for this project here.
Introduction
Computer graphics often deals with digital images, which are two-dimensional arrays of color data (the pixels on the screen). In Lab 2: Pencils you have already started learning how we can manipulate the values in these arrays to create your own digital images. In this assignment, you will be building upon that to write a painting application that features multiple types of brushes that you can use to paint on a 2D canvas, similar to applications such as MS Paint and Photoshop.
Requirements
Color Brushes
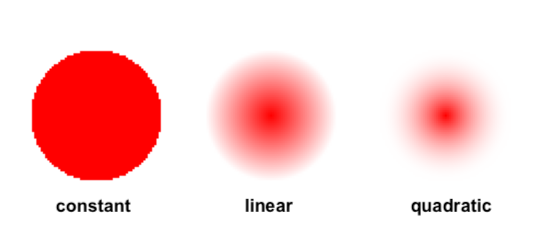
You will implement 3 color brushes
-
Constant: equal amount of color at each pixel at a distance at or within the brush's radius. For example, at radius 1, the constant brush should draw 5 pixels total (the pixels diagonal to the center would have a distance of
). -
Linear: linearly decreasing amount of color at each pixel as you move away from the center point. The amount of color at the center point is 1, and the amount of color at the edge is 0. Letting
be the amount of color at a pixel as a function of the pixel's distance away from the center, what is ? -
Quadratic: quadratically decreasing amount of color at each pixel as you move away from the center point. Letting
be the amount of color at a pixel as a function of the pixel's distance away from the center, your quadratic brush should exhibit the properties of the following function: for some values
, , and and brush radius such that , so that no color is applied at the edge , so color is fully applied at the center
Masks
All of your brushes should be implemented using masks. This means that each time the mouse is clicked, you should not be finding the distance of every pixel from the click coordinates and comparing it to the radius to calculate how to color it. Instead, we use masks to store a brush's distribution of color so that each time you need to put color down on the canvas, you can just index into the brush's mask to figure out how much color the brush paints there.
Masks are arrays that store brush opacity values between 0 and 1 for the bounded region of the brush. For example, a constant brush with a radius of 3 might have a mask that looks like this, where 1 means the final color of the pixel is the brush color and 0 means there is no brush color and the existing canvas color remains unmodified:
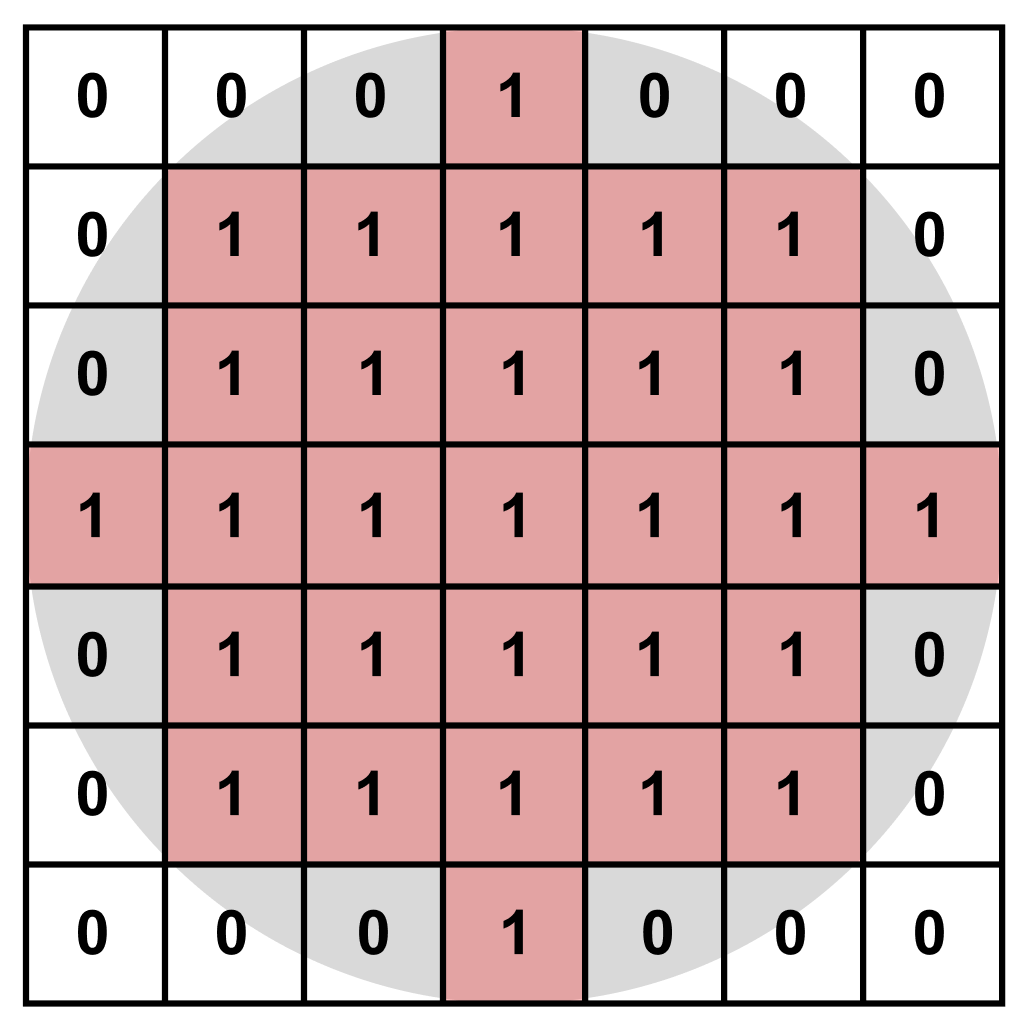
Keep in mind that masks must always have an odd width and height (2 * radius + 1).
For efficiency, you probably don't want to use a 2D array for your mask (recall how we stored our canvas in lab 2).
Consider also what you need to do when the radius of the brush changes. You will be responsible for updating your brush when a change is made in the GUI that affects the mask.
Mixing Colors
Brush masks store a range of values between 0 and 1. These values indicate how much of the selected brush color should be mixed with the canvas's previous color to produce the painted result at each pixel that the brush covers. So a value of 0.6 in the mask means that the resulting color of the canvas pixel would be 0.6 times the brush color added to 0.4 times the previous canvas color at that pixel.
Our GUI also has an alpha slider. This adjusts the overall opacity of the brush, independent of the mask distribution. If a mask value is 0.5, but the alpha slider is set to 0.5, then the actual resulting amount of color painted by your brush at that point should be 0.5 * 0.5 = 0.25. Make sure that you account for the alpha value when mixing your brush and canvas colors during the painting process.
"Edge" Case
If you run the code, you'll notice that the paintable canvas doesn't take up the entire GUI. So, what should happen if a location outside of the canvas is clicked? In this situation, we expect that the brush will never draw on the canvas, even if your mask radius is large enough that parts of the canvas would normally be covered.
Smudge Brush
You will also implement a smudging brush, which creates a smear effect by repeatedly "picking up" and "putting down" color when you click and drag the mouse across the canvas.
- Picking up: you will need some sort of data structure in the canvas to store the color values of the canvas to be placed down when the mouse moves.
- Putting down: just like a color brush you should use a mask to blend the brush color with the canvas. Unlike with the color brush you will not be blending a constant color value set by the GUI, but rather the previously picked up color values that you stored and must index into.
Make sure not to recreate your data structure on every call to mouseDragged. This would be an inefficient use of memory!
You may use either the linear or quadratic mask for this brush.
When picking up color at the edges of the canvas, you should fill pixels out of bounds with a transparent value (RGBA(0, 0, 0, 0)).
The alpha input in the UI should not affect the smudge brush.
Stencil Code
Creating your brush
How you choose to create your brush mask is entirely up to you for this project. We have not provided you with any stencil for this, but you should think about how to best design your code.
Think about what member variables you should store when generating and updating the mask as the parameters in the GUI are modified. Also, consider when you need to update the mask as you should attempt to minimize how often you are regenerating your mask.
Canvas2D
Canvas2D is our implementation of the 2D canvas that you will be working with to paint with your brushes. You should already be somewhat familiar with this and our representation of the canvas as a 1D vector of RGBA structs from lab 2.
Similar to lab 2, you will need to index into the array and modify the color values to paint on the canvas. However, this time you will not just be changing pixel values one by one--you will need to repeatedly paint many pixels using a brush mask. This will require more generalized code that can modify the canvas for any mask size, distribution, brush color, and coordinates where the painting is occurring.
Updating the Canvas
Updating the RGBA vector that stores the canvas data does not automatically update the canvas's appearance in the UI. You need to tell the canvas when there has been a change that needs to be displayed. You can do this by calling the displayImage() function in Canvas2D that we have provided you, which updates the UI to display the current contents of the canvas's RGBA vector.
2D Coordinates to 1D Index
You will need to convert between 2D (x, y) coordinates of pixels on the canvas and their corresponding indices in the 1D RGBA data vector. You might want to implement a helper function to do some of that math.
Mouse Events
We have provided you with mouseDown, mouseDragged, and mouseUp functions in Canvas2D which are called when you click and drag on the canvas (just like the functions you used in lab 2). The x and y coordinates of the pixel on the canvas are provided (with the top left corner of the canvas being (0, 0)). You should implement these functions so that your brush paints on the canvas when the mouse is clicked and dragged. Also, be sure to paint even when the mouse is clicked once without being dragged. This will require you to put color on the canvas inside of mouseDown and not just in mouseDragged!
Settings
The Settings class contains variables tied to all of the GUI elements that users can interact with, including the sliders which change the color, brush radius, and brush alpha values. When something is modified in the GUI, the Settings class is updated and the settingsChanged() callback function in Canvas2D is invoked.
You can access the variables in settings.h by doing settings.variableName to get the values you need for your brush and use the settingsChanged() function to make updates. Think about when it is necessary to update, though, as it is inefficient to completely regenerate your brush mask for every little thing that is changed. Points will be taken away for efficiency if your mask is regenerated after all possible settings changes.
TA Demos
Demos of the TA solution are available in this Google Drive folder. projects_2d_min is the "minimum" solution with the baseline requirements complete. projects_2d_max is the "maximum" solution with all of the extra credit features implemented.
macOS warning: "____ cannot be opened because the developer cannot be verified."
If you see this warning, don't eject the disk image. You can allow the application to be opened from your system settings:
System Settings > Privacy & Security > Security > "____ was blocked from use because it is not from an identified developer." > Click "Allow Anyway"
You may need to repeat this action multiple times - keep trying to open the application and allowing it until it works.
Grading
- General painting functionality (25 points)
- Color brush masks (30 points)
- Constant (8 points)
- Linear (10 points)
- Quadratic (12 points)
- Smudge Brush (25 points)
- Software engineering, efficiency, & stability (15 points)
- Filled out submission template sections on design choices, collaboration, and known bugs (5 points)
Extra Credit
For extra credit, we encourage you to try implementing some extra brushes/painting tools of your choice. Here are some suggestions (though you are free to come up with your own, too):
- Spray paint brush (up to 3 points): A brush that sprays dots of the currently-selected color at random locations within the radius around the center when painting.
- The distribution of dots should be different every time the brush is "painted" to the screen.
- The density with which the dots appear should change in correlation with the brush density parameter in the UI. If
density = 100, the brush should function like the constant brush; ifdensity = 0, it should do nothing. - Like the other brushes, this brush should be circular.
- It may be helpful to use the C++ rand or arc4random function.
- Speed brush (up to 4 points): A brush that changes size based on how fast the mouse is moving. When it moves slowly, the brush should be thicker. When it moves fast, the brush should get thinner.
- Fill bucket (up to 5 points): Just like the fill tool in Paint, you should use fill in contiguous areas of color with the selected color when clicked. (Beware that doing this recursively may cause Qt to crash due to a very high recursion depth so you will likely need to use a data structure to help you when iterating through the pixels.)
- Fill should work when the mouse is pressed, not when it is dragged.
- If used on an empty canvas, the entire canvas should be filled (i.e., treat the edges of the canvas as bounds).
- Fix alpha blending (up to 5 points): You may notice that with our implementation a brush with an alpha of 0.5 puts down color that is much darker than 50% opacity. This is because as you move the mouse, your brush often overlaps its previously painted pixels and adds additional color repeatedly (see Figure 10). To avoid this, when "fix alpha blending" is checked, the brush should not increasingly darken past the expected opacity of the brush when painting a single stroke. Successive strokes should darken the color of previously painted strokes (i.e. you only need to account for pixels from the current stroke while fixing the blending).
If you come up with your own new brush type, please check with a TA or the Professor to verify that it is sufficient.
CS 1234/2230 students must attempt at least 8 points of extra credit.
FAQ
Dark outline around my linear and quadratic brush
Check 7.2 as both come from the same issue with float and double casting to std::uint8_t
My smudge brush is slowly making everything darker
When you blend your colors you're likely using a float value to multiply the opacities by the color values, but our RGBA struct uses std::uint8_ts. If you set the new color value to the result of your multiplication, C++ will implicitly cast the float product to an std::uint8_t. This can cause rounding errors that slowly decrease the color values. For example, smudging a blank canvas should keep it white, but your might be setting RGBA values to 254 and gradually decreasing them rather than the correct 255.
You can solve this problem by adding 0.5f before you cast back to an std::uint8_t.
Reference Images
Constant
Linear

Quadratic
Smudge
Spray

Speed
Fill
Alpha Blending
Submission
Filling out the template
Your repository includes a submission template file in Markdown format located at the root directory of your project with the filename submission-brush.md. This file should contain the following:
- Output Comparison: This is where you will put videos of your completed project to be used for grading. Specific instructions on how to do this are located in the submission template.
- Design: This section should contain any information about your software design or function that you think TAs would find useful for grading and/or reading your code.
- Known Bugs: If you have any bugs in your code, please document them here. If possible, indicate what user input causes the bugs to appear, if you have made any attempts to fix them and, if possible, where you believe they stem from in your code.
- Extra Credit: If you implemented any extra credit, describe which ones you have implemented as well as where the code for each implementation lies within your overall project code.
Submitting to Gradescope
Submit your GitHub link and commit ID to the "Project 1: Brush (Code)" assignment on Gradescope.
Reference the GitHub + Gradescope Guide here.